This is a continuation of my prior post title Experimenting with Bread Dough Process. Apparently, when my updated posts become too long, with too many words, there are times when text gets lost on an update, so I’ll have to come up with a different titling scheme and give up on the idea of continuing to add content to existing posts. For now, this will be Part Two. As with the prior post in this series, the dates below were snipped from the prior post, and is why they are earlier than the date of this post.
2009.Aug.14
I feel like I found the mother load of information about enzymes, and as I was reading through the commercial report from an apparent enzyme manufacturer (PDF), I found these two paragraphs that may explain the increased stickiness (I may have gone overboard with my chosen emphasis):
Glutenin can be classed as a heterogenous mixture of proteins. It has a molecular weight of 100,000 to
several million. It is a multiple chain protein with crosslinked intermolecular disulfide bonds. It has
moderate adhesiveness and high elasticity….Gliadin is considered a heterogeneous mixture of prolamines with a molecular weight of 25- 60,000. It
is a single chain protein containing intramolecular disulfide bonds. It has high adhesiveness and low
elasticity.
It would seem possible that the increased stickiness in my implementation of the above described autolyse process could be the result of a changed glutenin-gliadin ratio. The big problem with determining this is that I made so many changes at once, I’m not sure which change increased the stickiness. Along with the increased stickiness was more extensibility, as I understand the term versus elasticity. It could be a worthwhile step to backtrace to the prior flour mix with all purpose and high-gluten, but use the newer process, to help narrow the possibilities of whether the increased stickiness is due to the flour mixture, or to the autolyse step, or something else in the changed process.
The problem with making one change at a time in a recipe is that it takes so long to make significant progress from one set of conditions to another set, and there’s also a tendency to want to make smaller amounts of dough, one loaf or even less, which further increases the time investment. But it would also avoid the impulse to backtrack. I’m not sure if I want to do that right now, I’d prefer to keep figuring out how to exhaust the available dough sugars through longer fermentation times, and try to determine a practical method for predicting when that happens, perhaps time, temperature, and yeast quantity based.
It wasn’t long ago (first I had to learn and understand baker’s percentages, then I needed scales) that I tried a recipe for pizza dough that was considered “quick” to make (the link is the source, however what follows is a cut and paste from my spreadsheet where I laid out all the separate-page formulas column-by-column so I could quickly compare and study them, and I recall rearranging the ingredients’ order for spreadsheet organization purposes, so I didn’t need to scroll to see them all).
High-gluten Flour (14%) 100 Water 59 Oil 2 INSTANT Yeast (IDY) 1.5 Salt 1 Sugar 4 Non-fat Dry Milk 1
Its basic formula difference was that it had a high yeast amount and high added sugar, and a correspondingly short fermentation time. Since I didn’t have any heat-inactivated (enzyme) non-fat dry milk, indeed, any NFDM at all, that ingredient was skipped, though undoubtedly there are carbohydrates and proteins in milk. I interpreted the recipe’s written ingredient “sugar” as sucrose, there was nothing to indicate otherwise. My god, that pizza caused so much gas and indigestion I couldn’t believe it(!), and those after effects did remind me of a couple of restaurant pizzas I’d eaten over my lifetime. The next day, just to check, I made an identically topped pizza with a longer fermentation dough with a smaller yeast amount and no added “table sugar”. Result: No upset tummy.
What I figured happened was simplistic, and keep in mind this is just my guess: When the bread with topping is baked, the yeasts’ spores are not necessarily all inactivated, only the yeasts are reliably killed. Since it was a “fast rise” dough, along with the added sugar, the yeast did not have enough time in pre-baking fermentation to consume that extra sugar, no matter the precise sugar sub-name it is that the yeast feed directly upon (I think it’s maltose). After a number of steps including baking and eating, the food stays in the stomach for some time, then passes through the pyloric sphincter into the duodenum or small intestine. At about this time, my guess is some yeast spores germinated, and were present in enough numbers to restart fermentation, thus creating gas. The “fast rise” continued in the gut, and as I recall, it felt “fast” there too! My lesson to myself was to be exceedingly careful about added sugars in yeast-bread dough, particularly when combined with high-fat, high-melting point toppings such as cheese, which likely slow digestion in part by encapsulating some pockets of partially digested baked bread.
2009.Aug.15
I was searching for “straight dough“, I believe yesterday, and found the hold-over webpage from the pre-Over-Commercialization Internet days, days I sorely miss.
It confirms that the process I’ve developed and documented here is a hybrid technique, not straight dough and not sponge dough. That said, I’m explicitly not claiming I’m the sole developer. Bread has been around for millennia, it is said the Egyptians made varieties of bread, indeed, it seems one of the initial timeline points of “civilization” versus “pre-civilized” or the hunter-gatherer era. “Civilization” centered around agricultural propagation of food and particularly cereal crops, the beginning of mono-cropping. So, we’re talking about techniques that have been around for many, many years. Tools may have changed. Knowledge regarding why particular chemical processes are occurring may have improved. Fancy new automated factories may have been built with computerized machines reducing required labor. But bread as a product is old. Very old.
Why there is so much misinformation floating around about making it could be the basis of a few good rants.
One of the problems is that over the years terminology and technique changes, and that’s something to be aware of when reading older cookbooks. A case in point is another page about “1916 straight and sponge doughs,” apparently an Army manual for bakers published back in 1916. When reading through that, it is clear the term “prove” was used to identify more sub-stages of fermentation than it is today, where definitions have evolved somewhat according to the terminology used by a number of recently published bakers. Today, the usage of proving and proofing is understood as limited to the post-shaping and pre-baking period, in other words, the final rise before baking. Nevertheless, the term prove is a curious term that relates to yeast. Essentially rising dough at any stage of fermentation proves yeasts’ viability. One cannot say today, and expect to be fully understood, “I added yeast to my pre-fermentation water and flour mix and set it aside to proof, then I kneaded it some more and set it aside to proof again.” In the past it appears that statement would have been understood. It’s likely professionals would understand, or at least would question it, having read old recipes themselves, whereas beginners would be confused by reading newer recipe’s text in contrast to old recipe’s text, when proofing meant one thing, versus today when its meaning is more specific, at least among certified professionals who tend to be the authors of published baking books. It’s not clear, at least to me, that all these semantic evolutions have been improvements (besides just today’s oxymoronic usage of “pre-ferment”, already covered). For example, “Dough rising in bulk-fermentation is proof of yeasts’ viability, but dough rising in bulk-fermentation is not considered the proof stage.” Say what?
If the purpose of language is to communicate, it’s not clear that modern baking terminology has served the intent of clear communication, instead it appears to have increased confusion among those who most need it, those who are first learning.
To wax momentarily cynical, in the far, far distant future, or perhaps in the next few publishing cycles, the proof stage could perhaps be correctly referred to as post baking, where “heat inactivation” will be the new term used to describe today’s baking cycle in reference to killing the yeast, and something else, perhaps “flour hydration” will be used to describe today’s autolyse stage. Then, even more books can be sold to describe the “new” process with the new and improved terminology! After all, the final heat-inactivated product is the ultimate proof, is it not?
One curious newer technique is Oregon State University’s page description of “continuous mix“. It’s easy to visualize a tube in which water and-or flour flows and that at different length points ingredients are added. This process, particularly if the tube has vanes and blades or mixing technology incorporated in-between these add-another-ingredient points, reinforces the idea of ingredient order being of critical importance in dough processes.
Another page OSU has are some dough-temperature guidelines. I love this kind of technical stuff. And how about thier awesome word, “temperapature”! Whether it’s a dictionary-listed word, or not, it certainly carries accurate meaning! As in (my sentence, but used in the context their page seems to mean it), “The aperture of the cells is related to temperature.” Temperapature! Very cool.
2009.Aug.17
It occurred the term “proof” is also used in rating the alcoholic content of some beverages. There’s no reason to rehash that here, just use a search engine if you want to find out more. I’ve often wondered why I’ve never learned how to make beer or distilled spirits, though the odor of alcohol, specifically a beer odor, in some bread batches has been obvious.
The most recent batch of bread I made is nearly tasteless, however, that was not as true of the prior batches, including the one immediately proceeding it, though undoubtedly, since I’ve so far resisted the urge to experiment with bacillus (sourdough) due to not caring for sour bread, not as much “flavor” if sour flavor is the intent. So tracking the alcohol content by some measure, perhaps smell even though it is inexact, could be a good indicator.
For my next test, when I need to make more bread, which will be a little while yet, I’m going to alter some of the temperatures related to process, but keep the formula the same as the last batch. One change will be made in order to determine if the warmer water used in the autolyse stage is the source of the post-autolyse stickiness. So, at some point in the future, I will use cooler water when mixing the flour and water during the autolyse, and which will decrease the temperature of the post-mixing and pre-resting stage. I still will use a cooling process during the rest, due to years of experience with foods where I’ve noted a cooling cycle blends flavors. It’s my belief that a cooling cycle during autolyse rest probably helps the flour hydrate. I think of such a process as breathing in (cooling) and out-breath (heating), as with cooling there tends to be volume contraction and with heating, expansion. “Temperapature” as used by the author of the OSU page is perhaps a better, more accurate term to use (though I do wonder if it’s spelled the best way). Physically, I believe this volume expansion is found in the extreme when something is in its gaseous state, yet I’ve also found the flavor mixing that occurs when making chili as well as blue cheese dressing during an overnight cool down followed in the case of chili with a reheat, to perhaps be explained by the same phenomenon. It also appears as part of my process used in throughly seasoning cast iron pans, heat it up, brush oil, cool off. During cooling, things seem to contract slightly, whereas when heated, they expand. In the case of the pans, the cast iron seems to absorb a little oil during quick cooling, since cast iron pans are typically somewhat porous. An engineered bi-metallic thermometer is one use of this phenomenon in the case of two metals (which are solids) of differing temperature expansion rates. Varying the autolyse temperature through contraction of cool (refrigeration) and expansion of warmth (mixing) probably helps molecules to better align with each other.
In any case, I will be testing two different changes with my next loaves. The first is whether the warm water temperature used in the autolyse step is related at all to the post-autolyse rested dough’s increased stickiness. My wonderment has to do with whether the warm temperature water added to the flour tends to favor gliadin instead of glutenin, perhaps through some unknown-to-me enzymatic process. I also want to continue extending the fermentation stage, as it seems from the bulk-fermentation temperature readings that active fermentation is mostly occurring at greater than 63F degrees or thereabouts. I’m still undecided as to how best to go about that. One possibility is to keep the initial dough temperature of about 84F degrees the same, followed by a refrigerated bulk-fermentation for about 2-3 hours, then remove the dough to a room temperature environment for a few hours, then possibly return it to the refrigerator at some point, or perhaps letting it sit out the entire night, which is the cooler portion of the day-night cycle, or perhaps only leaving it out for another 3-6 hours, and then returning it to the refrigerator for about 3 hours minimum. A second possibility is to decrease the initial bulk-fermentation dough temperature, perhaps attempting to keep it at about 65 degrees or so (by allowing the cooling of the autolyse to be extended a little more), and keep the initial bulk-fermentation at room temperature for 6-9 hours, then refrigerating it for the remaining period to slow the yeast. Of those two, I tend to think the first is preferable due to wanting the yeast to get a good start in a warmer environment, however, the latter is more streamlined or simple with respect to process and temperature, hence my indecision.
The addition of yeast represents a division line of sorts in the process, so I’m hoping that making these two changes will still be somewhat scientific, in the sense I’m looking for two different things. 1. Whether the pre-yeast stickiness of autolysed dough is decreased with a cooler and different temperature process. 2. Whether extending the warmer fermentation time of bulk-fermentation increases the yeast numbers (which I can only determine indirectly).
The results of 1 should be obvious as soon as handling the post-autolyse and pre-fermentation (before yeast added) dough. The results of 2 will be noted in whether the increased time at warmer fermentation levels increases yeast numbers to a point that the odor of alcohol is more evident and also results in a higher proofing rise and in a larger cell structure in the final baked product.
I’ve read in a number of places that baker’s yeast doubling should occur in anywhere between 90 minutes and 4.5 hours (that’s a very wide variance), and according to theartisan.net, one group of researchers found no increased yeast numbers at all. I’m sure there are a huge number of different yeast strains, specific strains that aren’t typically disclosed on the packaging of baker’s yeast, so what’s important to me is the doubling rate of the yeast I’m currently using. The last time I found some that passed a viability test, I went back to the store and purchased several large packages with the same batch number, and I keep it in the refrigerator in the still vacuum-sealed packages, so I won’t be running out of this particular strain for some period of time, probably several more years (however, next time I do need to purchase some, it could be a different strain but packaged identically). Since my bulk-fermentation temperatures are not constant, it wouldn’t seem possible to determine the cycle length judged by how much the dough peak shifts by changing the initial inoculation amount, though if I go to a constant temperature fermentation period somewhere within the range of active yeast multiplication temperatures, that time-shift test would still seem possible, so perhaps it will be revisited in the future.
I was just reading through my brief spreadsheet notes, and saw that I’d recorded a higher stickiness post-fermentation with the latest batch. So it appears that decreased stickiness is also a test of sorts regarding the amount of fermentation that has occurred. Therefore, it would be inappropriate to try to make two changes at once because it appears both steps alter stickiness. I should decide on one, or the other. Since my generalized thrust is currently with altering the fermentation peak point, I should skip altering the autolyse temperatures for now.
In case anyone is wondering why I want to find out if autolyse temperatures are responsible for the increased dough stickiness, it’s actually quite simple. I’m wondering about proteolytic enzymes or proteases. These enzymes break down proteins. That beer-making diagram that I linked to as a commenter several years ago in my own Honey Wheat Berry post, and also linked to somewhere in this series of posts, is, if not memorized (it’s not), at least is indelibly impressed in my mind as a resource to refer to. The pH of the dough at this point is likely on the alkaline side of the proteolytic bounds, but I’ve seen different figures elsewhere for those bound points anyway. It’s impossible to know precisely what the miller and packager has put into any of the flours, but that is my thinking for why the temperature may be making the dough stickier (in this case). There could be other, simpler reasons for stickiness, such as too much water, but that doesn’t seem the case in this instance. It is something that I need to track down, the precise reason why these last two batches, with the new process, are stickier after autolyse. In order to do this, one must consider all the known possibilities first. Since I’ve been carefully tracking what I’ve done, I can go back and undo things one by one until the precise reason is found.
Perhaps what I need to do is make some very small dough amounts using different flour mixtures and processes, without the intent of following through and making a whole loaf, or combining them all together for one baking of a “surprise” loaf. Perhaps just a handful of flour each time, in proportion. Change processes singly, flours as well, and see which one causes the stickiness. This seems doable, and wouldn’t require the eating of a bunch of mistakes in larger amounts.
Here’s another expensive book with more information about proteases. This science report (PDF) says that alpha-amylase can also increase stickiness.
2009.Aug.19
So far I have two basic flour mixes, one of high-gluten mixed with all-purpoose flour, a second of high-gluten mixed with baker’s flour; each has a unique ratio to adjust the mixed-together protein to roughly equivalent levels, 12.14%, based upon the best information I have available. The high-gluten’s protien level is derived from the nutritional label, which may—likely does—have a rounding error, that protein level is 13%. The figure I’ve been using for All Purpose is 10.3%: while I don’t remember specifically, I believe I also calculated that from the nutritional label, but I also recall looking it up at the USDA Nutrient database lab. 10.3% was the best figure I was able to discern at the time. The Baker’s Flour figure of 11.8% was sourced from a manufacturer’s infosheet. Ultimately, I have little clue as to how accurate any of the figures are.
Lately it seems I’ve been making two loaves of bread at a time, instead of 4. So I can take the total flour weight of 2 loaves, and divide that weight by 4, and that gives me a gram figure, which I’ll temporarily call Test 1/4, which means the flour that exists in about 1/2 a typical loaf, or 1/4 of a 2-loaf batch. Since I have two basic flour mixes, I can use the 1/4 flour weight, and have two units each of one flour mix, and two units of the other flour mix. Each flour mix of each respective type can have a cold-water autolyse and a warm water autolyse, to test for stickiness. Then, when combining the Test 1/4 batches into loaves, I can mix the two cold-water autolysed flours together into one loaf, and the two warm-water autolysed flours into a second loaf. This combining of cold-autolysed Test 1/4s and separately warm-water autolysed Test 1/4s will mean I’ll have a third flour mix of three flours, a proportion which could be calculated, but I don’t believe calculating it is particularly important, what is important is that Both will have roughly the same flour mix of unknown proportions of three flours total (bakers, HG, and AP), separated by the temperature of the autolyse water. From there, instead of mixing the cold-autolyse & warm-autolysed Test 1/4s (which are doubled up) together in a larger bulk-fermentation, I can ferment them separately but identically, and bake them into two loaves. Besides any dough stickiness differences that may develop in some or all of the Test 1/4 batches, which may shed light on the nature of the stickiness related to either the flour mixes, the autolyse process, or the temperature treatment, it will also tell me of any differences that exist in the baked product based upon cold or warm-water autolysed doughs.
I thought momentarily of designing it so one baked loaf only used baker’s flour, and the other only high-gluten flour, split the same way into warm- and cold-water autolyse processes, but then when I baked the loaves they’d be of differing protein levels, so I discarded that idea as not quite as normalized a test. I guess this will be a diversion from altering the fermentation peak, but I guess this is what I’m being directed by my mind to do next. To try to answer two problems, both related to stickiness: whether the flour mix contributed to increased stickiness, or the warm-water autolyse, or perhaps some combination of each. If all dough batches are of roughly equivalent stickiness, I’ll probably have to conclude it’s related the autolyse process itself, something to do with hydrating all the flour first, and not related to either the flour mix or the autolyse water temperature (the latter seeming to eliminate enzymes as the possible/probable cause, since their activity is apparently related to temperature as well as pH).
2009.Aug.21
This is my next test. I’m not sure when I’ll be needing to bake it, but it provides somewhat of a graphic for August 19th’s idea, the one directly preceding. I decided not to backwards calculate the percentages of the final loaves’ flour mix, as it doesn’t seem all that important given what I’m trying to find out. Also, I routinely use the tilde symbol “~” to indicate approximately, as it reminds me of the math symbol for approximately equal to.
| NFM | NFM | ||
| Warm | Cold | ||
| New Flour Mix (NFM) 12.14 protein | grams | grams | |
| High Gluten Flour | 28.00% | 115.78 | 115.78 |
| All-Purpose Flour | 0.00% | ||
| Baker’s Flour (11.8% protien) | 72.00% | 297.72 | 297.72 |
| Salt | 1.23% | 5.09 | 5.09 |
| Instant Dry Yeast | 0.64% | 2.65 | 2.65 |
| Olive Oil | 4.00% | 16.54 | 16.54 |
| Water (de-chlorinated pH~7) |
57.23% | 236.65 | 236.65 |
Note that I’ve increased the yeast % back to 0.64%, as I prefer the flavor of that bread given the current fermentation schedule. I’ll decrease it again when I return to changing the fermentation peak and the Peak:TotalTime ratio.
| OFM | OFM | ||
| Warm | Cold | ||
| Old Flour Mix (OFM) 12.14 protein | grams | grams | |
| High Gluten Flour | 66.00% | 272.91 | 272.91 |
| All-Purpose Flour | 34.00% | 140.59 | 140.59 |
| Baker’s Flour (11.8% protien) |
0.00% | ||
| Salt | 1.23% | 5.09 | 5.09 |
| Instant Dry Yeast | 0.64% | 2.65 | 2.65 |
| Olive Oil | 4.00% | 16.54 | 16.54 |
| Water (de-chlorinated pH~7) |
57.23% | 236.65 | 236.65 |
And here’s how I’ll combine them into two 827g flour-weight loaves to compare warm- versus cold-autolysed dough when baked:
| Warm Autolyse | Cold Autolyse | |||
| Single Loaf | Single Loaf | |||
| NFM | OFM | NFM | OFM | |
| grams | grams | grams | grams | |
| High Gluten Flour | 115.78 | 272.91 | 115.78 | 272.91 |
| AP Flour | 140.59 | 140.59 | ||
| Baker’s Flour (11.8% protien) | 297.72 | 297.72 | ||
| Salt | 5.09 | 5.09 | 5.09 | 5.09 |
| Instant Dry Yeast | 2.65 | 2.65 | 2.65 | 2.65 |
| Olive Oil | 16.54 | 16.54 | 16.54 | 16.54 |
| Water (de-chlorinated pH~7) | 236.65 | 236.65 | 236.65 | 236.65 |
The test is about relative stickiness in the dough post-autolyse and pre-bulk-fermentation in any of the 1/2-loaf batches, as well as any notable differences in the baked product of warm- versus cold-autolysed dough.
I will define cold-autolyse as I mean it for this singular test as using coldish water (I’ll derive a temp later) combined with the flour so that the mixed dough never exceeds 84F degrees until it begins baking. I’ll define warm autolyse as using at least as warm a water temperature as I used the last time for the autolyse, which was 105F, but I’m thinking of increasing that a little higher. At the point when this water is mixed into the flour, there is no yeast, so killing yeast isn’t a temperature concern at this point, but going too high can alter the starch’s structure too much, such as all the way to gelatinization temperature (also see gelatinization), which I want to avoid at this point of this test, as it will reportedly result in sticky bread crumb (read the referenced PDF. it is my intent to adopt this technique at some point in the future, but I have to build up to it in a way that allows me to consciously understand the interactions of the various ingredients with each other, as well as the effects of processes upon those ingredients. So, it’s several iterations away, presuming I don’t get sidetracked. Altering the fermentation peak comes first, then some poolish processes (which the fermentation peak relates to), then a small percentage of scalded flour. I also find myself thinking more about bacillus inclusion, but I can’t allow it to result in a “sour” flavor.). So a good point would be the upper bound point of the proteolytic enzyme box in the beer making diagram I’ve referred to in several places, but no higher. And I mean the water temperature, not the settled temperature of flour and water after combining the two. With the Warm-water autolyse batch particularly, it will need chilling that won’t be as necessary with the Cold-water autolyse batch, to equalize the temperatures in the two doughs. The objective with chilling the warm-water autolyse dough will be to bring it down in F temperature, so that after post-autolyse kneading, i.e. when mixing in the yeast, the doughs are of equal temperature, and will be at about 84F when both go into the refrigerated bulk-fermentation for 18 hours. This means once the yeast is added, the doughs will be treated, with respect to time, temperature and process, “about the same.”
2009.Aug.24
| Warm Autolyse | Cold Autolyse | |||||||
| Single Loaf | Single Loaf | |||||||
| NFM | OFM | NFM | OFM | |||||
| Warm | Warm | Cold | Cold | |||||
| grams | grams | grams | grams | |||||
| water temp (goal, not necesarily acheivable) | 120F | 120F | 33F | 33F | ||||
| dough temp (extra kneading to raise temp) | 104.3F | 111F | 74F | 73.9F | ||||
| post mixing pre-autolyse rest stickiness | extreme | typical | typical | typical | ||||
| autolyse location | refrigerator | room temp/fridge | ||||||
| post-autolyse temp goal | <74F | <74F | ||||||
| mix warm and colds together, add yeast | ||||||||
| knead to temperature | ||||||||
| actual temp start fermentation | 84F | 84.2F | ||||||
| start fermentation stickiness | extreme | moderate | ||||||
I mixed the dough today, will bake tomorrow. In the data table above, the 111F dough temp was a mistake, the temperature rise during kneading happened faster for some reason, and I didn’t stop soon enough. The NFM-warm immediately became sticky after adding the warm water and some short amount of blade-mixing. Continuing the mixing and before the autolyse rest, it didn’t want to drop down into the blades as I’ve explained the phenomenon in prior text. The NFM-warm was the only batch with that issue at this stage. After a couple of hours in rest, the OFM-warm increased its stickiness quite a bit. After mixing the two warms and the two colds together, adding the yeast, and raising them to fermentation temperature of 84F by machine kneading, the warm autolysed dough was so sticky it was very difficult to handle, it was very much like thick glue that wanted to stick to the fingers and bowls in thick layers. The cold autolysed dough was somewhat sticky, what I’d characterize as typical to moderate. Even though I’ve used the word moderate, it is somewhat stickier than the stickiness of the prior straight dough process, which leads me to the belief that autolyse itself increases stickiness somewhat.
I feel like I may need to repeat this (not sure if I want to), but with different flour mixes. I’d like to know, and have a repetition of, whether this warm/cold:sticky/less-sticky aspect remains when using only high gluten flour, or whether it is something that is only happening because of the baker’s flour. With this test, since the NFM-warm developed its stickiness almost immediately upon reaching temperature after adding the warm water, that same dough was mixed with the OFM-warm which didn’t have baker’s flour, and could have made that combined dough seem stickier than it otherwise would have been. Since I have no specialized machine for quantifying stickiness, I found the best test was handling during the process of rounding.
I’m wondering if the baker’s flour has an enzyme in it that the high-gluten doesn’t (even though the high-gluten says “enzymes” on the ingredient label). There are so many different kinds of baking enzymes, I guess it’s useful to know that enzymes of some kind have been added, but it would be nice to have more precision on labels. I suppose the flours could also be of slightly different wheat strains.
Another thing I noticed, particularly after the autolyse rest and during the process of kneading (to add temperature), as the dough temperature increased, stickiness also tended to increase a little, and this seemed true of all the dough.
I need to be sure to check the extensibility versus elasticity when panning the dough. In a prior batch using a warm autolyse, I seem to recall the dough seemed more extensible and less elastic. I expect to find this prior result re-confirmed, but it’s also a reason to retest using only the particular High-Gluten flour I’m using. The reason I say “particular”, is because it seems clear to me that there are significant differences between flour brands, that the U.S. laws don’t seem to require labeling of enzyme additions, that there are a number of different enzymes with somewhat similar effects but that act at different temperatures and pH ranges, and consequently, one flour is likely not the same as another flour with respect to these more subtle dough changes, and lacking that information does not allow a typical home baker to tailor a process for the particular enzymes that may have been added based solely upon what’s listed on the ingredient label. Consequently, changing the flour source, or even if the manufacturer or miller or distributor changes their formulas slightly in a way that is not reported on their own label, these changes could seem to greatly affect these more subtle temperature and time processes.
In any case, it will be interesting to find out if there’s any noticeable difference between the two baked loaves. If there are no notable differences, then my conclusion will be the cold-autolysed dough is easier to handle, and would seem to result in less dough loss (like what gets stuck to the fingers and gets washed down the drain). OTOH, if the warm autolysed dough is more extensible during panning and-or shaping stage, then the increased difficulty in handling may be a worthwhile tradeoff.
In this series of batches, due to the complexity involved in keeping small dough amounts separate, I was unable to record a number of the data points I’ve found are a good idea to record, tending to go more from memory. However, because these were fermented in dough balls of approximately half the weight of my temperature-fermentation test, and typical amounts fermented at once over many batches, I knew the fermentation-stage dough balls would cool off faster if placed immediately in the refrigerator, and would skew the peak:totalBulkFermentTime to a smaller number. Therefore, I left them at room temperature for 2 hours before placing them in the refrigerator. It’s my feeling that currently lacking a temperature controlled cold-fermentation box, that this is probably the simplest way to alter the peak:totalBulkFermentTime.
2009.Aug.25
While handling after adding salt and oil (per previously explained process), and during the multi-step process of panning, both warm and cold autolysed doughs seemed of roughly equal stickiness. Extensibility versus elasticity also seemed roughly equal, but more extensible than the straight dough process. The best home test I know of for extensibility is pizza dough shaping, and this style of sandwich loaf is vastly shape-different, requiring little extension. The warm-autolyse batch during rounding had the smoothest skin. Both doughs had a noticeable odor of beer or alcohol, so I probably overshot with my guess of 2 hours of room temp fermentation before refrigeration, but only slightly, though this is likely to give the bread a nice, if subtle, flavor.
Proofing was set at 86F (range of about 3F deg), and I guess (because I don’t yet know how long it will take) for 2.5-3 hours prior to baking, though possibly at the shorter end of the range due to the slightly longer room temp fermentation, and the fact that it’s a warm day here, already over 86F outside.
Proofing didn’t go as I expected, at 3 hours, it hadn’t risen as far as I thought it should, so I increased the proofing temperature to 96F, and at 3.5 hours began the oven warm up. At 4-hours the dough was poke tested, and it mostly sprung back, but it did leave a small dimple. It’s possible that the sugars were decreased due to the first 2 hours spent at room temperature during what would typically be called bulk fermentation. The baking procedure’s the same with pre-warm to 500F, bake at 500 for 5 minutes then reduce thermostat to 300F, steam for first 15 minutes (though 8 minutes is probably enough) and bake for 1.5 hours total. Both of these loaves had a bit less oven spring, possibly due to the increased proofing time, even though these loaves had the same amount of moisture that should become steam (so this may mean that yeast out-gassing activity is also important during the initial 3 minutes in the oven). It seems the warm autolyse dough rose a little bit higher than the cold-autolyse. I’m thinking a lighter crust color would confirm fewer sugars (Maillard reaction).
2009.Aug.26
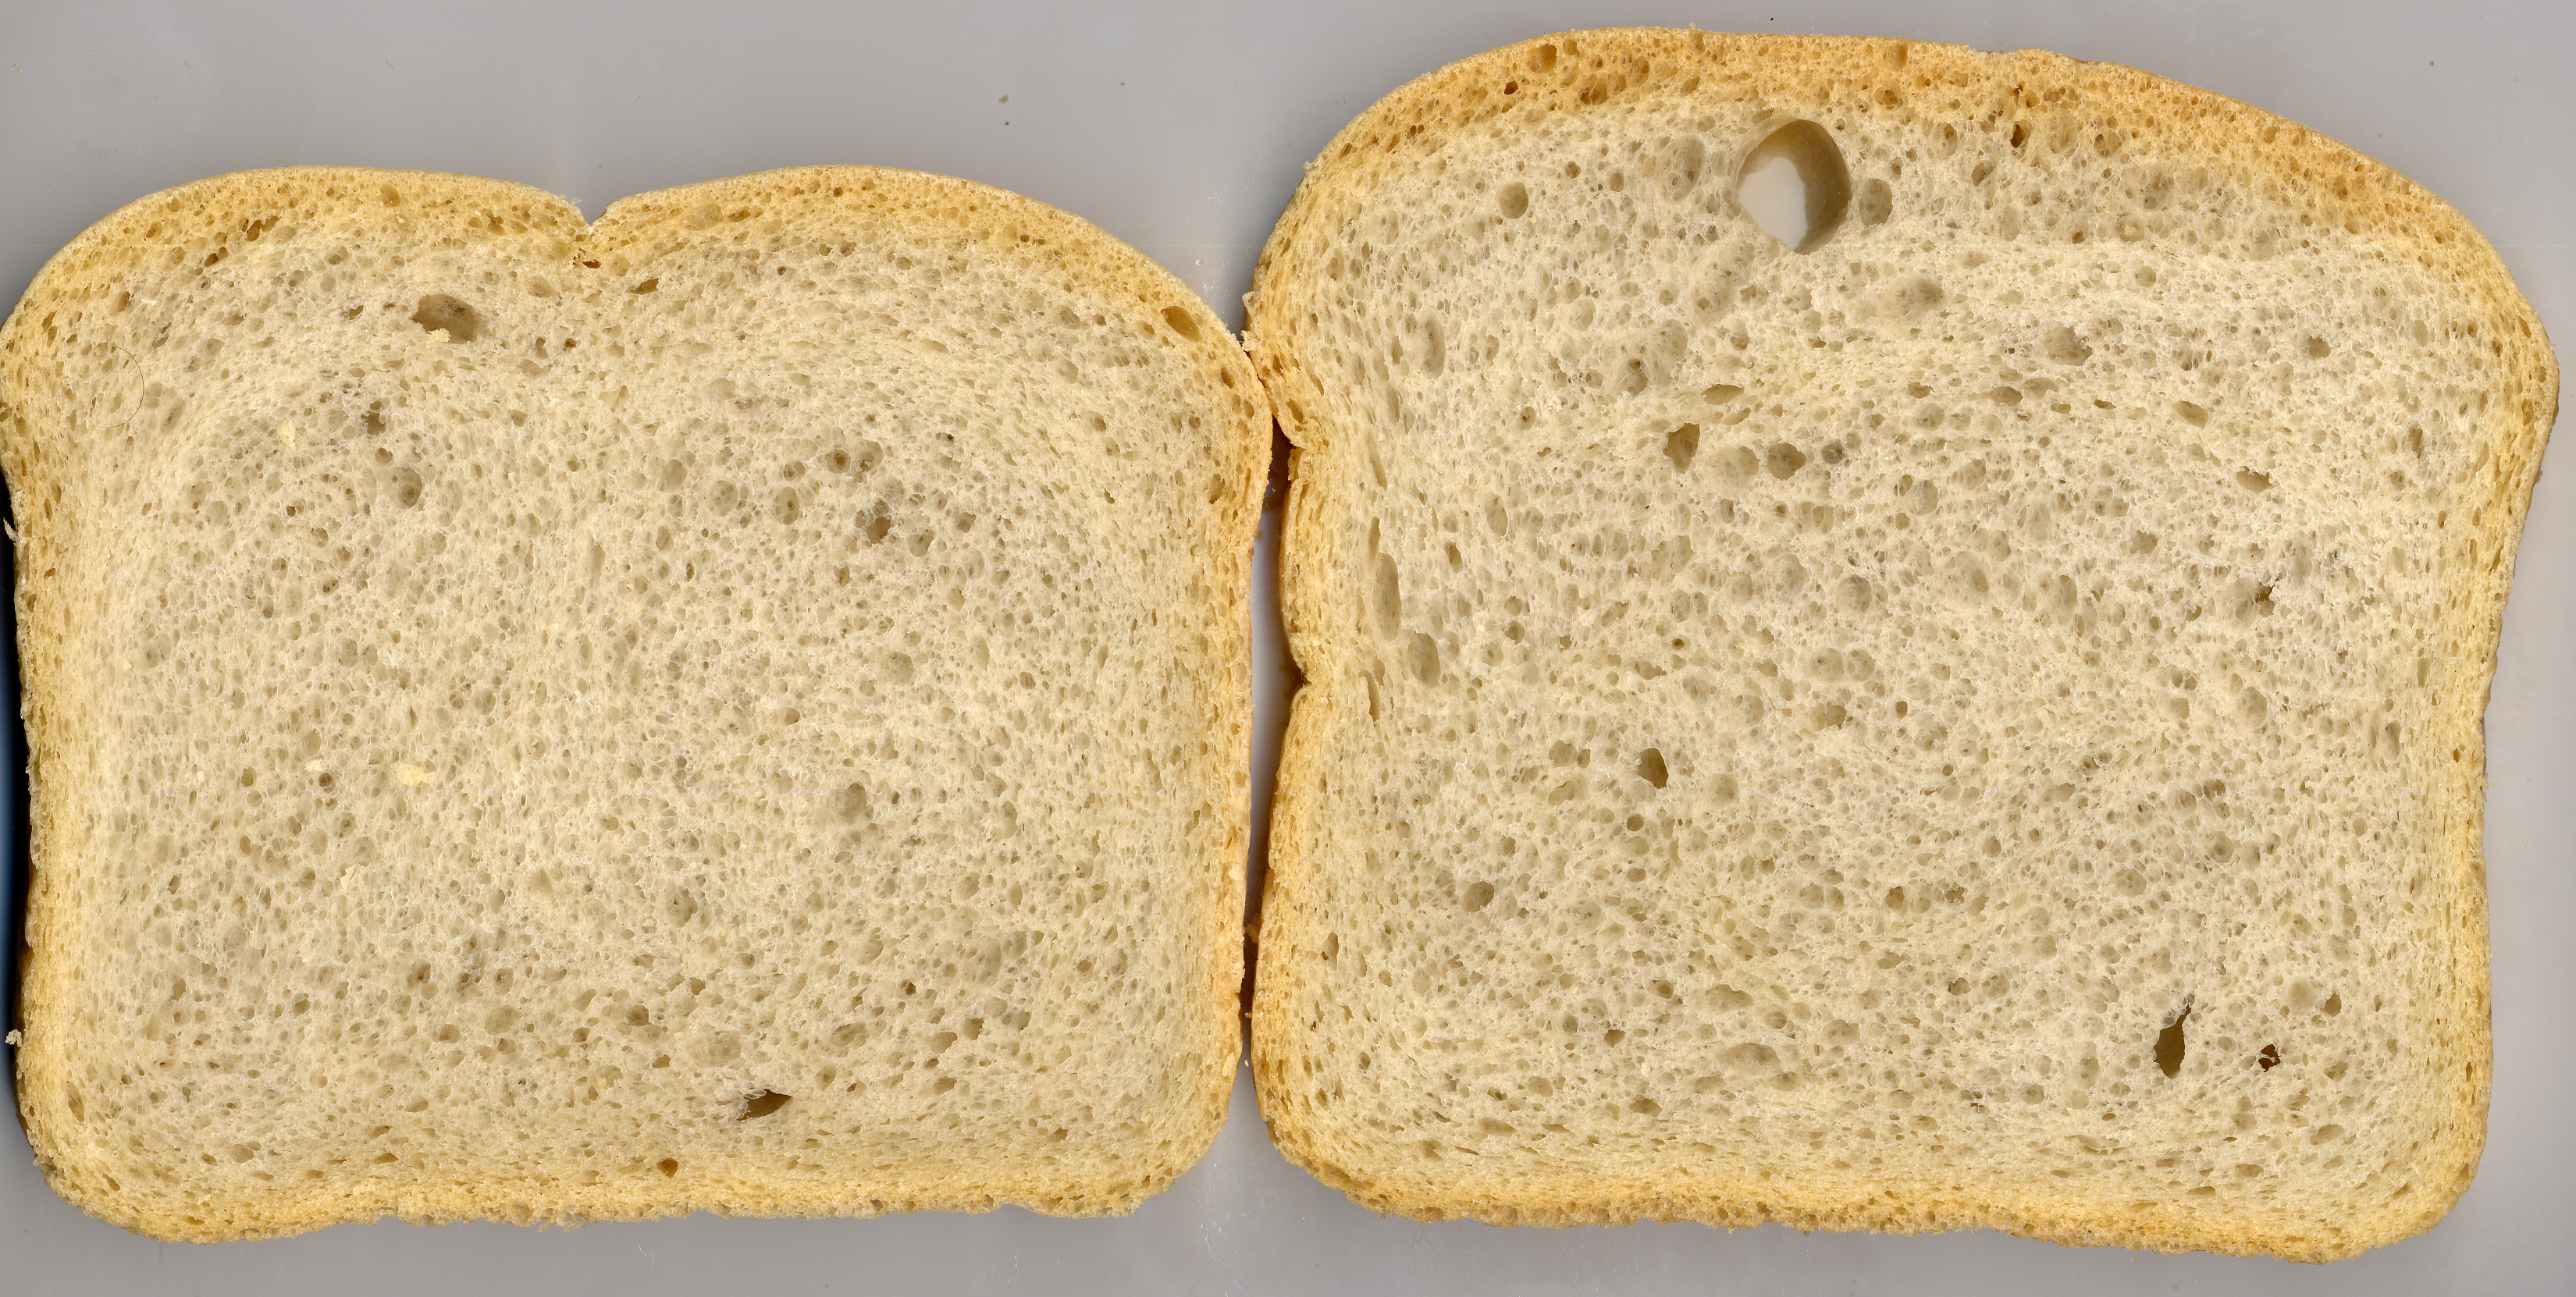
Both crusts are definitely a lighter shade of some amount of brown or tan color versus other, better loaves I’ve made. I believe this is due to the increased fermentation temperature time, i.e., the two added hours of room temperature fermentation before refrigeration. I didn’t realize the dough was so close to the point of running out of broken starches for the yeast to feed upon. Additionally the warm autolyse seems a slightly darker shade of tan or brown versus the cold-autolysed loaf. Unfortunately, the sandwich-slice photos don’t show this as well as looking at the loaves themselves. The warm autolyse batch likely had extra enzyme activity, which created somewhat more sugars from “broken starches”, and likely explains the increased volume as well as a slightly darker shade of brown or tan versus the cold-autolysed loaf.
I cannot tell any difference in flavor between the two loaves but a dear friend that sampled them said the cold-autolyse was slightly more “sour”. I suppose the inverse of this is that the warm-autolyse was slightly sweeter. I noted with both loaves that the crust wasn’t as crisp like it is when it’s a darker color: it was tougher. The crumb is still tender.
This proofing problem has been happening throughout several of the batches, and I didn’t know where the issue was arising from. It’s good to feel like I’ve gotten to the bottom of it. Going for too long on the bulk-ferment (during yeast-active temperatures), exhausts the yeasts’ food supply, reducing food for the proof, which must limit the yeasts’ out-gassing.
This is not a simplistic shorter fermentation times are better observation, as the initial yeast inoculation amount contributes, as well as the time spent at various temperatures. Since I’ve been having this problem off and on throughout several of the batches, I believe one redundant way of dealing with this process issue is simply to add some yeast food, more broken starches, during the final kneading immediately preceding proof. A nice measured amount. This is a large problem as far as I’m concerned given its tendency to repeat, and dealing with the issue will have to take precedence over a high-gluten only warm versus cold autolyse test, which I consider a more subtle-process investigation.
What I will try first for the yeast food addition is a very small amount of scalded flour (PDF). I’m thinking of trying 1-2% of the total flour amount, though I believe the study said up to 6% is generally beneficial. I will add the scalded flour at the point when I mix the salt- and oil-added doughs together, which directly precedes shaping, panning, and proofing. If you read that study, they’re adding the scald for the purposes of extending the shelf life as an anti-staling ingredient and as a replacement for alpha-amylase. However, I’m basing my reason for trying it upon a different idea, that gelatination of the starch in flour breaks the starches down into smaller chemical structures (these two ideas seem to be different conceptual process reasons for what is essentially one underlying factor, the addition of broken starches). The reason I believe this will work is some obscure partial sentence I read in another science study:
Another sentence from another source that seems to say the same thing, “The gelatinization dramatically increases the availability of starch for digestion by amylolytic enzymes.” Whether the amylolytic enzymes are working during the proof stage is unknown by me, my guess is they are (and results are suggesting that the beer diagram’s bounds are not as clearly defined when applied to bread dough processes as the bound points indicate), but the outcome of the process idea of adding gelatinized flour during the final kneading before shaping remains to be seen.
If it doesn’t work as expected, simply adding some malt or malt syrup of some kind would probably also work, but I prefer the idea of using the flour itself, it seems a more purist approach. It’s interesting that high-water temperatures are used to scald flour, combined with time at relatively high temperatures, and the warm autolyse is quite similar, but the temperatures are quite a bit lower. So perhaps we could say that the warm autolyse process is, or is quite similar to, a low-temperature scalded flour; or that scalded flour is a high-temperature flour-water autolyse process. It probably depends upon the definition of “scald” to make full sense, but I’m looking for the pattern or similarity of the two processes.
Adding food for the yeast is undoubtedly the reason why poolish process breads have flour added to them again after fermentation, besides just the moisture issue, as the new flour has some small percentage of damaged starch according to a number of experts. The same seems true of many biga recipes. Adding flour is apparently also done with sourdough cultures, though I have no experience with those (but I do read a lot). So it seems like the idea of adding broken starches by scalding a small amount of flour and adding it at the final kneading should work.
The process I’m using isn’t sponge since it uses 100% of the flour. Curiously, reserving 1% of the flour and some yet to be calculated amount of water from the autolyse amounts of flour and water reduces the autolysed flour to <100%, which later has yeast added, so then it seems it qualifies to be called a sponge. Ha. The sponge restriction still seems rather arbitrary to me, particularly since I'm thinking that what ingredients have been added, and in what order, is a preferable classification scheme. 2009.Sep.06 Upon further reflection and study, I've decided a 2% scalded flour level will be my next test. Hopek, Ziobro, and Achremowicz used three temperatures, given in degrees C, which I've converted to 167F as the initial water temperature, 140F as the mixed temperature, then mixture is maintained at 104F overnight. They used a 1:2 ratio of flour:water for the scald, so that means 200% baker's percentage of water, however, my temperature calculations say that 243% water at 167F mixed with 74F degree flour, combined results in a 140F mixture. It's possible my temperature calculations are off somewhat, but I'll trust them for now. Additionally, I don't know if a slow cooker will keep the mixture at 104F overnight. Another possibility is to put it in a vacuum bottle to slow the cooling process, however I'm thinking of simply putting the mix into a pre-warmed blender (pre-warmed so it doesn't cool the mixture when added) and blended for some time period to speed the mixing and collisions of the enzymes with the remaining molecules. I also saw a patent online somewhere that said a microwave may be utilized to do this quickly. What is a monomer (mentioned in the patent)? “The glucose molecule is the monomer of starch.”
I’ve also noted that my bread is staling faster again. Upon defrosting a couple of slices several different times to make sandwiches, the staling or crystallization of the crumb began immediately, at least during hot and dry weather, a problem I never noted when the formula had vinegar added, so I presume that the pH of the dough hasn’t decreased much over the fermentation times currently being used. Therefor I intend to reintroduce the vinegar as a critical ingredient. I saw a web page online that said a mixture of 20:80 acetic:lactic acids generally results from sourdough, so that acid mix should probably be attempted at some point, but right now I have no lactic acid, though it is available at homebrewer suppliers, so for now it will be only 4% acetic acid (vinegar).
More and more I find myself thinking about exploring sourdough, as perhaps the exceedingly sour taste I dislike so much could be a result of formulas or processes that were designed to deliberately create extreme sour flavor. In any case, my readings have said in order to best modulate the growth action of wild yeast relative to the bacillus strains, a temperature controlled fermentation chamber is needed (27°C which favors wild yeast versus 33°C which favors the Lactobacillus), and right now I don’t have one of those dedicated solely as a fermentation chamber.
2009.Sep.13
I’m getting around to making the scalded flour loaves, this time both loaves should be identical. The 2% (normal percent of the total or “base” flour amount) scalded flour was added at the point after overnight refrigeration. First off, it was quite difficult to add the thin and watery paste to the dough, the best procedure seemed to be the blade mixer in a technique similar to adding the oil.
Another interesting effect that occurred was that the dough’s stickiness increased again, making it quite hard to handle. Once added, and rested in the refrigerator for a short time to aid the hydration (warming-cooling cycle), the dough felt ‘just like’ the baker’s flour pre-bulk fermentation stickiness, explored in a prior test. So I guess another possibility for the baker’s flour stickiness is that the miller, or packager, added some heat-treated flour. I don’t know if they’re required to disclose that on the label, or not, particularly if they processed the wheat according to some varying milling processes: it’s still “wheat”. With coffee beans, certain types of coffee grinders create more heat than others, so I suppose that is a possibility, the particular grinding method the miller used. In any case, this dough is so sticky it’s hard to handle once again.
It had been my intent to add this as a redundant technique to increase the damaged starch in the dough during the final proof, as insurance against poor bulk-fermentaion timing (and temperature) but the increased stickiness makes handling it much more difficult. Decreasing the moisture content slightly could help with this, but that also increases the difficulties associated with kneading. The increased stickiness at this point makes shaping and handling more difficult than it otherwise needs to be, so this may not have been the best idea, to include it post bulk-fermentation.
I also decided to re-include the vinegar, 2.35%, as the loaves without it had been staling a bit faster once again.
Making the scalded flour was also informative. I had thought to try the 160F water, in a flour ratio that settled the mixed temperature at 140F, but something happened, perhaps the mass of the measuring cups cooled the water too much, the final mix was only 117F, and afterward it was much like the consistency of a thin pancake batter. So, I thought to microwave it for a few seconds, much like the patent (linked above somewhere) said was a useful technique. After either 20 or 40 seconds, the temperature was 140F, but it’s consistency had changed massively, it had turned into a clearer, more opaque and thicker paste that reminded me somewhat of paper maché glue. So I think next time I’ll try starting with room temperature flour and water, mixed together, then simply use the microwave to bring it up to temperature. It seems very fast, and doesn’t seem to require a long, slow cooking like the scalded flour science report by Hopek, Ziobro, and Achremowicz, linked somewhere above, suggested.
I debated with myself how best to re-include the vinegar (4% acetic acid), as I wanted the main flour autolyse to occur at a natural pH level, so I let the scalded flour cool for a few hours, then added the vinegar to it, and brought it up to 140F again using the microwave. Then I let it cool some at room temperature and then refrigerated it overnight.
Anyway, here’s the formula. You’ll probably note the spreadsheet is growing:
| Scale Recipe Here | Flour | Total # | Total g | Scalded | Drier | Remain’g |
| Flour Weight per pan |
Weight | of pans | per pan | Flour % | Flour % | ingredient |
| 827 | 1654 | 2 | 1349.83 | 2.0% | 98.0% | 100.0% |
| ingredients | Baker’s | normal | Base | |||
| Percent | percent | grams | grams | grams | grams | |
| High Gluten Flour | 28.00% | 0.17 | 463.12 | 9.26 | 453.86 | 0.00 |
| Baker’s Flour | 72.00% | 0.44 | 1190.88 | 23.82 | 1167.06 | 0.00 |
| Water | 55.00% | 0.34 | 909.70 | 99.24 | 810.46 | 0.00 |
| Vinegar | 2.35% | 0.01 | 38.87 | 38.87 | 0.00 | |
| Instant Dry Yeast | 0.64% | 0.00 | 10.59 | 10.59 | ||
| Salt | 1.23% | 0.01 | 20.34 | 20.34 | ||
| Olive Oil | 4.00% | 0.02 | 66.16 | 66.16 | ||
| Totals | 263.22% | 1 | 2699.66 | 171.19 | 2431.38 | 97.09 |
The basic “recipe” or gram amounts I used are in the right-hand three-columns.
I still don’t have a good way to put the process, which appears to be at least as important as the ingredient formula, if not moreso, into table format (but I’m working on it). Basically, the process used this time is the same as the warm-autolyse used last time, as I wanted to insure I exhausted the damaged starches to the same level during bulk-fermentation. After the warm autolyse of the ingredients under the “Drier” column, and after a cooling for 1.5 hours, the yeast was added, then the bulk-fermentation began. It was extended like the last time, 2 hours at room temp before putting in refrigerator (the 2 hours at room temp seemed to be what exhausted the damaged starches resulting in a lighter colored crust in the prior NFM vs. OFM & warm vs. cold autolyse test). The next day the scalded flour was added, followed by 1/2 hour in the freezer, then 1/2 hour in the refrigerator. Next, the salt was added to 2/3 of the dough, and oil was added separately to 1/3 of the dough using the blade mixer, then those two were combined and kneaded using a spiral hook for 10 minutes. Division, rest, and panning followed, then the proof. However, this proofing time was a bit shorter, as it rose somewhat more and faster than the prior batch, thus it didn’t need quite as long a proof time. This proof was 1/2 hour shorter for a total of 3.5 hours from beginning of proof to beginning of bake (so this suggests to me that 2% scalded flour was perhaps a smaller amount than needed, as 3 hours should have been sufficient). The proof temperature was 86F for 2:20, then it was raised to 94F for 0:40 (I’m using a 75-watt halogen bulb, so it takes some time to increase. I might change that to a 150-watt bulb), then the loaves were removed from the oven-as-proofing chamber to room temperature while the oven was pre-heated to 500F.
Slicing surprise!
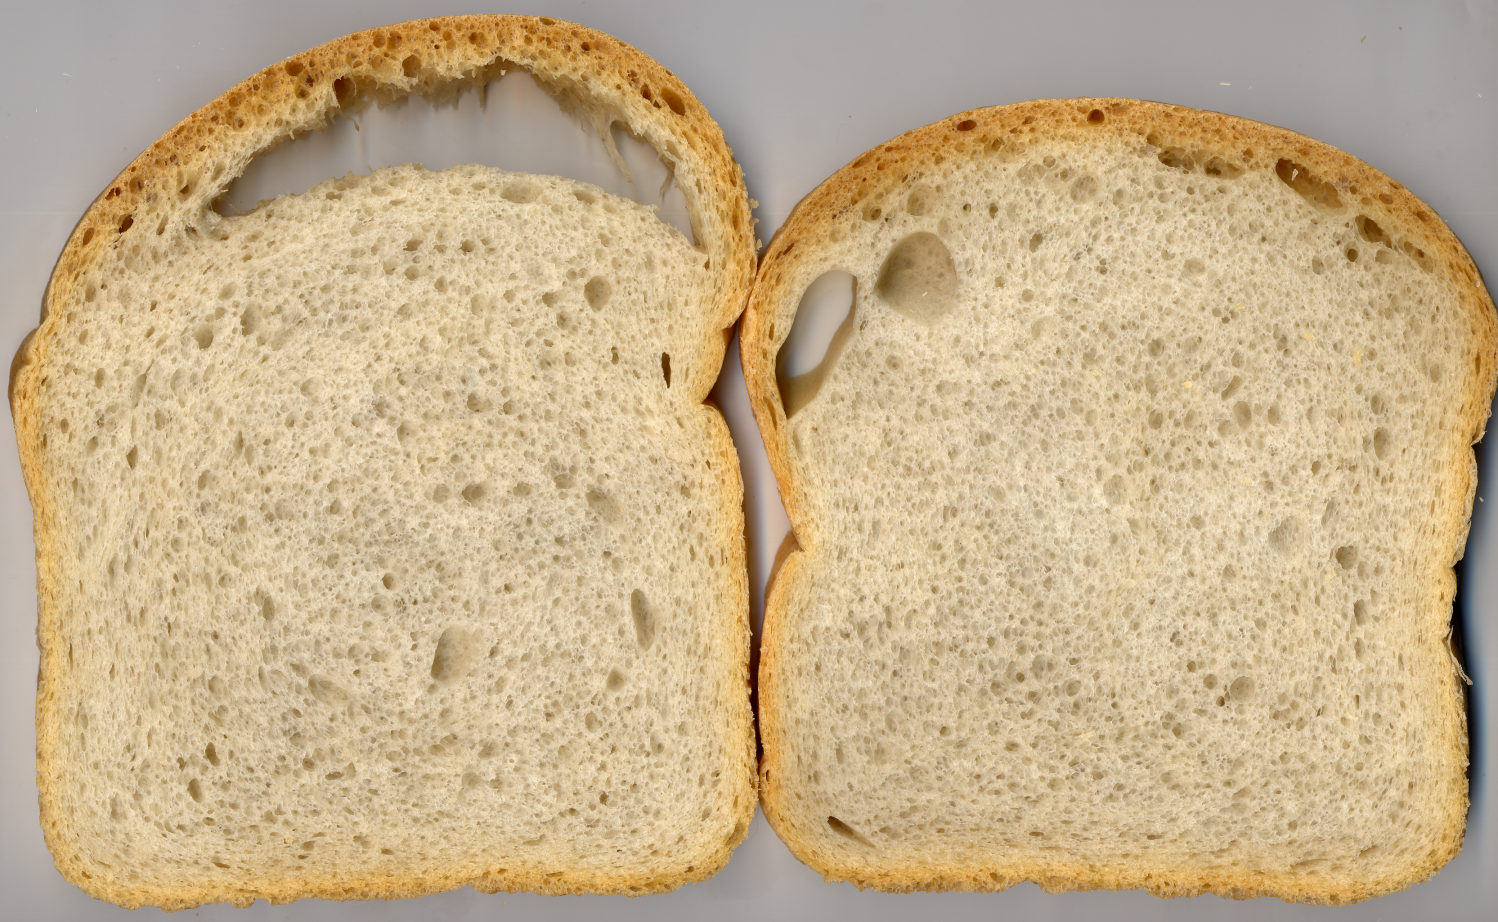
It’s what Barry Harmon would call a “flying crust” batch! Both slices are from the same loaf, but the second loaf, not pictured, didn’t have the flying crust at all. The tunnel is at least 1/2 the loaf’s length. Since both sets of doughs were treated the same, indeed being divided by weight for panning only after adding the s.flour, which itself was after bulk-fermentation, I don’t have a good understanding of how to create a flying crust on demand, except for the fact this is the first batch that had a remarkable one. I find myself wondering if there should have been more kneading after adding the scalded flour (s.flour), perhaps it didn’t get as evenly distributed throughout all the dough as it could have, perhaps hydration was somewhat uneven, but that’s just a guess. Or perhaps these types of huge tunnels are a possible symptom, a somewhat unpredictable one, of too many sugars left in the dough at the point when it’s baked.
Besides the crust being a more typical shade of brown or tan, one other characteristic worthy of note is that toasted slices developed a darker brown color than any prior batches in an equivalent time period, which is consistent with more “sugars” remaining in the final baked product.
The color of the loaves is normal, or darker brown (or browner tan?) than the last time. The crust is also much crisper, though possibly not quite as crisp as some prior batches. My general feeling before slicing and actually seeing the tunnel was that the 2% scalded flour added after bulk-fermentation didn’t entirely compensate for the over-extended bulk-fermentation; if it had, the 86F temperature proof would have been enough in 3 hours just like the “Wow” batch. That seems to be confirmed by the tunnel result.
Hopek, Ziobro, and Achremowicz in their scalded flour study (and by the way, they put the scalded flour into the dough pre-bulk-fermentation) say, with respect to the amount of damaged starch in wheat flour:
The number of such granules depends on the miling intensity and increases rapidly with increasing roll pressure, typical flour contains 5-9% damaged starch.
This could be a big difference between flours typically used for bread that, at least in the U.S., don’t have their “fineness” specified on the consumer label. I’ve read other, much lower claims, for the amount of damaged starch typically in wheat flours used for bread.
In thinking of the prior OFM versus NFM test, extreme stickiness seemed isolated to the warm autolysed Baker’s Flour. Perhaps the Baker’s Flour is a finer grind, and simply has more broken starches as a result? The only way I can think of to test that idea is to use sifting screens of different mesh sizes, but I don’t have any of those, just the typical wire strainer available at nearly any grocer which have rather large openings or spaces between wires.
It took me a little while to find at least some of the U.S. government regulations pertaining to wheat flour:
(a) Flour, white flour, wheat flour, plain flour, is the food prepared by grinding and bolting cleaned wheat, other than durum wheat and red durum wheat. To compensate for any natural deficiency of enzymes, malted wheat, malted wheat flour, malted barley flour, or any combination of two or more of these, may be used; but the quantity of malted barley flour so used is not more than 0.75 percent. Harmless preparations of α-amylase obtained from Aspergillus oryzae, alone or in a safe and suitable carrier, may be used. When tested for granulation as prescribed in paragraph (c)(4) of this section, not less than 98 percent of the flour passes through a cloth having openings not larger than those of woven wire cloth designated “212 µm (No. 70)†complying with the specifications for such cloth set forth in “Official Methods of Analysis of the Association of Official Analytical Chemists†(AOAC), 13th Ed. (1980), Table 1, “Nominal Dimensions of Standard Test Sieves (U.S.A. Standard Series),†under the heading “Definitions of Terms and Explanatory Notes,†which is incorporated by reference.
So it appears there likely is some legal wiggle room for millers on the fineness side, as long as most of it passes through a motorized #70 mesh in precisely 5 minutes (read section (c)(4)). Finer-ground flour would still pass through, but coarser-ground flour wouldn’t. While I haven’t read the entire page, that excerpted paragraph seems to imply that malted wheat can be used in quantities greater than 0.75%.
With 2% of scalded flour added, dough stickiness seems to be increased afterward. If the s.flour stickiness is due to a similar phenomenon to the Baker’s Flour stickiness, it seems reasonable to believe that after bulk-fermentation, it’s stickiness would be reduced (this would be consistent with reduced sugars that the yeast has consumed over time).
2009.Sep.14
Between the increased sugars, and the huge tunnel just under the top crust, it seems adding s.flour pre-proof and post-bulk fermentation is not optimal, it might be better to add it to pre-bulk-fermentation dough. That’s probably what I shall try next time. However, so far my best results seem achieved with a ~2700g dough ball at 84F immediately put into the refrigerator for bulk-fermentation. That seems to fix the total time available for yeast growth quite well. The length of time before dough reaches 63F or thereabouts (my data said it stopped rising, as dough cooled, somewhere between 65F-56.3F and 3-6 hours, so I estimate it was around 63F and probably at 3.5-4 hours), when this yeast strain seemed to stop much of its CO2 output, can be controlled either by the initial dough temperature (up to 105F or possibly a little higher won’t kill the yeast), or by the size of the dough ball itself. I’ve noted dough balls of half that weight cool much quicker. The idea of using time at room temperature for extending the yeasts’ growth curve before retarding also seems a valid technique, however, I’ve only explored extending it while the dough is at the warmer or initial temperature. Another possibility is to immediately refrigerate 84F dough for 3 hours, and when it reaches 65F, just before it stops rising, to remove it from the refrigerator for some time period to let the dough warm up somewhat, then put it back in the refrigerator at some point. This latter idea would extend the fermentation time while the dough is at the coolest portion of the yeasts’ CO2 output range.
2009.Sep.15
In thinking about the best point to add s.flour, it seems it would be best to perform at least one more test using the 2-hour extended bulk fermentation at room temperature followed by refrigeration. Were I to change back to the bulk-fermentation performed entirely in the refrigerator, and also moved the point in the process where the s.flour is added, it seems that would be two changes, and wouldn’t compare as well versus the most recent “flying crust” batch.
Some sundry and related reading, how to make maltose, and a reasonably nice diagram of the maltose molecule.
2009.10.06
It was time to make another couple of loaves. This time I closely followed the above process, including the flawed 2-hour room temperature bulk fermentation before refrigeration. The intentional change was to add the 2% (flour weight) scalded flour prior to bulk fermentation, instead of prior to the final proof.
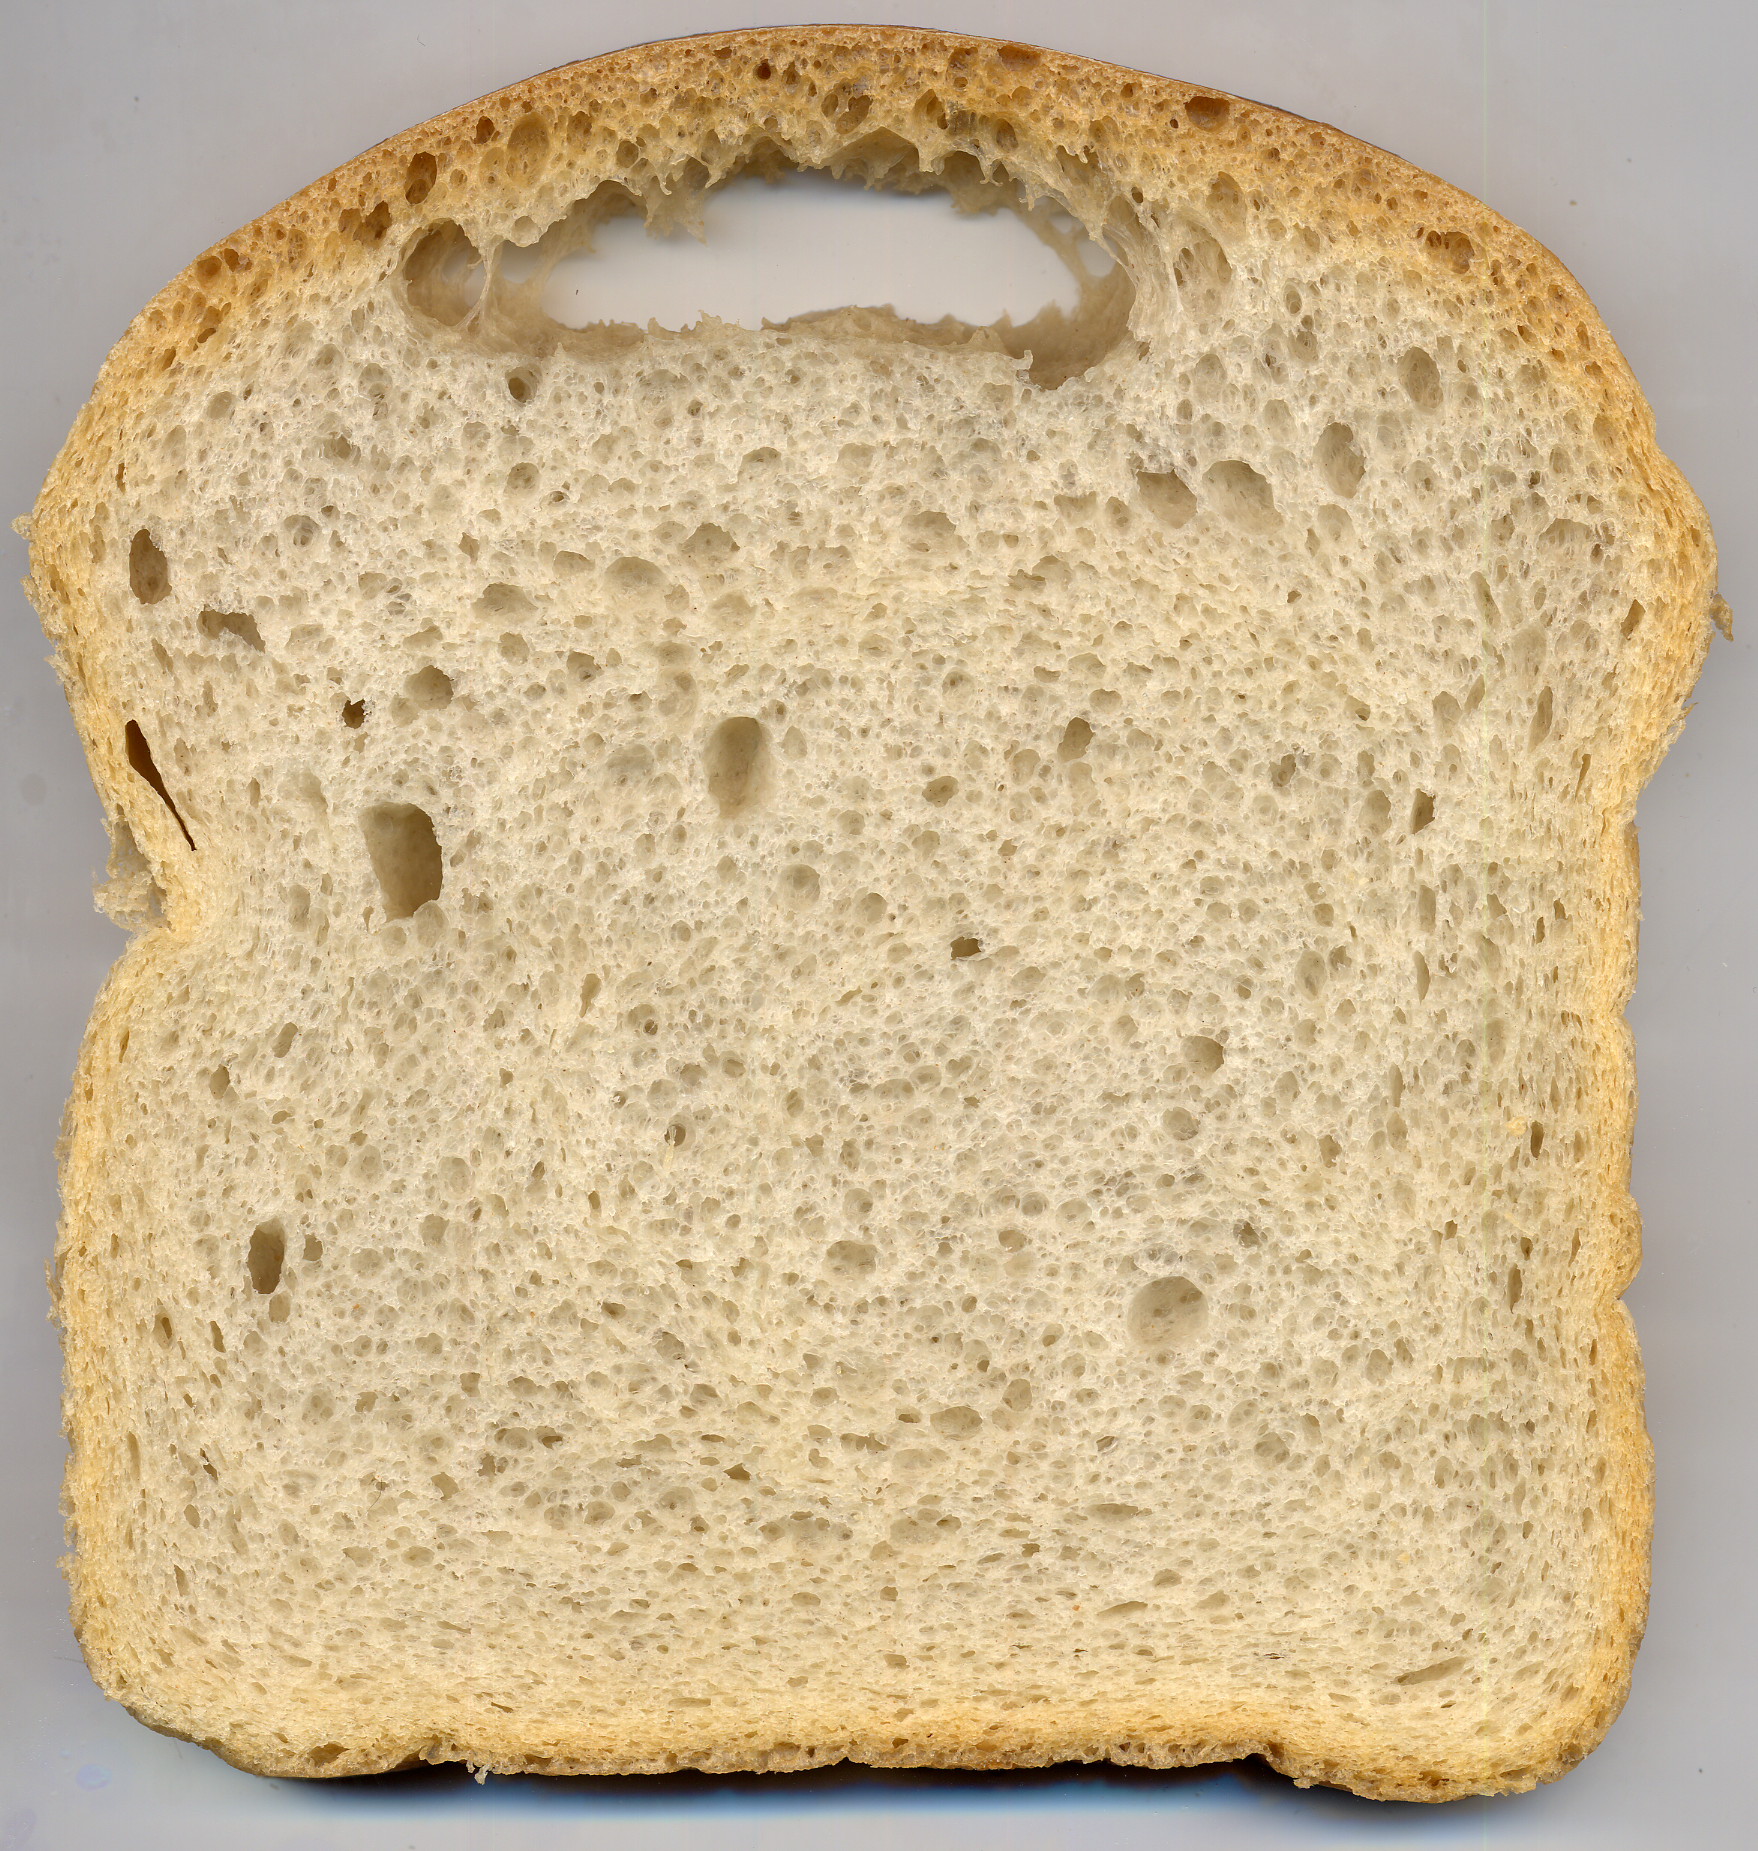
This tunnel is much smaller than the last one, it is less then 2″ long, and is only evident in about 5 slices. The other loaf had no similar flaws.
I did note a problem with the proof at 86F. After 2 hours of proofing, the panned dough hadn’t risen much, so I turned the temperature up to 96F 20 minutes sooner than the last batch, and I brought it up to temperature immediately using 10 seconds of the oven’s flame. Later, after removing the proofed dough from the oven-as-proofing chamber at 3 hours, and after warming up the oven, when re-placing the risen loaves into the 500F oven for baking, I noted they had risen a lot more than expected during that 1/2 hour at room temperature. Typically the rise tends to stall at this stage. This has led me to wonder if an issue with the scalded flour, which may have large components of dextrins (whatever may be a molecular component of scalded flour and or damaged starch), isn’t only one where the yeast has trouble waking up from the refrigerated overnight temperatures but is also due to a gas-ouput stall due to a yeast change in food source. I’m sure I’ve read somewhere that during this change from that which is easily digestible, i.e., shorter damaged starches and sugars, to other less digestible foods, i.e., longer starches and sugars, that there is a short period where the outgassing stalls.
Yes, here’s the out-gassing chart, and it appears on a page with some informative yeast discussion. I presume the times would be different than the chart indicates, as each line is at a constant temperature, whereas in the technique I’m using, the dough is cold when it comes out of the refrigerator, so it takes some time to warm up.
This bread is a little lighter in crust color, and when toasting, didn’t develop as dark brown of a crumb like the prior batch, indicating to me that there were fewer free sugars remaining at the point when the yeast action stopped during the bake. This batch had a very strong sharp alcohol odor after overnight bulk refrigeration. After baking and sampling a couple of slices, it has a nice flavor, as well as very crisp crust.
This batch also had a nice total volume in spite of the sub-optimal extended bulk fermentation.
At this point I will drop the extra 2-hours at room temperature before refrigeration. Were I to continue using the scalded flour in this same process, I would probably choose to reduce it slightly to 1% or thereabouts, due to the yeast stall and timing issues. I will probably also make the decision that 96F is a preferable final proof temperature for similar types of sandwich breads.
However, I’m not done experimenting with scalded flour yet. The next step in the experimentation is to incorporate a long fermentation poolish at room temperature, before mixing the final dough for bulk fermentation. I plan to also incorporate at least some portion of the scalded flour into this poolish as an additional food source for the yeast. In thinking about this, it seems one point to add it would be after the first drop after the dough-rise peak. Another addition point or place-in-the-process would simply be to include it right at first.
A poolish is defined as a fermentation (often called a “pre-ferment” or simply preferment, but it’s kind of a misleading name as I’ve previously pointed out) of about 100% water. Since I want to continue using the autolyse with all the flour, there’s a bit of a math problem that limits the total amount of flour that may be subject to the poolish step, because the total water used is the limiter. So I have a bit of calculating to do.
One more site in the related sundry-reading category is wikipedia’s page about maltodextrins and this site about carbohydrates, even though the latter doesn’t directly mention dextrins. Those dovetail nicely with this short youtube video about how to make dextrins from corn starch using an oven. I find myself wondering if the same thing can be done with wheat flour, though the coloration issue would probably not be ideal. If the wheat flour can be “gelatinized” in a dry process, it would mathematically free up some water for use in another portion of the dough process. I’m thinking of trying it. Afterwards, a simple home test would be how much it thickens the same amount of water as I used in the scalded flour portion of the above two batches. I believe it’s also possible to buy this type of flour already premade, though I haven’t seen it at any of the stores where I typically shop.
2009.Oct.07
Before bagging the last batch in plastic overnight, which I use to soften the crust prior to slicing, the crust was arguably the crispest yet. The wikipedia page about dextrins claims that they are used as crispness enhancers in many foods, so it could be that scalded flour added to dough, fermented, and baked may have some greater percentage of dextrins.
http://www.rpi.edu/dept/bcbp/molbiochem/MBWeb/mb1/part2/sugar.htm
http://www.anslab.iastate.edu/Class/AnS518/Ans518_Class3.ppt
(page 17 has a nice graphic)
http://en.wikipedia.org/wiki/Maltotriose
http://www.elmhurst.edu/~chm/vchembook/547starch.html
This post is currently at 10078+ words, so it’s time to split it up again.
Very Great describe!Why is ascorbic acid added to bread dough during the chorleywood process?
Thanks for asking that question when you did, the timing of it was good relative to search engine results: wheat bread study as PDF: “Why is ascorbic acid added …”?
I don’t know anything about the Chorleywood Process except what little I’ve run across online. If I recall correctly, it is a shorter-time dough-process which is manufactured and kneaded using automated factory machines. A search indicates Cauvain and Young wrote a book with the process name in the title that is said to explain the process in some detail, but I’m sorry to report books by those authors are too pricy for me, though it looks like they (same authors have other baking titles) have some fabulous information.
Ascorbic acid is often referred to as a dough conditioner, which as far as I’ve been able to gather allows the simulation of longer-fermented doughs in shorter-fermentation processes with respect to the baked product. I would guess that as an acid, it would also have something of a preserving and/or mold-inhibiting effect, perhaps similar to what I’ve found with vinegar (acetic acid).
I noticed that baking911.com has a nice general information page about dough conditioners. I find myself continuing to wonder about ascorbic acid’s use in bread.
If old dough wasn’t used in the formula and if Vit. C were added during one of the later process steps it doesn’t seem it could hurt sponge enzyme activity, though how to dissolve the granules might be an issue unless base formula water was reserved for the purpose.
There’s a good, if at times cryptic, thread at egullet.org about ascorbic acid. That thread mentions some of Calvel’s dough formulas used it. It’s not clear to me whether said formulas are in The Taste of Bread, though that’s my guess. The discussion seems to obliquely reference processes with characteristics similar to Chorleywood without naming them, and hints there may be a longstanding process schism among published experts.
There are also some reasonably specific thoughts on how one might use ascorbic acid over at The Fresh Loaf. The same thread says: “20 ppm (white or cake flour) and 50-60 ppm (whole wheat flour)”, whereas HRUÅ KOVÃ1 and NOVOTNÃ2 (pdf study linked in prior comment) appear to have studied 10ppm.
It’s a long process but its worth it. Thanks for sharing!