This is a continuation of Part 2: Experimenting with Bread Dough Process.
I had mentioned I wanted to try adding a longer primary fermentation, a so-called “preferment” or “pre-ferment”. The first one I tried was a simplistic poolish using my typical bread formula and flour amounts. The second batch used too little yeast, and it didn’t rise very well.
The first poolish batch turned into very nice bread, bread that was accidentally ruined after it had been bagged in plastic, ready for slicing the following day and stored in the oven, when I forgot it was there and started warming up the oven for something else. The oven was somewhat over 200F when I remembered the two loaves there, but the plastic had shrunk itself around those loaves. I decided to compost that batch, as I figured that plastic fumes had saturated through the bread.
I wasn’t enthralled with the poolish process, however, because it was more complicated to make, it involved more weighing of ingredients and separate processes (particularly if I had to separately autolyse each), as well it didn’t seem to provide much advantage over the straight dough approach I’d been using judging by the results (but it was and is easy to mix). More work for the same result? That’s when I realized that the poolish methods didn’t autolyse all the flour, at least not a strict autolyse.
So I started wondering if I could autolyse all the flour much the same as the straight-dough process I’d been using, then turn some or all of that dough into a long fermentation that occurred prior to the typical overnight bulk refrigeration. Flipping the question around, it seemed easy enough to simply add a long fermentation step between the straight-dough autolyse and the typical, retarded or refrigerated overnight fermentation. Additionally, I realized that with an additional fermentation step, I could add the salt and oil immediately prior to the secondary or bulk fermentation, and not need to do much kneading the next morning before division and panning for the final proof: there would be nothing that needed to be mixed into the dough at that point in the process.
I had originally hoped the long fermentation would take 8-hours at 72F (winter room temperatures here), but it had tripled in bulk at 4.5 hours due to the 0.15% Instant Dry Yeast added to it at that point-in-time. I’ll have to reduce that amount the next time for a longer fermentation, as the schedule allows an 8-hour primary ferment without needing a third day. For reasons of simplicity of process, I opted to subject all the autolysed flour to this long fermentation at 55% water (only flour, water, vinegar, and yeast added to the dough at this point).
First, a warm autolyse of only flour and water that resulted in 100F degree dough, which was placed in the refrigerator for 1.5 hours, at which point it cooled to about 83F degrees. Then the vinegar was added and kneaded, then a small amount of yeast for the long primary fermentation was added, and this mix was returned to the refrigerator for another 1/2 hour or so, until the dough cooled to 70F, when it was removed to room temperature. This rose for the next 4 hours at room temperature (72F) for a total of 4.5 hours. Because the dough had tripled in volume, I thought that was enough, but my guess is it would still be considered immature. At this point, more yeast was added, a short knead of a minute or so followed by a 10 minute rest, then salt was added and kneaded, then oil was added and separately kneaded with 1/3 of the dough using the prior-mentioned food-processor blade technique, then reincorporated and all of it stand-mixer kneaded for another minute on the slowest speed. The dough was 79F when it entered the refrigerator for the overnight bulk or second fermentation.
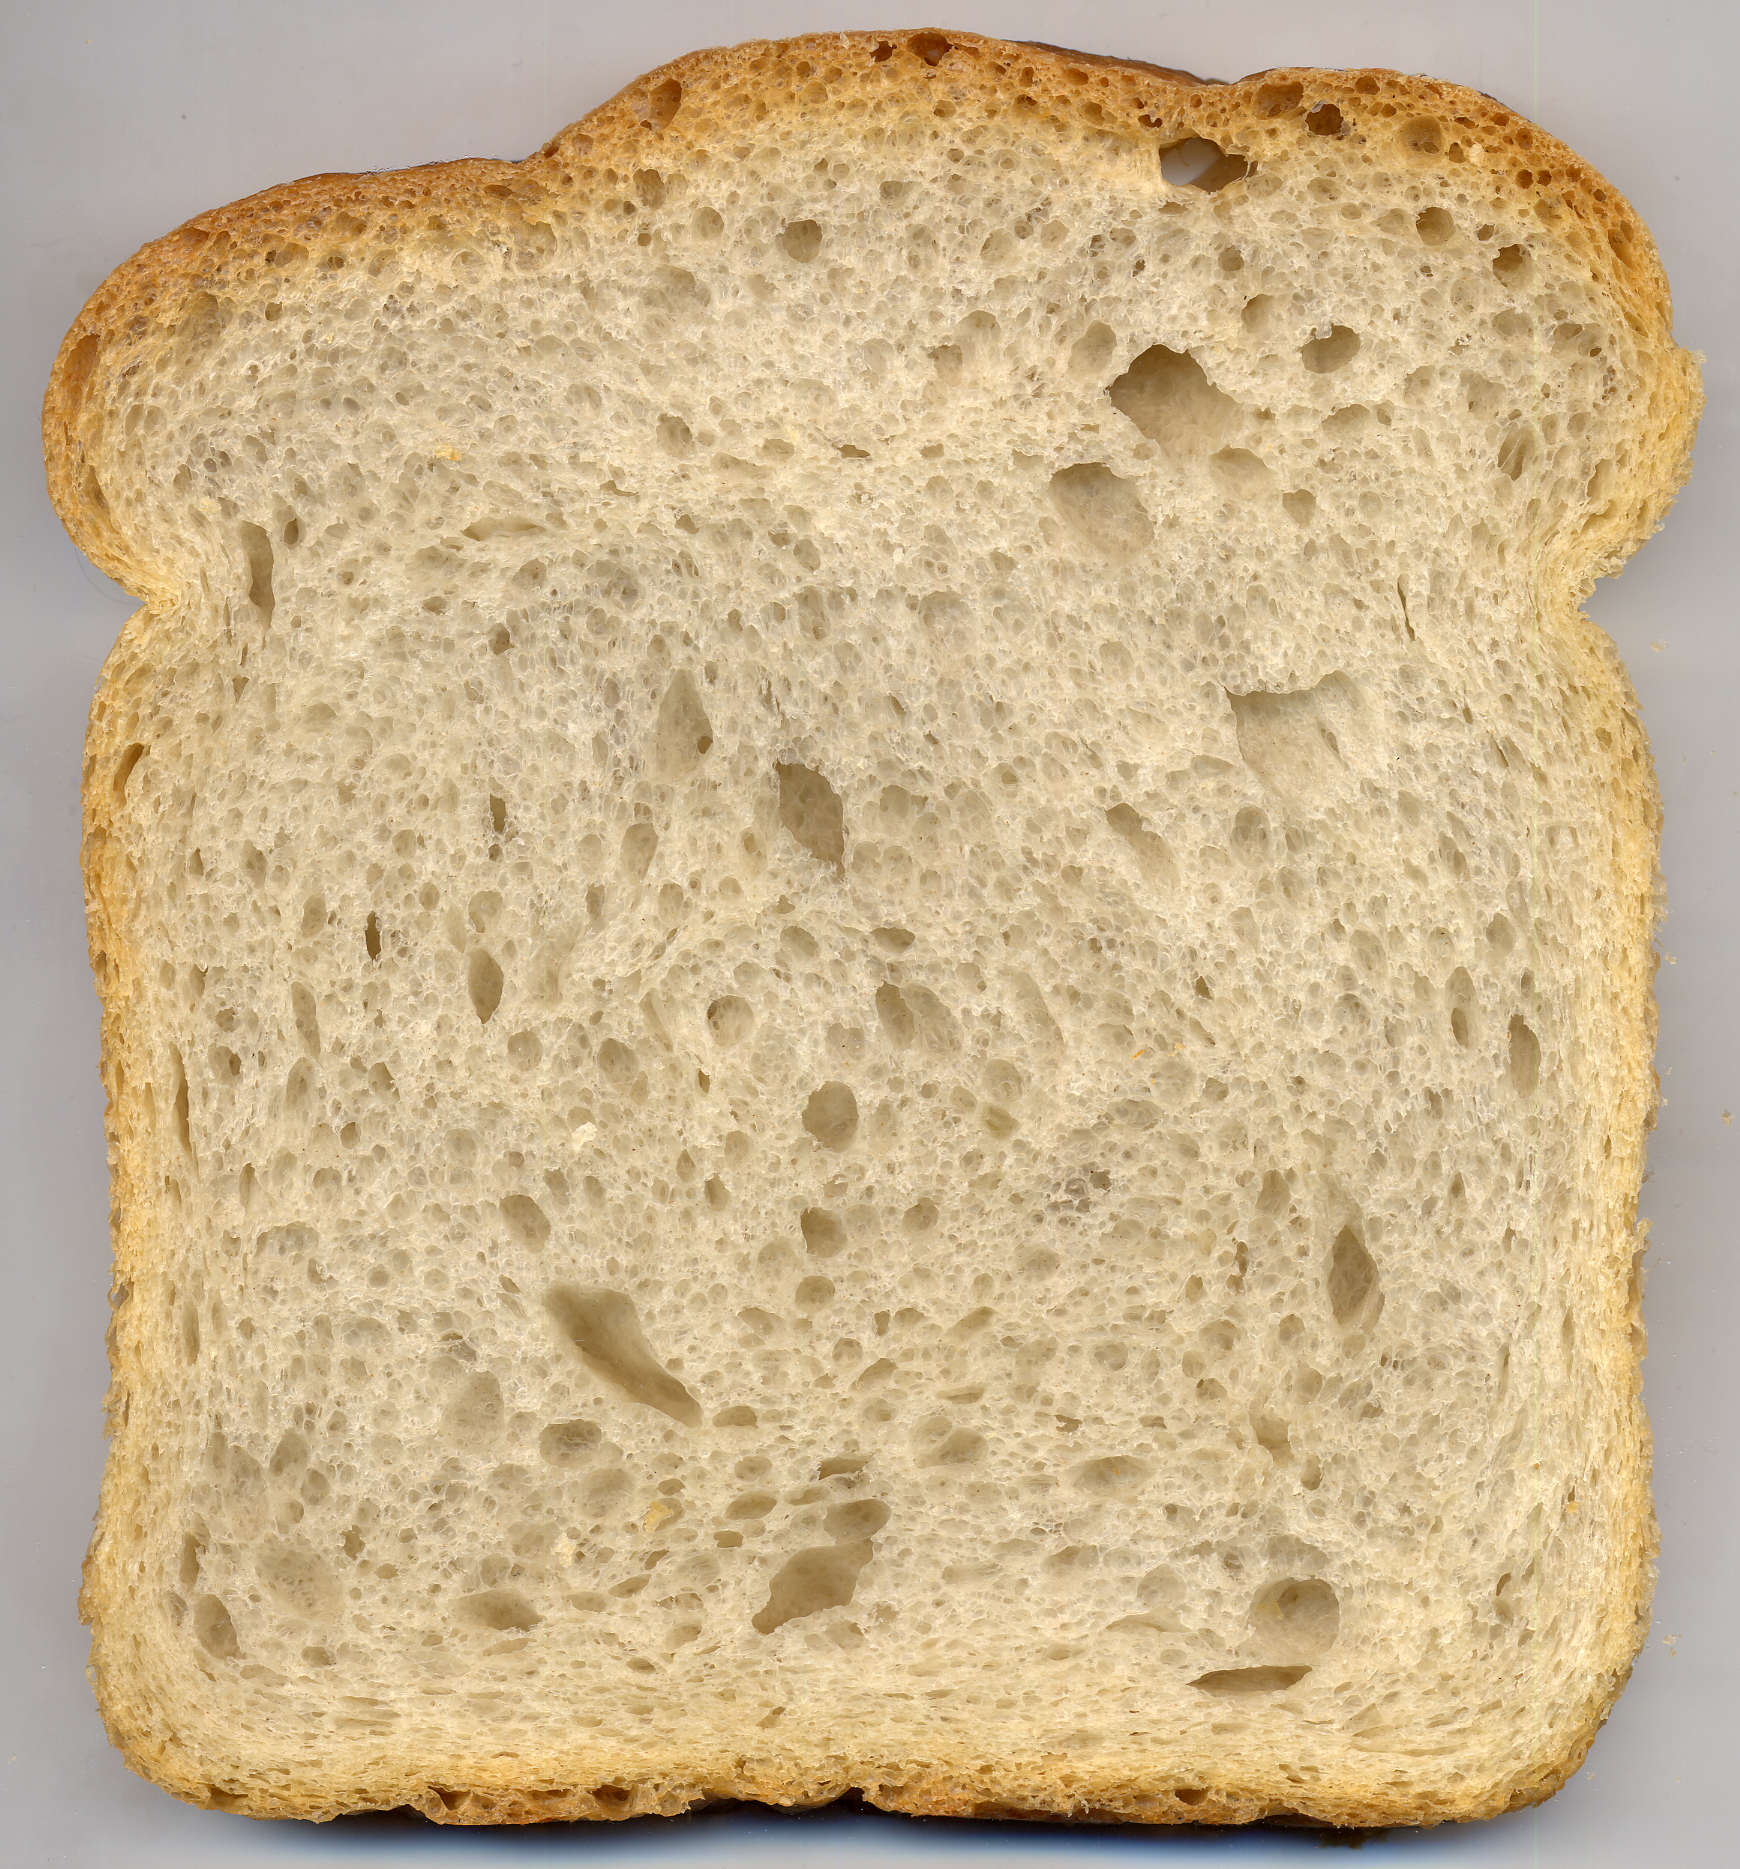
This dough process seems to result in the nicest and softest crumb yet, and the crust is a somewhat darker golden color. The crust was slightly tough following baking, but as toast it’s wonderfully crisp:
| Scale Recipe Here | Flour | Total # | Total g | % of Base |
4.5-hour | 3-5 hour |
| Flour Weight per pan |
Weight | of pans | per pan | Flour | First | Retarded |
| 827 | 1654 | 2 | 1349.83 | 100.0% | ||
| ingredients | Baker’s | normal | “Base” | Autolyse | 1st Frmt | 2nd Frmt |
| Percent | percent | grams | grams | grams | grams | |
| High Gluten Flour | 28.00% | 0.17 | 463.12 | 463.12 | ||
| Baker’s Flour, bleached, enriched | 72.00% | 0.44 | 1190.88 | 1190.88 | ||
| Water | 55.00% | 0.34 | 909.70 | 909.70 | ||
| Vinegar | 2.35% | 0.01 | 38.87 | 38.87 | ||
| Instant Dry Yeast | 0.64% | 0.00 | 10.59 | 2.48 | 8.10 | |
| Salt | 1.23% | 0.01 | 20.34 | 20.34 | ||
| Olive Oil | 4.00% | 0.02 | 66.16 | 66.16 | ||
| Totals | 263.22% | 1.00 | 2699.66 | 2563.70 | 41.35 | 94.61 |
| <— Flour Sub-Total —> |
100.00% | H20 F –> | 118.55 | 70F |
I’m not certain why the crust was tougher than straight dough versions which have always been crisp shortly after baking. I think I’ll keep playing around with this additional technique for some batches and see if it can’t be better optimized.
This dough was warmed to 79F before the overnight retarded rise, but I find myself doubting whether warming is needed for this step of the process when using a long primary fermentation.
Another question that I’ve had over a number of baking cycles is how fast does the temperature of the dough rise during the final fermentation proof after panning. The dough warms up quite a bit during division and panning, before the proof itself. I recorded some temperature measurements this time.
| IDY | First Ferment | ||||||||||
| 0.15% IDY | “Place on top of refrigerator” rise data |
||||||||||
| hrs ——> | 2:00 | 3:31 | 4:37 | ||||||||
| clock —-> | 4:30 PM |
6:01 PM | 7:07 PM | ||||||||
| d.temp.F> | 71.5 | 71.5 | |||||||||
| notes | doubled | tripled | 0.15% too much yeast for this step | ||||||||
| beer odor —> | none | none | |||||||||
| IDY, salt, oil | 2nd or Bulk or Retarded Ferment | ||||||||||
| 0.49% | “Place dough in refrigerator” rise data |
||||||||||
| hrs ——> | 0:00 | 0:26 | 1:01 | 1:27 | 2:00 | 2:31 | |||||
| clock —-> | 7:40 PM | 8:06 PM | 8:41 PM | 9:07 PM | 9:40 PM | 10:11 PM | |||||
| d.temp.F> | 79 | 73 | 74.5 | 73.5 | 70.7 | 69.6 | |||||
| notes | woke up | ||||||||||
| beer odor —> | |||||||||||
| 86F | Final Proof | ||||||||||
| Proof temps and rise | |||||||||||
| hrs ——> | 0:49 | 1:08 | 1:47 | 2:15 | 2:45 | ||||||
| clock —-> | 12:50 PM | 1:09 PM | 1:48 PM | 2:16 PM | 2:46 PM | ||||||
| d.temp.F> | 66.4 | 67.7 | 70.8 | 74.1 | 75.8 | ||||||
| notes | swelling | almst.x2 | x.2+ | ||||||||
| beer odor —> | Retarded dough had moderately strong alcohol odor before final Fermentation |
||||||||||
While those data points with the proof were derived from an 86F thermostat setting, it stands to reason that even if it were set to 96F, and if the initial dough temperature (which I often abbreviate as d.temp) is =< 65F, the dough will still need to warm up, that it will take time in the chamber to do so, therefore it would only warm the cold dough at a faster rate. It further stands to reason that the size of the final proofing dough ball or mass would also affect the rate of warm up, with smaller masses warming up faster.
The baking procedures and temperatures for this formula were the same as they've been for the last few batches.
Sundry Reading:
Creating Artisan Breads (General Mills) PDF.
Your Guide to Preferments.
I’m also grateful I was able to obtain a copy of Bread by Jeffrey Hamelman. I haven’t had a chance to read it fully yet, but I’ve picked it up a few times, read a few pages, and each time learned something new!
2009.Nov.26
I note that this last batch using autolyse and “pre-ferment” is a darker baked color, much like the straight dough batch with 2% scalded flour. Because one loaf of the straight-dough batch with scalded flour had “flying crust”, I opted to not further explore that at the time, however it’s possible with additional optimization, particularly with the baking or mixing process, the chance of a “flying crust” could be reduced or increased. Perhaps scalded flour is a fast method of simulating longer-fermented dough.
I also note from the fermentation temperatures that it seems to take instant dry yeast about 1 hour to “wake up”.
With the straight-dough versions, I found it beneficial to warm the dough to 84F before placing in the refrigerator, and while the dough’s cool-off time in the fridge is related to the size of the dough ball (probably a function of surface area to volume), at the current dough ball size (two loaves or about 2700 grams total weight), that allows a cool off period that was long enough so there was significant swelling of the dough before the dough gets below 68F degrees, which seems a temperature threshold where yeasts’ out-gassing activity decreases. Because there’s additional fermentation with the addition of the first ferment (“pre-ferment”) in this latest process, I find myself thinking that it’s less important to get a lot of rise during the first portion of the retarded bulk ferment, a technique that seemed to work well for straight dough. I want to try reducing the initial temperature of bulk fermentation to 75F, particularly to delay and or decrease the rise occurring during the initial portion of bulk fermentation, and to try to synchronize outgassing in such a way that more of it occurs during final proof after the dough has been panned.
Besides lowering the initial temperature of the dough, shortening the bulk fermentation period would also seem a similar outgas-delaying tactic.
I’ve calculated that if I autolyse the dough to 40% hydration for the autolyse, but keep the total formula’s water at 53-55%, and further weigh 25% of the the autolysed dough and add the balance of the water to that 25%, it will end up at 100% hydration, or what is generally known as a poolish. Because 75% of the autolysed dough will be allowed to rest without the addition of yeast until incorporation at the bulk ferment stage, none of the carbohydrates in that 75% portion will be consumed by yeast during the first ferment, so I believe the poolish that does have yeast added can mature more than the last batch’s first fermentation. So, I’ve decided to keep the 0.15% IDY for the 8-hour first fermentation for at least one more try.
Using the flours I have on hand, I’ve found in the past that 40% hydration will probably cause the autolysed dough to remain mealy unless it’s pressed together. It may be too little moisture for a satisfactory autolyse and, if so, the percentage of the dough that can be brought to 100% hydration would decrease from 25% to some lower figure. If the autolyse moisture percentage is the same as the formula’s overall moisture, then any amount of autolysed dough can be used for the first ferment, as there would be no additional water needed. In this case, the first ferment wouldn’t have enough moisture to be considered a poolish, it would be a biga.
So, this will be the next experiment: split the first fermentation from 100% of the dough to 25%, as well as decrease the initial bulk fermentation temperature a few degrees.
Sundry Reading:
Perhaps the sticky dough that I have is due to the soft water I use. It could make an interesting experiment to autolyse first with water that has only had the chlorine removed, and find out if the dough made from the baker’s flour that I’ve been using is still sticky.
2009.Nov.29
I made the poolish percentage as 20% of autolysed dough weight (not a baker’s percent), instead of 25%, which allowed the autolyse hydration of all the flour to be about 43% expressed as baker’s percent.
| Base Formula — Leave the red cells alone. Change data in light green cells. |
Summary section, enter data in Base Formula sections | |||||||||||
| Scale Recipe Here | Flour | Total # | Total g | % Base | % Base | 80% | 20% | |||||
| Flour Weight per pan | Weight | of pans | per pan | Flour | Flour | grams–> | 1930.14 | 482.53 | <–grams | |||
| 827 | 1654 | 2 | 1349.83 | 0.0% | 100.0% | Post | grams | grams | Bulk | Final | ||
| Flour | ingredients | Baker’s | normal | Total | Scalded | Autolyse | Autolyse | dough | 1st Frmnt | Ferment | Ferment | |
| Protien | Percent | percent | grams | grams | grams | grams | grams | grams | grams | grams | ||
| 13.0% | High Gluten Flour | 28.00% | 0.17 | 463.12 | 0.00 | 463.12 | 0.00 | |||||
| 11.8% | Baker’s Flour, bleached, enriched | 72.00% | 0.44 | 1190.88 | 0.00 | 1190.88 | 0.00 | |||||
| Water | 55.00% | 0.34 | 909.70 | 0.00 | 719.80 | 189.90 | 0.00 | |||||
| Vinegar | 2.35% | 0.01 | 38.87 | 38.87 | 0.00 | |||||||
| Instant Dry Yeast | 0.64% | 0.00 | 10.59 | 0.50 | 10.08 | 0.00 | ||||||
| Salt | 1.23% | 0.01 | 20.34 | 20.34 | 0.00 | |||||||
| Olive Oil | 4.00% | 0.02 | 66.16 | 66.16 | 0.00 | |||||||
| Totals | 163.22% | 1.00 | 2699.66 | 0.00 | 2373.80 | 38.87 | 0.00 | 190.40 | 96.59 | 0.00 | ||
| Cumulative Weight for Process (grams)—> |
0.00 | 0.00 | 2373.80 | 2412.67 | 1930.14 | 672.94 | 2699.66 | 2699.66 | ||||
| 12.14% | <— Flour Sub-Total —> |
100.00% | H20 F –> | 132.00 | 140.00 | 114.53 | 61.07 | 46.43 | ||||
| Desired Initial Dough Temperature |
d.d.tmp-> | 90.00 | 140.00 | 90.00 | 70.00 | 70F | 68.00 | 77F | 65 | |||
| Environment Temperature “amb.t” |
38F | 70F | 38F | 70F | 38F | 86F | ||||||
| Time @ Environment Temp. |
1.5 hrs | X hrs | 8 hrs | 8 hrs | >5 hrs | 3 hrs | ||||||
| Actual ending d.tempF |
69 | 78 | 38 | 70 | <68F | |||||||
| New Environment Temperature |
300F | |||||||||||
| additional time |
1:35 | |||||||||||
| step: | 1 | 2 | 3 | 5 | 4 | 6 | 7 | |||||
| Dough “Work” Periods | completed: | n/a | X | X | X | X | X | X | ||||
| Date | Nov.27 | Nov.27 | Nov.27 | Nov.27 | Nov.27 | Nov.28 | ||||||
| Room Temp |
73 | 73 | ||||||||||
| knead, “work” type |
blade | blade | rest | blade | blade | |||||||
| “work” time (minutes) |
~1 | <1 | <1 | 2 | ||||||||
| knead, “work” type |
stand | stand | ||||||||||
| “work” time (minutes) |
2 | 3 | ||||||||||
| actual post knead temp data is above, but needs ordering |
93.5 | 78.2 | 69.8 | 77.1 | ||||||||
| Work steps completed Clock reads | 10:00AM | 12:00PM | 12:30PM | 9:15PM | 11:50AM | |||||||
| rise & temp data |
4 | 6 | hours | rise | F deg. | |||||||
| 1:30PM | 10:15PM | 1:00 | 0 | 70.3 | swelling | |||||||
| 2:30PM | 11:15PM | 2:00 | 0 | 62.5 | doubled | |||||||
| Notes: first ferment rise is |
3:30PM | 12:15AM | 3:00 | 1/4″ | flip | |||||||
| doubled at about 1 1/3 inches |
4:30PM | 1:15AM | 4:00 | 3/4″ | ||||||||
| 5:30PM | 2:15AM | 5:00 | ? | |||||||||
| 6:30PM | 3:15AM | 6:00 | x.2+(1.75) | |||||||||
| 7:30PM | 4:15AM | 7:00 | 1.75″ | |||||||||
| 8:30PM | 5:15AM | 8:00 | alcohol odor | |||||||||
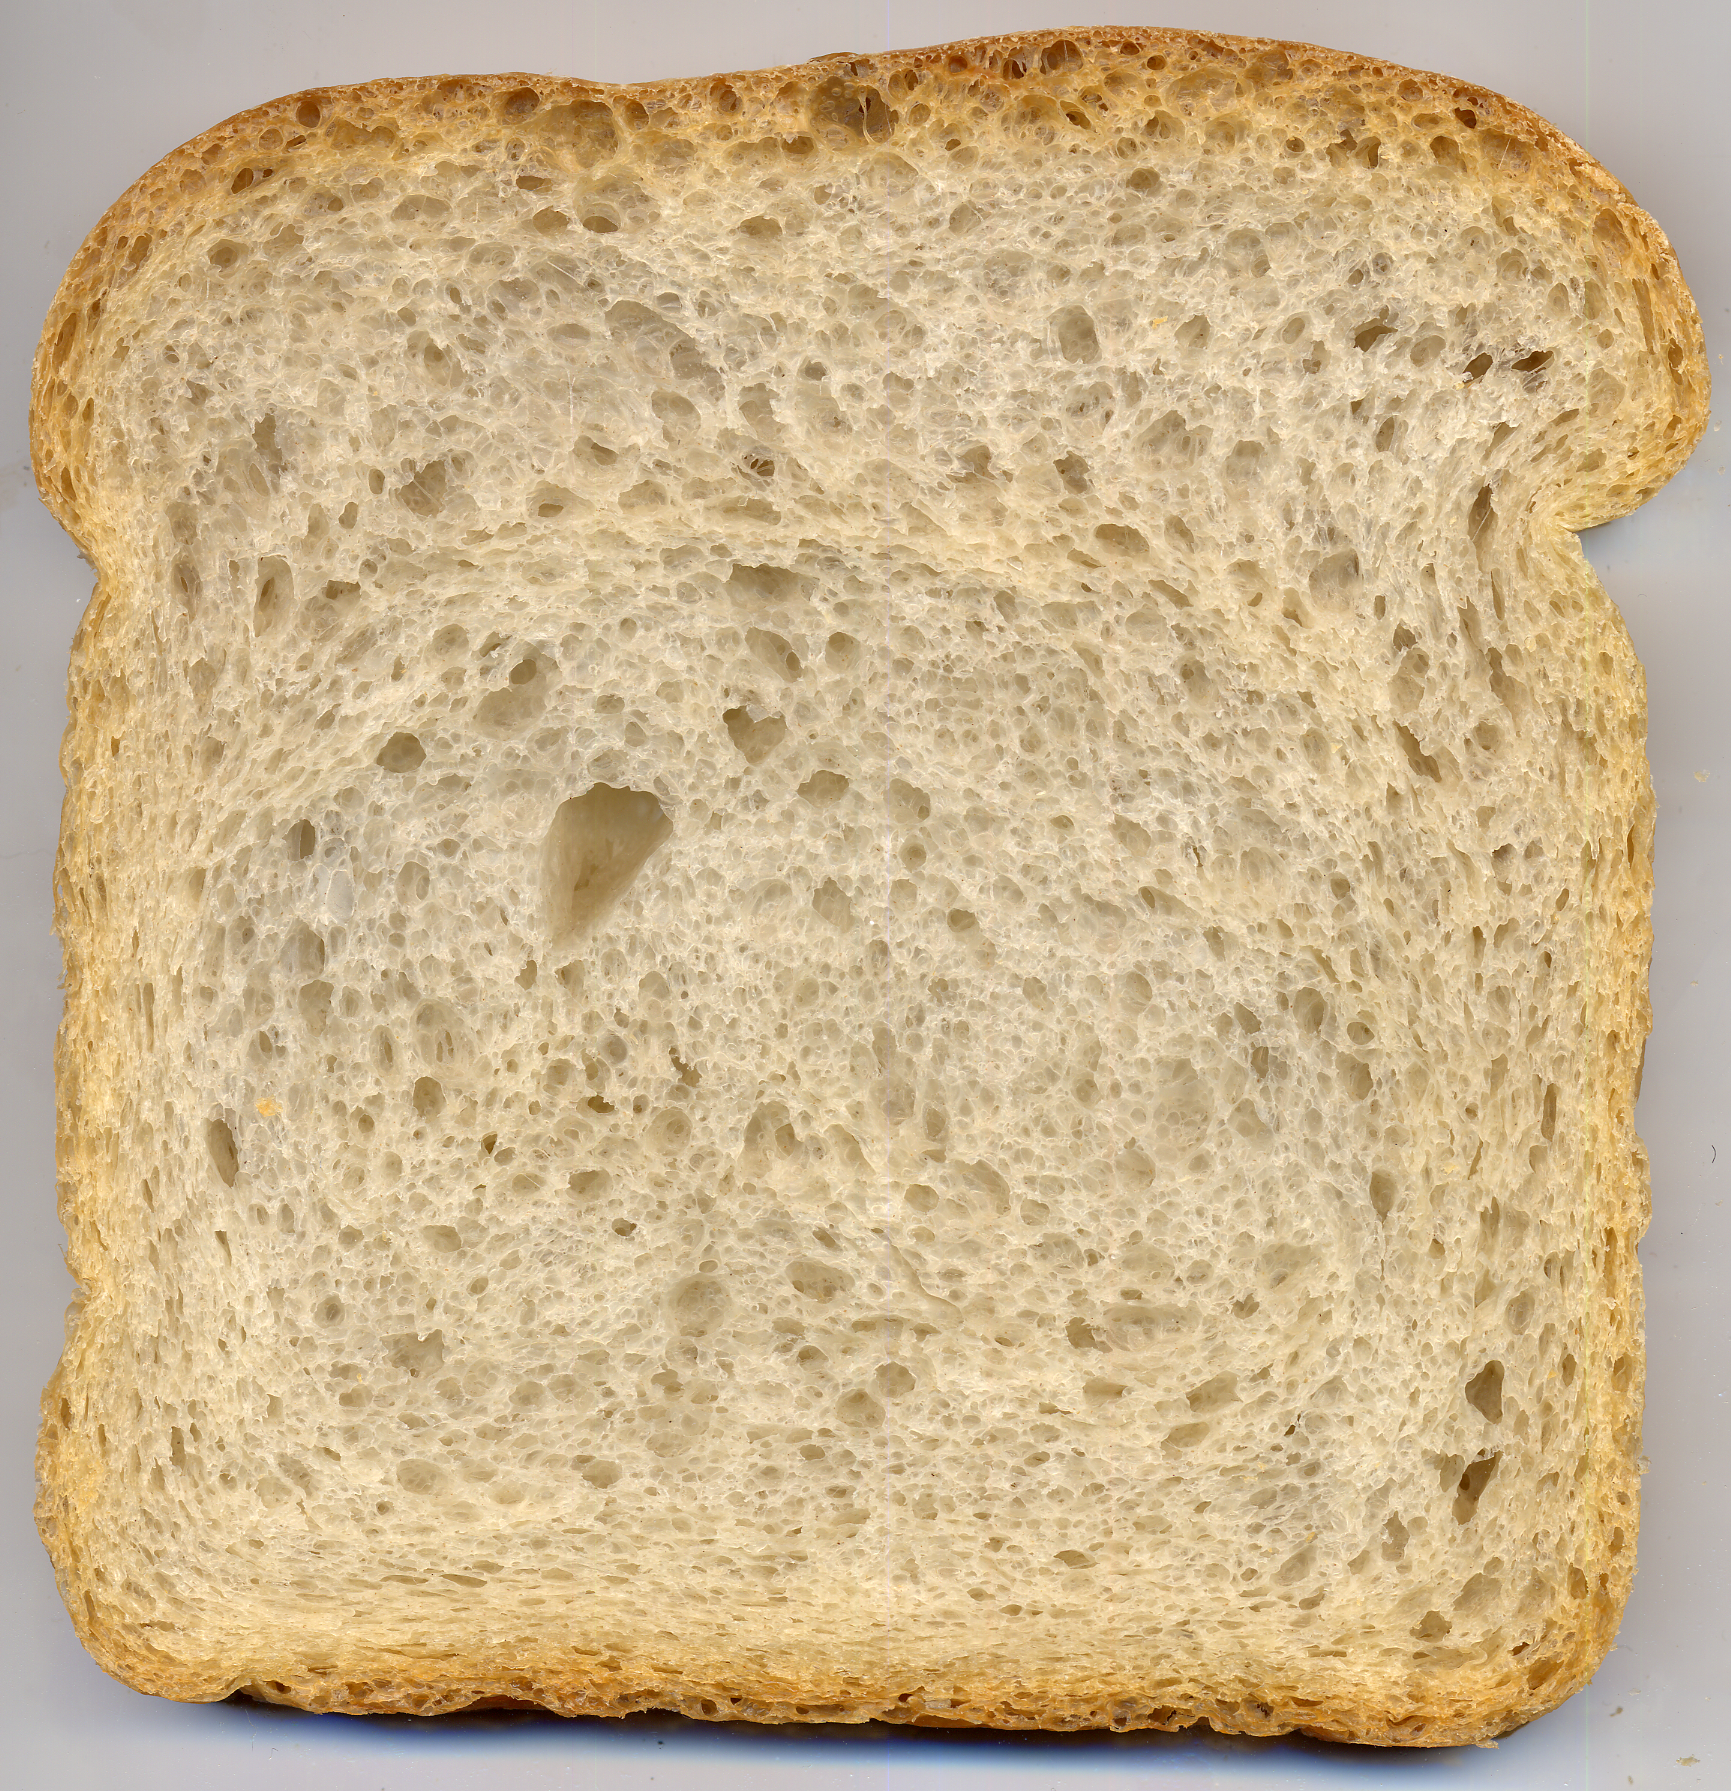
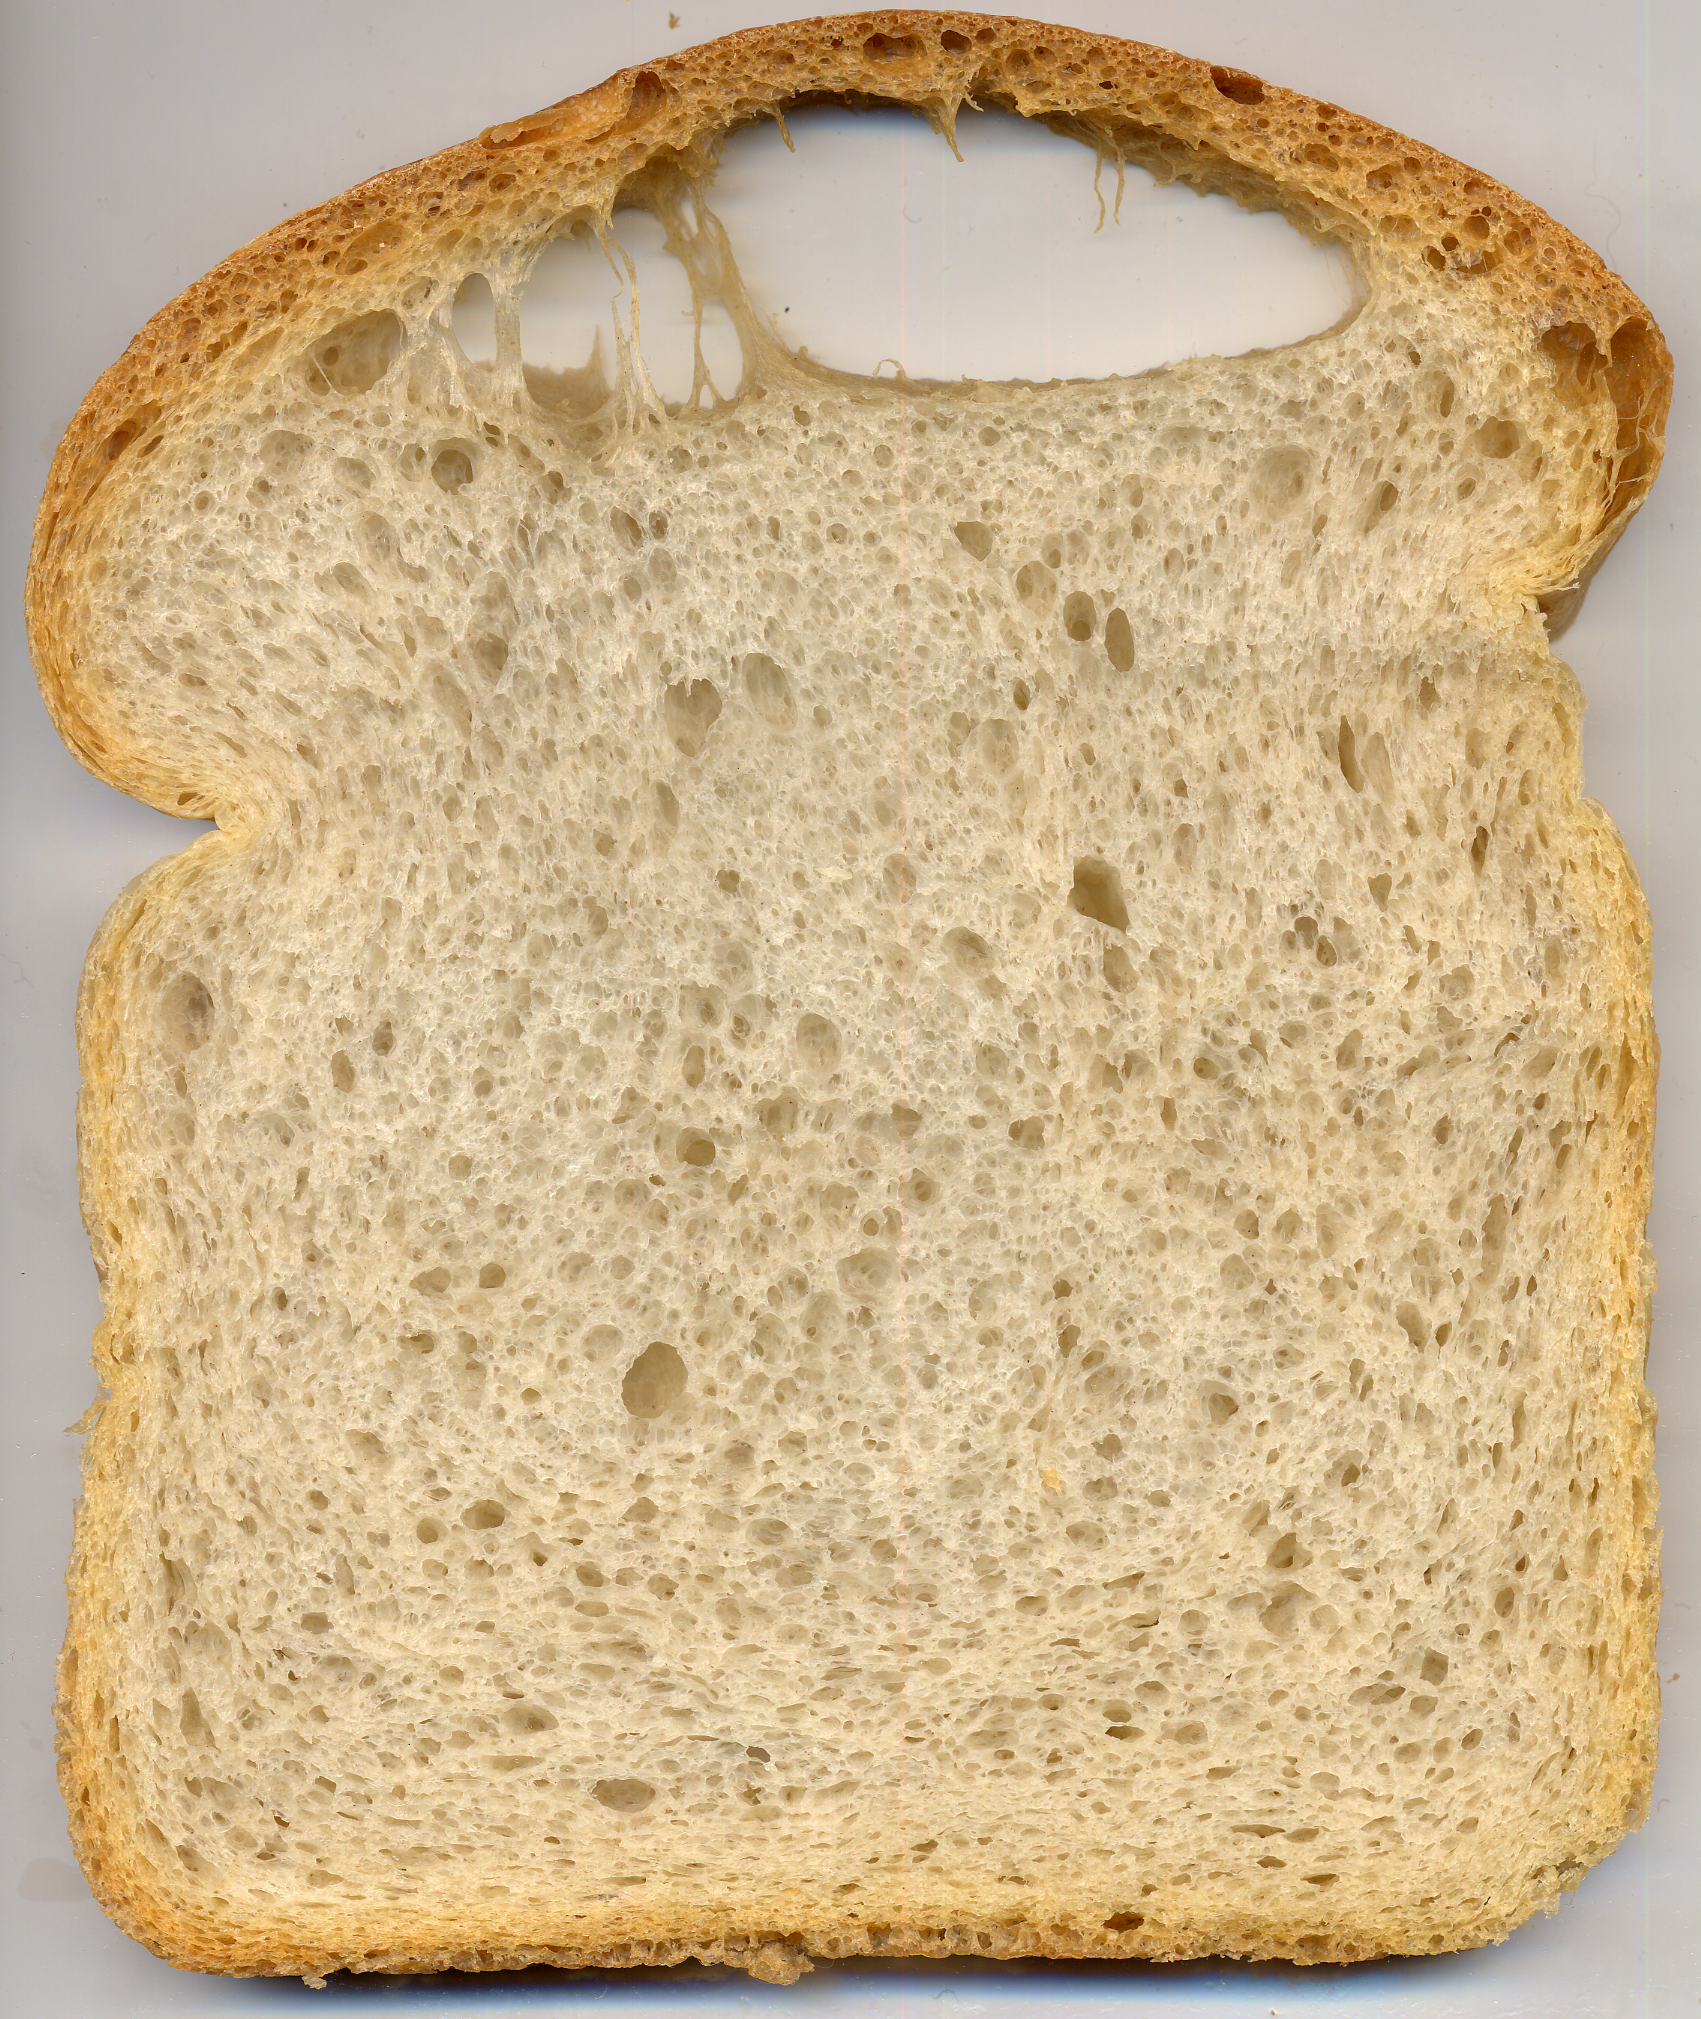
In spite of having little-to-no oven spring, and falling a little during the bake (slightly overfermented), this bread made the crispest toast so far, and the tough crust, after loaf cooling, has disappeared. There are visible differences in the lower and side crusts in the larger photos when zoomed in.
While it’s my intent to make process and ingredient changes to the second and third ferments due to perceived issues, this particular formula is probably worth saving for the outstanding toast. It seems that crisp toast needs at least three bread characteristics: sufficient oil, open crumb, and some residual sugars remaining during the bake.
With respect to both this batch, and the last, the dough had a different feel during panning, perhaps a characterization is more dissolved feeling, certainly a little more translucent, a slightly different shade of color; both batches at this stage were more extensible.
This last batch was more work to make given the 43% hydration of the autolysed dough. The blade attachment of the food processor seems to work well for this situation, trying to mix something much more liquid into what is essentially hard and dense. The prior batch used the overall formula’s hydration during autolyse, and that makes for much easier mixing.
The next batch will have process changes to bulk and final fermentations, to re-adopt a process I used with the straight dough versions, and see how it compares to these last two batches.
2009.Dec.1
I just noticed the bread dough rise times are partly a Fibonacci sequence: 8, 5, 3.
A yeast-related question that has been simmering in the mind is whether the poolish, were it to be added to the next flour batch without any more yeast added, then how long would it take to rise? Restated, if the 8-hour poolish or sponge comprises 20% of the flour total, it’s brought to maturity or somewhat past it, and the other 80% of the autolysed dough is then added to the poolish without any additional yeast added, then how long will that rise take?
March 17, 2010
Even though I haven’t documented it here, I continue making bread each month, still subtly changing processes here and there.
Anyway, either preceding or shortly following that above pictured batch, I tried only adding a very small amount of yeast at the beginning of a poolish-based batch. This inoculation was the only yeast addition, and hence used very little yeast. One issue to be aware of when doing this is you have to note the rise peak at each fermentation rest stage and not go too much beyond the peak before adding more autolysed dough. However, the batch after baking tasted poor. While I’m guessing, it seems that technique perhaps allowed a lacto-bacillus, that may have existed in the dry flour, to start multiplying faster than the the added yeast. It could have been some other mistake, but I don’t see much benefit in trying it again. One other possibility was that I kept the autolysed dough at room temperature during the 2-day process, so I’m going to insure that autolysed dough remains refrigerated until it is used.
—
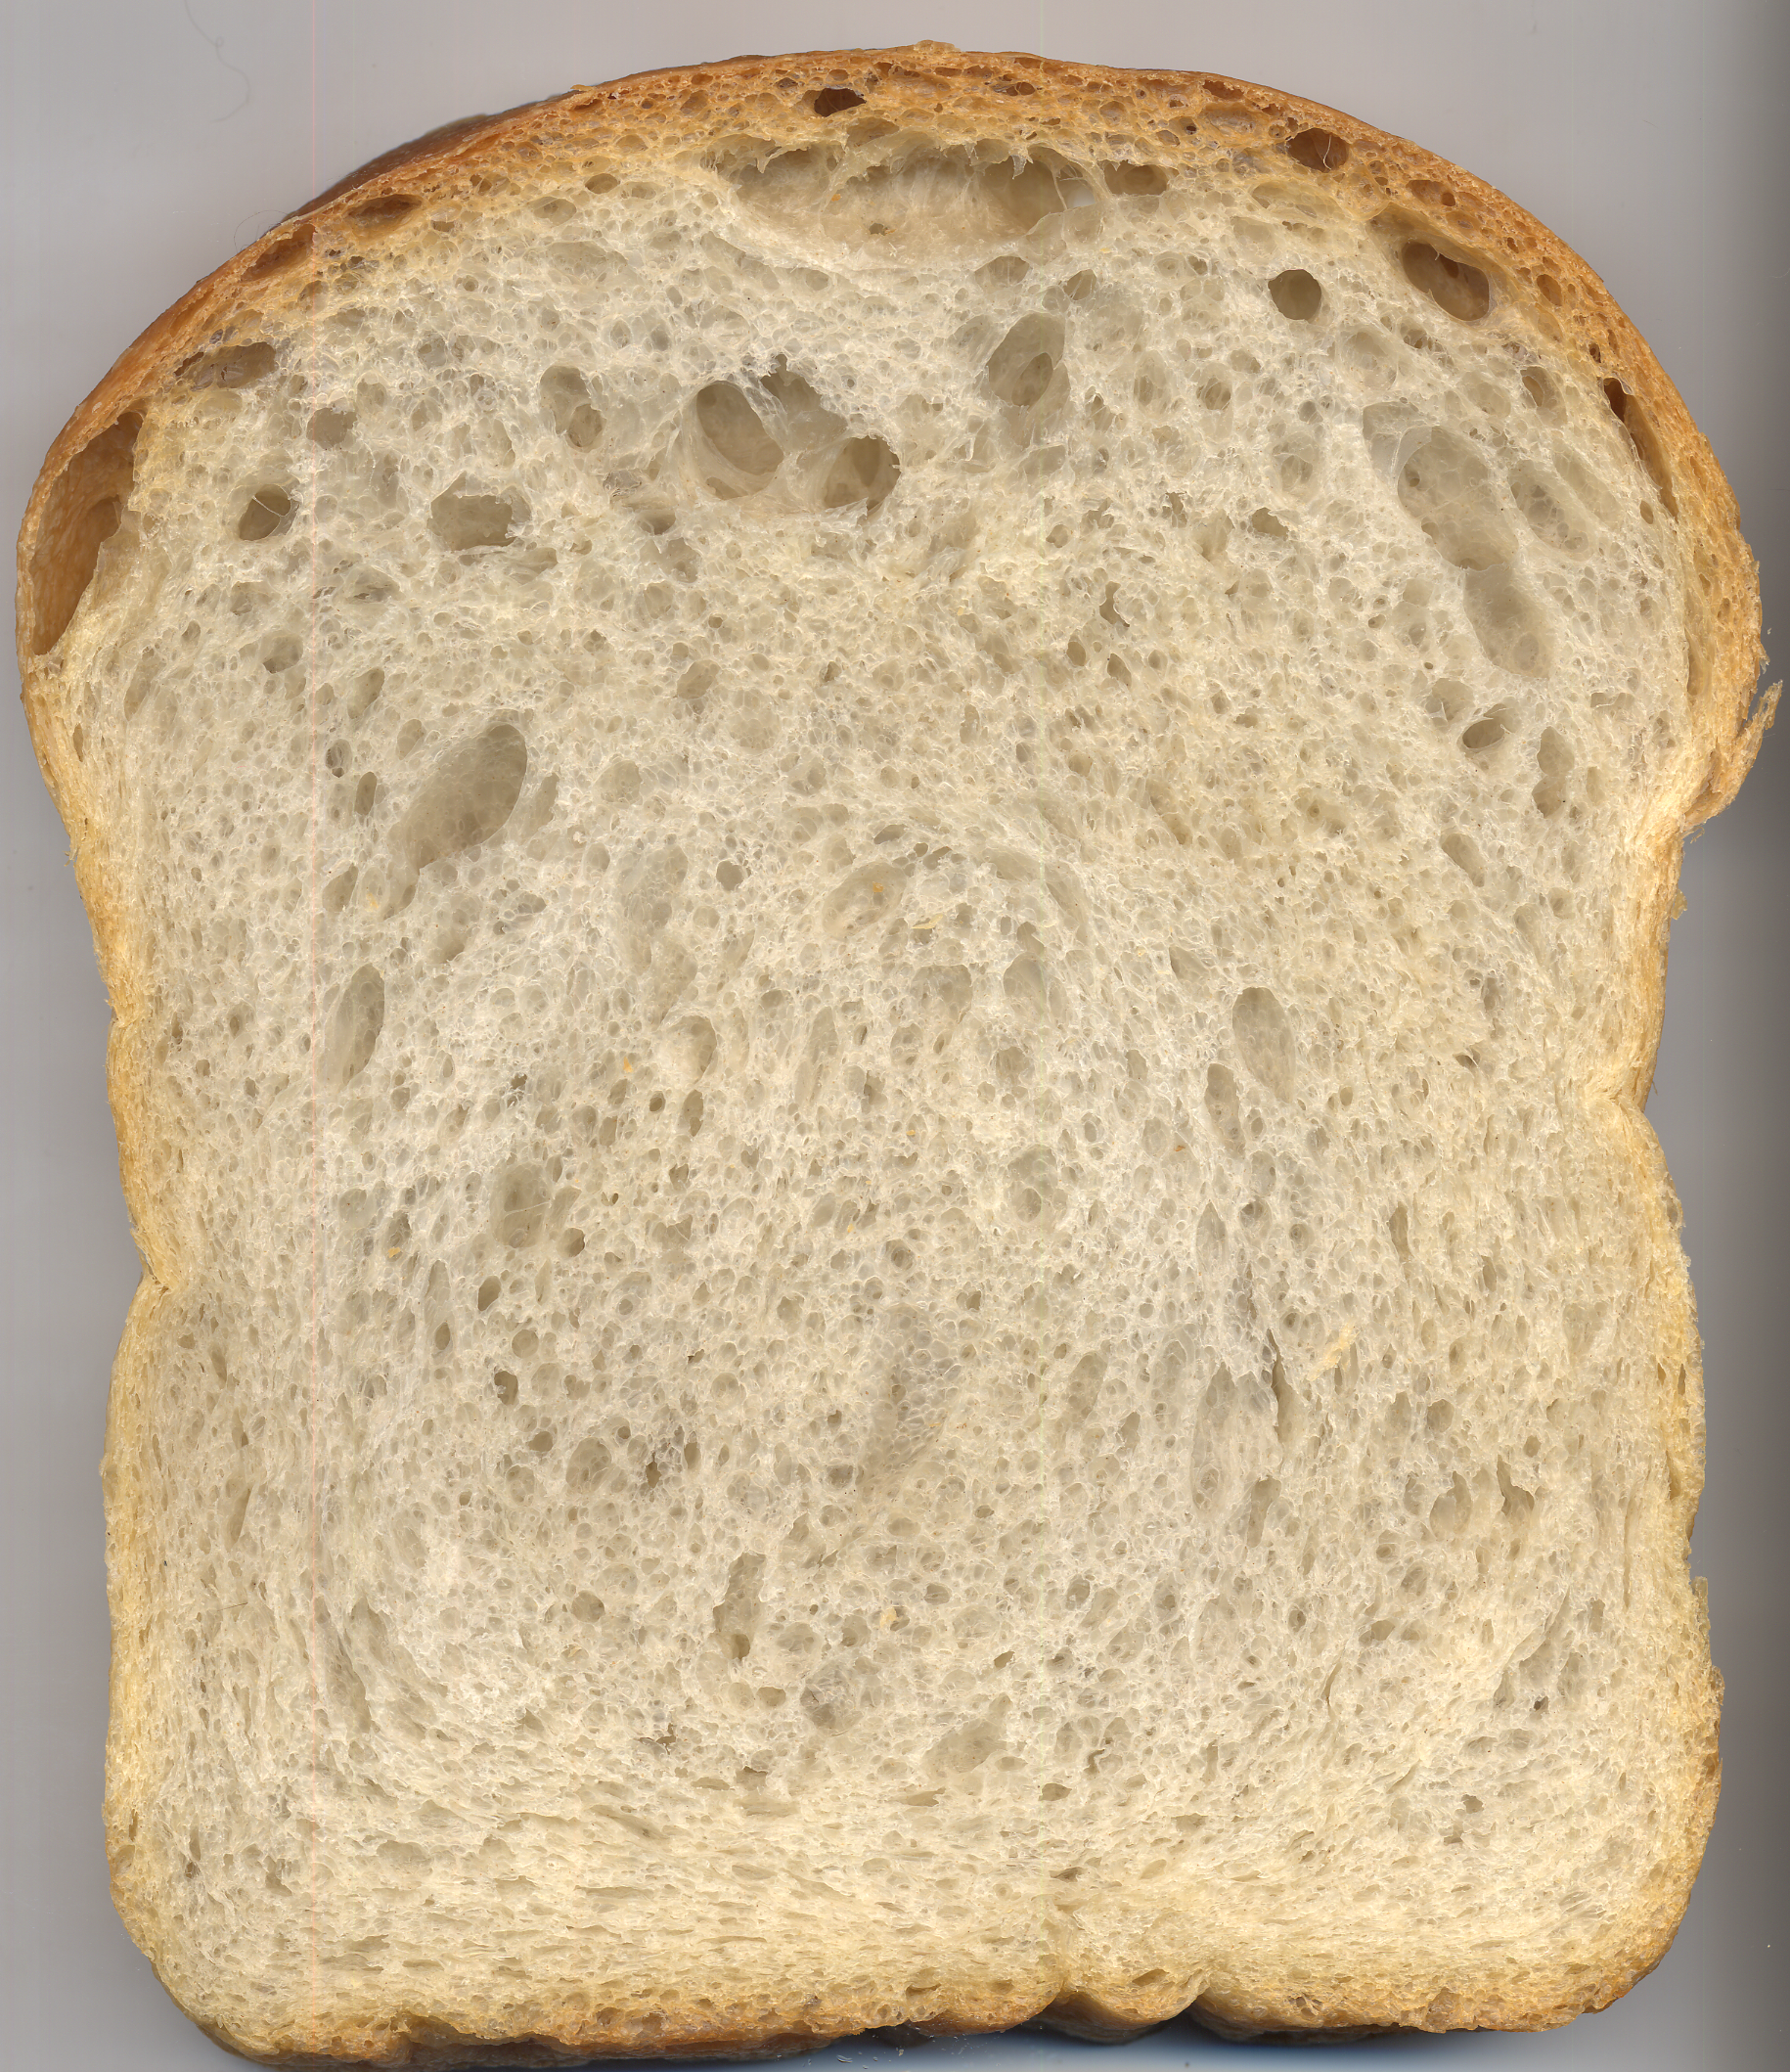
Another batch I missed writing about was last month, and it has the most open crumb yet. However, it caused some stomach discomfort a couple hours after consumption, and I believe I tracked it down to the amount of yeast that was chosen and the point in the process where the final inoculation of Instant Dry Yeast was added. Anyway, here’s a photo of it:
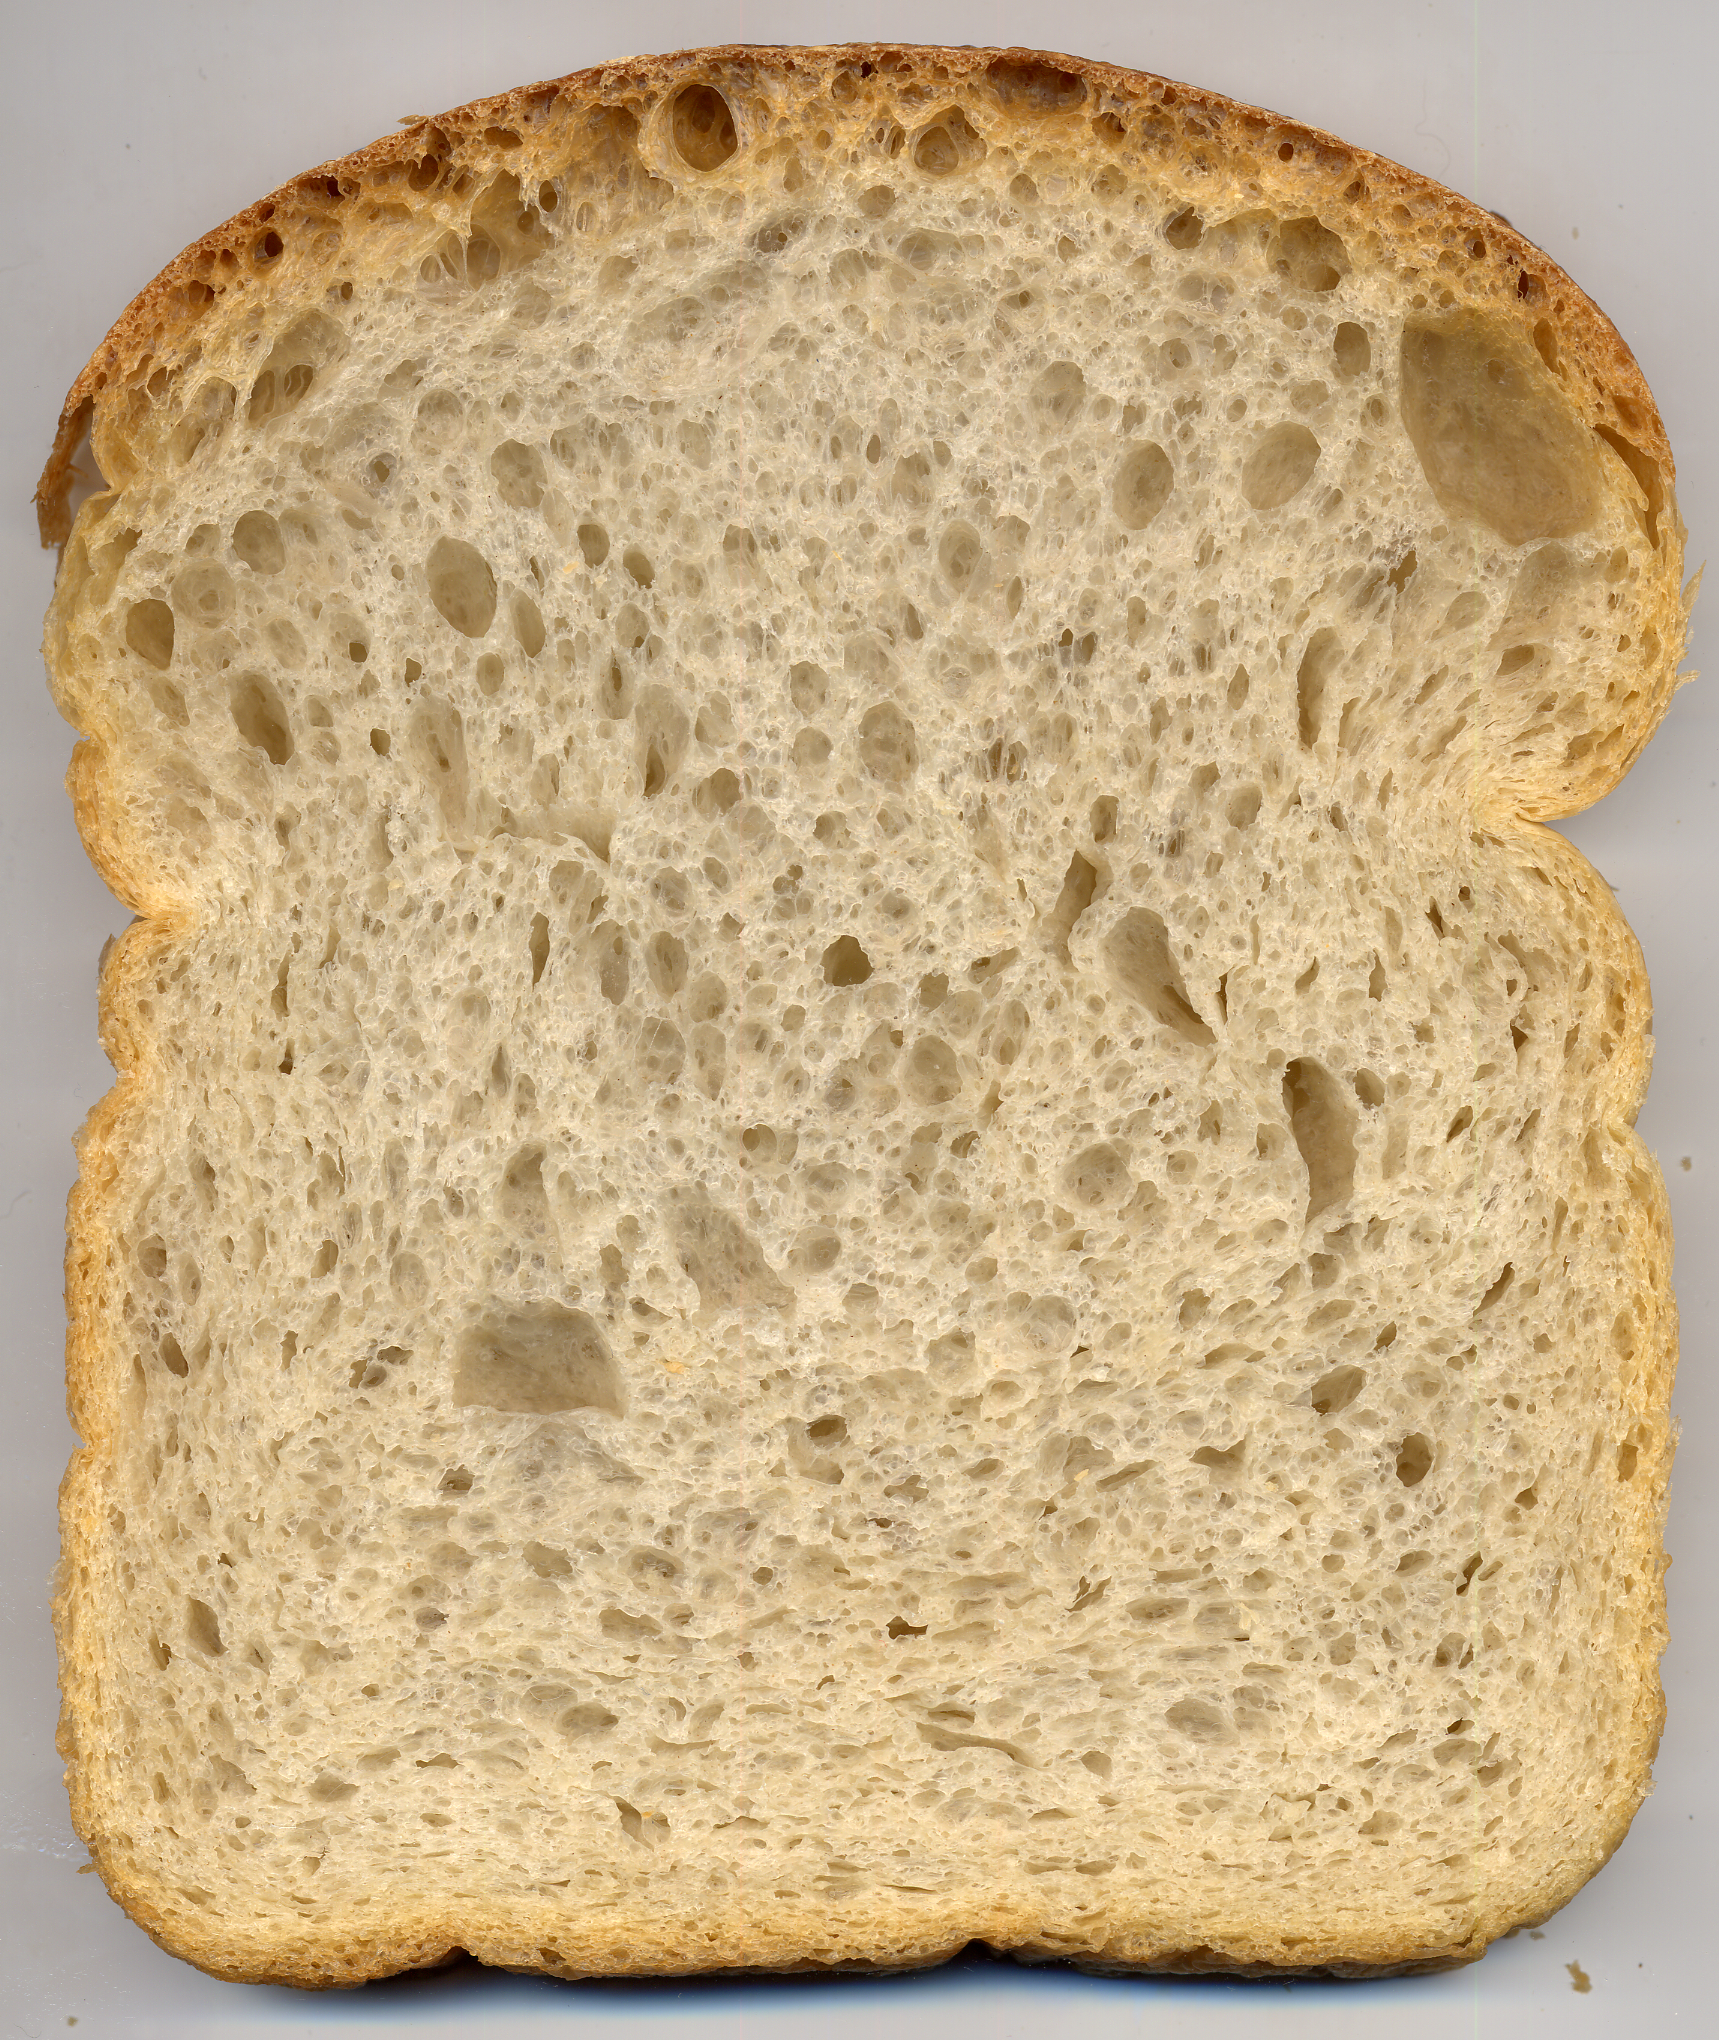
One noticeable feature of a very open crumb is that if you are putting a topping on it, such as toast and jelly or mashed avocado, or something else, perhaps egg salad, the crumb itself seems to hold more topping when scraped with a flat utensil, like a butter knife. The larger crumb holes simply hold more.
—
This is the most current batch that I just completed, I wasn’t trying for quite as large a crumb hole as the prior, as I thought it was getting a little large for my purposes. The formula.
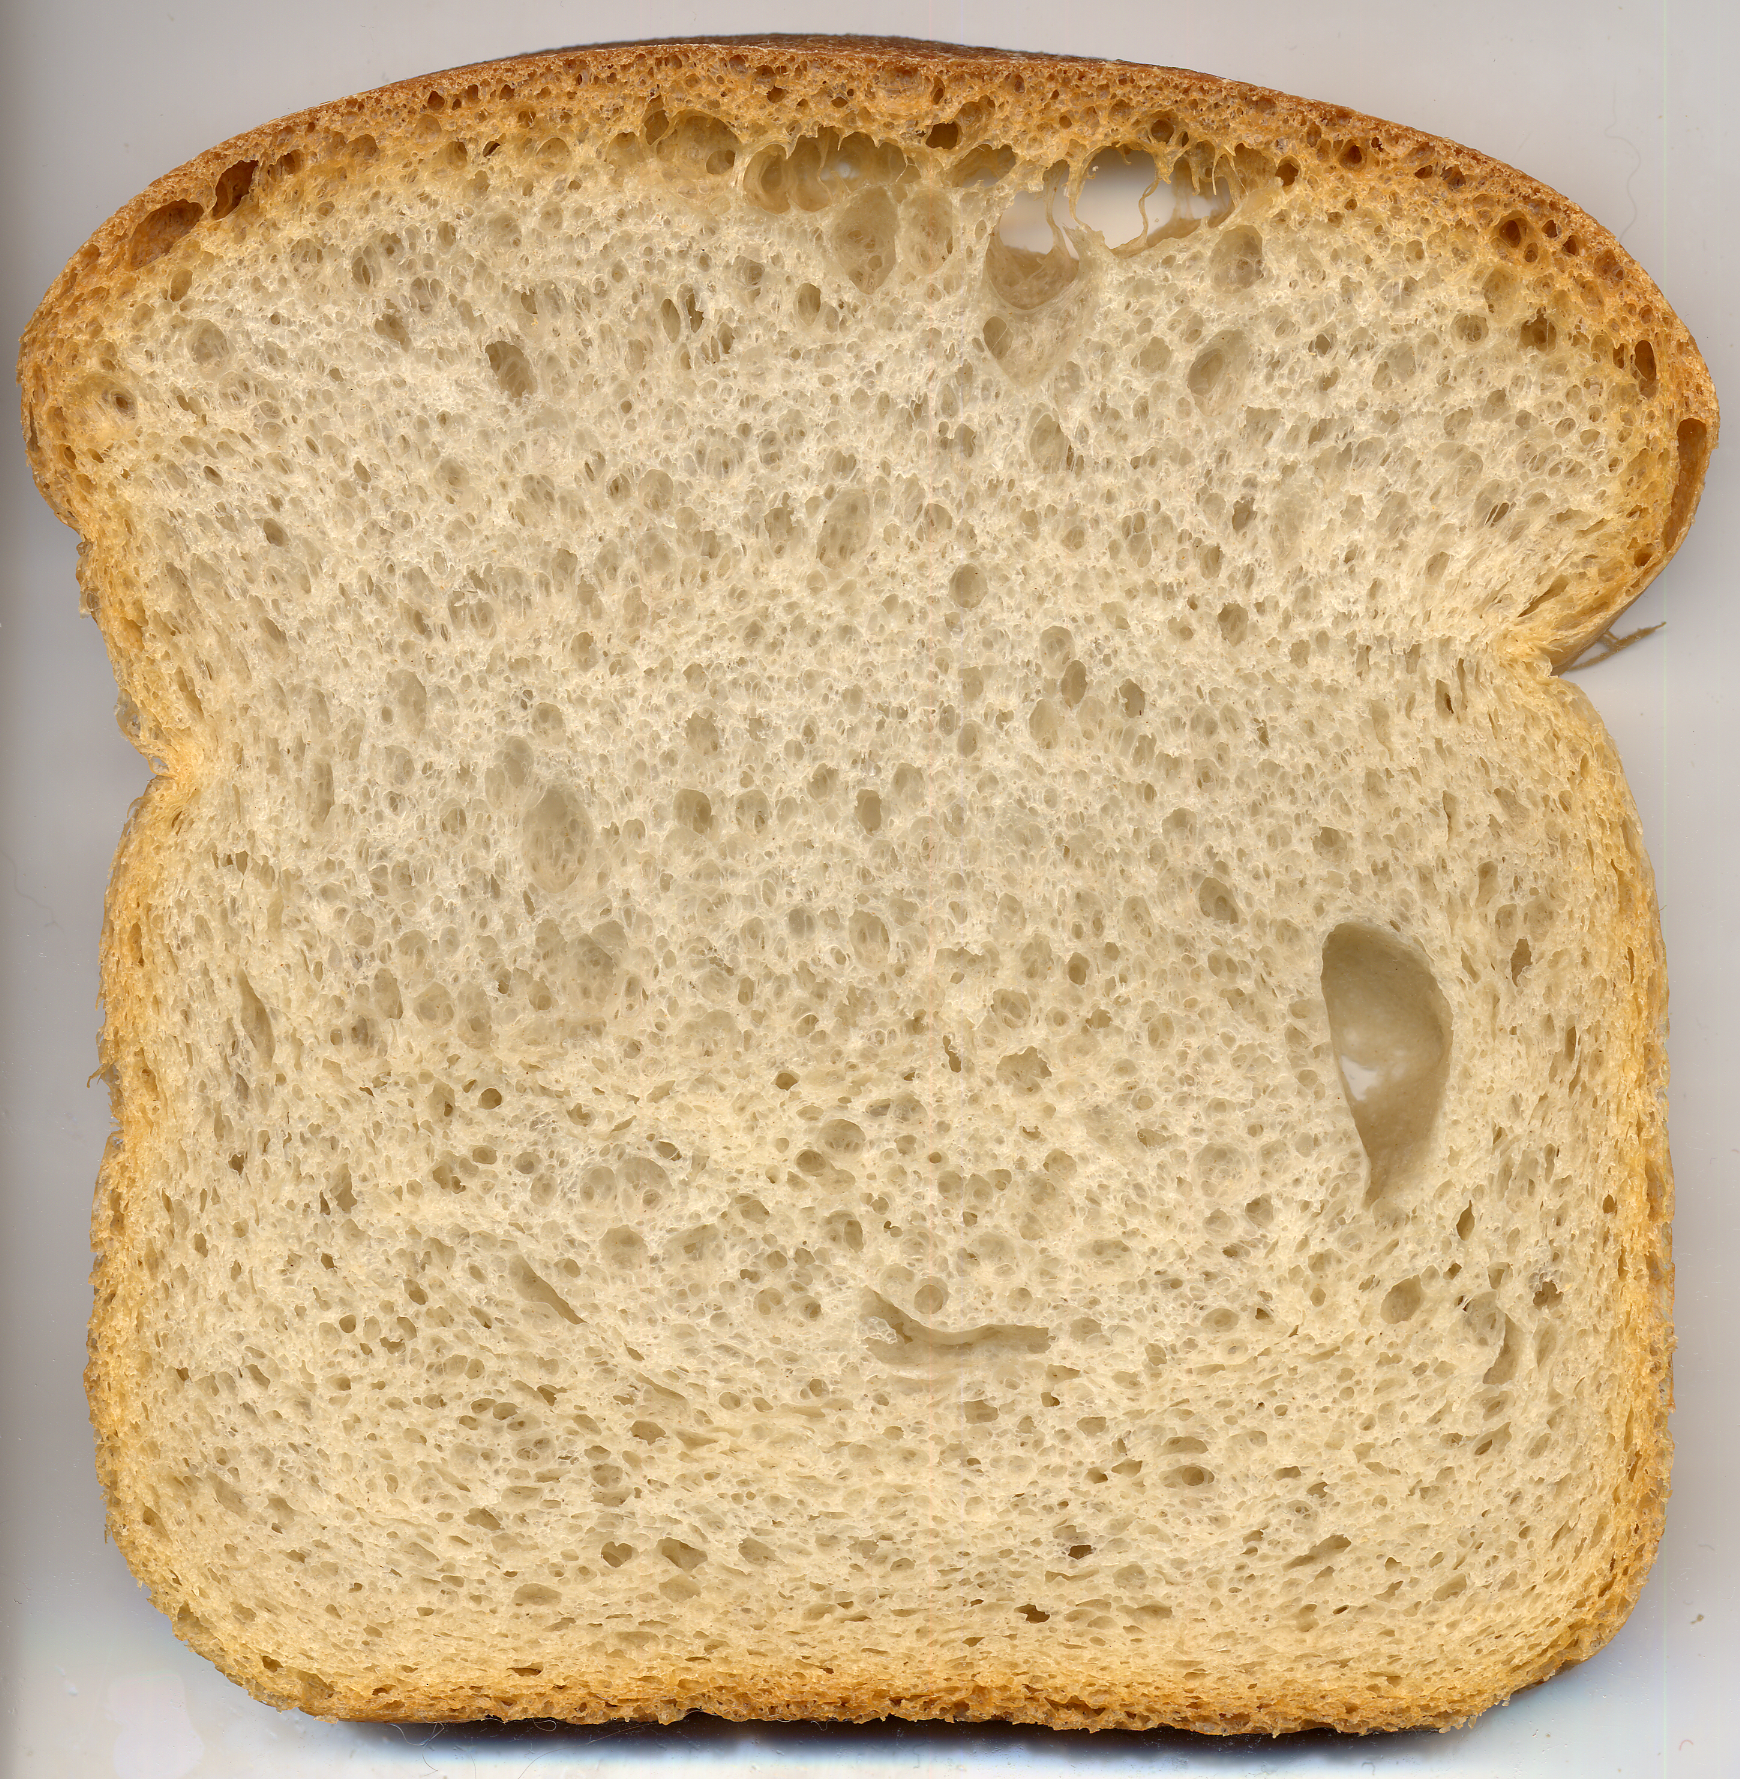
It’s reasonably obvious when making these longer fermentation doughs with a strictly defined autolyse period that the extensibility of the dough increases, making it much easier to shape and pan. Thus, these techniques should be good for pizza crusts, which need to be stretched quite thin. However, this particular process with a poolish combined with a low-moisture biga (~43.5% added water) is quite difficult to mix together without using a blade mixer, and even with one it takes some extra mixing effort which would be nice to eliminate.
The odor of the dough after mixing the two parallel fermentations together, for bulk fermentation, was deep and complex, quite pleasing, with a distinctive alcohol odor. These longer fermentation periods also seem to result in a darker crust after baking versus straight doughs, perhaps because of more enzyme-created dextrins, and the flour is simply better dissolved.
With my next batch, I’ll reduce the poolish from 20% to 10% of the total flour weight, that will allow increased hydration of the remaining autolysed dough, from 43% to about 48% (baker’s percent) added water content, which will make it softer, and hopefully easier to knead, mix and fold at various stages. I’ll also reserve some percentage of the autolysed dough to be added first at the bulk fermentation stage, essentially providing some fresh broken starches to the dough. My understanding is that the above pictured slice is baked from 100% “simulated old dough,” (sans added salt) Next on the plan is to reduced the 100% figure to 90%, reserving 10% of the autolysed dough for later incorporation at the work period directly preceding bulk fermentation. This may help with some of the lack-of-oven-spring issues.
This last batch was baked using the same procedures that for so long resulted in 203F internal bread temperature when removed from oven, but this time 207F was the recorded temperature. I believe this is due having changed to a Taylor 9842 waterproof digital thermometer. When I placed it in a pan of boiling water, it registered 212F, whereas the ones I previously tested registered 208F at a similar point. That’s a 4 degree difference, 203 +4 = 207. This thermometer seems to also have a sensor that’s well isolated to the tip, and it’s faster reading than others I’ve used.
—
2010.Mar.22
I had to make another couple loaves sooner than expected, so I made the process changes I wanted to try:
This particular “flying crust” comprised slightly more than half the loaf’s length, and unlike the scalded-flour addition several months ago (dated: 2009.Sep.13, in “part 2“), this type of crust happened with both baked loaves, so perhaps the technique is a little more reliable than the gelatinized flour method (using more of a straight dough process), which only created such a crust with one of the two loaves.
However, there was some, 1.25 inches (about normal), oven spring.
—
2010 Apr 10
This primary fermentation was the longest yet, nearly 20 hours. It was supposed to be 16, but at 16 hours the poolish didn’t yet have the odor that I was wanting it to have, so I decided to wait. As a result of the longer fermentation, the yeast amount was scaled back in the primary fermentations, and thus in the base formula total. I also changed the proofing and baking procedure slightly. It was proofed to a lower pan height and at room temperature, but about the same amount of time, 4-hours. The oven was preheated to 550F with steam, and when placing the proofed loaves in the oven to bake, I immediately reduced the temperature thermostat to 300F, which means that for some period of time, the burners would not automatically turn on until the oven temperature had cooled down. The steam was applied for the first 30 minutes of baking, and just this heat source alone seemed to keep the oven around 325-350F, so this seems to mean the baking bread didn’t receive any strong convection of dry and hot air from the burners until after the steam was turned off. There is no vent control on this oven, it is always open. One last formula change was the use of 1% scalded flour, all of it was added to the poolish at the beginning of fermentation. The scalded flour may have something to do with the whiter color, but it may also be caused by using a different sack of flour. The oven spring on this batch was greater than expected, approaching 3 inches. I noted the barometric pressure was a bit lower than typical, I’m guessing this could explain a higher rise, as I’d think it was similar to being at a higher elevation.
While it may have just been bad timing, this batch broke the steel planetary shaft on the consumer-grade stand mixer I’ve been using. It just seems to have twisted itself into two pieces! At the time I was kneading about one loaf’s dough (I do them serially as batches). I had read these machines were considered of a light duty for bread-dough use. Fortunately, the shaft is available as a replacement part! I did a bunch more hand kneading on this batch as a result. Maybe that’s why the oven spring was better.
2010.Apr.13
Adding the scalded flour to the 1st Ferment may have inhibited its yeast growth a small amount, perhaps due to some kind of osmotic-pressure change.
2010.Oct.9
It’s been a long time since I updated my continuing travails with self-teaching bread production processes. I’ve noticed that using scalded flour adds a reddish tint to the crust, and that 300% water (% of flour weight) seems to result in a thick, yet still viscous, scalded flour paste.
Recently I was reading Breadcraft, by John R. Irons (appears to have first been published in 1936), and found this little snippet that suggests a deeper technique, or another step added, to manipulate scalded flour:
A good method is to reduce 2 ½ lbs. of wheaten flour to a paste with cold water, then gelatinise the paste with boiling water. Allow this to cool to about 120 deg. F., and then add the malt product. In a very short time—only seconds if the malt is very highly diastatic—the paste will be converted into a thin liquid resembling in appearance coloured water, which should be added to the dough-mix with the yeast liquor. This thin liquid is maltose sugar, and immediately provides an abundance of yeast food to ensure quicker yeast action. The method, in addition, affords a safe guide as to the value of the malt product used. A highly diastatic malt will reduce the gelatinised paste to liquid maltose in a very short time; a low degree of diastase will fail entirely to show a conversion.
If the above technique works as stated, it would seem to be a great way to test the diastatic power of a malted wheat or barley flour, and perhaps to confirm that dry or liquid malt extracts have little diastatic power. Many old Vienna bread recipes, unfortunately, do not seem to distinguish malted flour from malt extracts, either dry or liquid, referring to any one of the three with the single term, “malt.”
I read that particular work with a heavy dose of skepticism, much of it is devoted to fast straight dough processes (which were popular at the time), whereas it seems more likely to me that old Vienna breads (circa 1867 or ± thereabouts) likely used slower (longer), cooler rising processes to achieve the desired result.
2010 Oct 11
I want to point to a great online PDF thesis by an Md. Asaduzzaman regarding mathematical modeling of yeast growth curves. I’m sorry that I’m not younger, I might actually try to follow and understand it, but at this point, I’m happy enough to have some curves that are sufficient for picking fermentation times anywhere between 2-16 hours. I have looked extensively for this math modeling information before, and wasn’t, during the searches, able to find it. Today was the lucky day!
One aspect of his 3 divisions, Lag Phase, Exponential Growth, and Stationary Phase does seem to be missing a fourth drop or dieoff point, which is explained here. My understanding, now after a year or two studying this is that the dropoff is at least somewhat critical in pre-ferments when the desired end product is increased dough extensibility (really important for pizza dough!). Apparently, the idea is that once the yeasts have exhausted their food and die, they release some enzymes that hasten the breakdown of dough elements, perhaps including proteolytic enzymes (because extensibility versus elasticity is mostly a function of the gliadin and glutenin matrix). That’s why I want a small percentage preferment to go well into an overfermentation state.
I was at one of the big yeast manufacturer’s sites the other day, and noticed that there’s a product that seems to be primarily dead yeast that’s sold as a dough conditioner. That would certainly cut a bit of time off longer pre-ferment processes, if one could add it as a powder similar to a dry active yeast in order to achieve increased extensibility in strong flours (high gluten), but whether it results in an equivalent baked bread or pizza crust versus the pre-ferment is unknown by me. Being limited to what’s readily available at retail grocers is either a blessing or a curse, I suppose depending upon one’s point of view. Curiously, I was looking for the link, and it appears the manufacturer has removed a bunch of the pages, I believe the two products were called Fermaid T & Fermaid P. Perhaps those product pages are gone for good, why we can only wonder. The products don’t seem to be available for retail sale, but I haven’t spent much time looking.