This bathroom remodel is a project I recently completed. Generally, at least in recent years, I don’t do much of this type of work. Moving 60 miles away from my friends who’d occasionally toss me a bone and into a town where no one knew me slowed these types of projects considerably, and forced me to find other types of activities to occupy my days. Still, I occasionally take on a project like this for its diversion from my normal routine. I love the exercise, getting outside, and building something from time to time. It’s a welcome respite from desk-jockeying a computer, staring myopically at a screen.
The photos are not a complete documentation of every step, they were simply taken by me at points in the project when I thought about taking pictures.
The house is estimated to have been built in the second quarter of the 20th century, perhaps a little later. The interior walls are plaster on button board. Therefore, the old iron and lead-coupled sewer pipes were estimated to have been about 50 or so years old, and small sections had been replaced around the outside of the house over the last 5 years because they were rusting through. We decided that the under slab pipes were likely in similar condition, and remodeling without replacing those pipes would not result in a long-lasting remodel.
When we cut the slab and dug up those pipes, we found they were disintegrating and leaking, just as those outside had been. The earth around the pipes smelled like a sewer, at least until the dirt dried.
If you click on any of the photos, you’ll be taken to a larger, higher resolution image.
1. This first photo is the main trench we dug in the room adjoining the bathroom, this is where the sewer enters or exits the home. You can see a little sunlight at the top center of the photo, under the cut slab. The door to the left is the bathroom. I will hereafter refer to this room as the “adjoining” room.

2. In this photo, we’ve stepped through the doorway seen in the previous photo, and into the bathroom. This is where the toilet was; the wall needed to be cut open to access the vertical 4″ iron vent in order to remove the old drain pipe. We didn’t remove most of the vent in the wall, it was not rusted on the outside as those that were in the ground had been. A little of this wall opening can be seen in the previous photo, as well. A rubber coupler will be used to join the iron to the new ABS, as well as a support structure to support the iron vent’s weight from being placed on the new ABS drains.
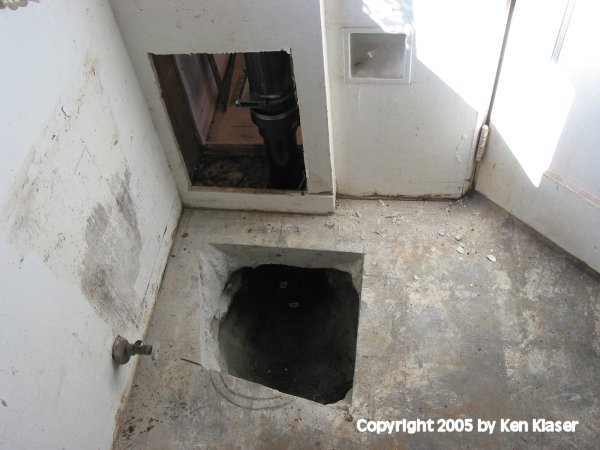
3. Stepping back, and rotating about 50 degrees to the right, we can see where the shower used to be. You can also see through the doorway a portion of the adjoining room’s trench. The back wall of the shower is shared with the closet located on the other side, where a capped clean-out terminated the under-slab drain system.

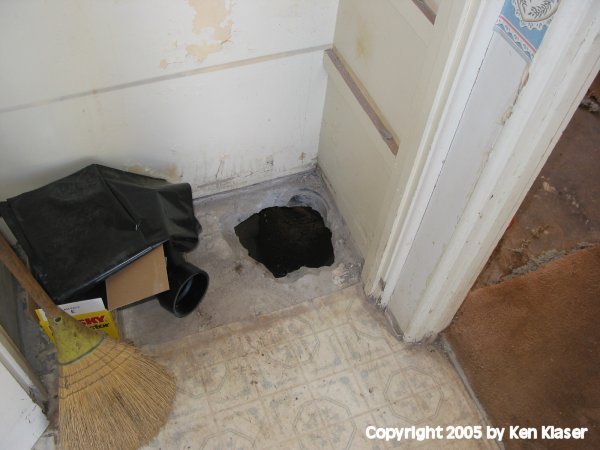
4. This closet is where the end clean-out of the inside sewer pipe was located. The wall in the upper left is the wall shared with the shower. The doorway in the lower right is to the adjoining room where the main trench was dug.
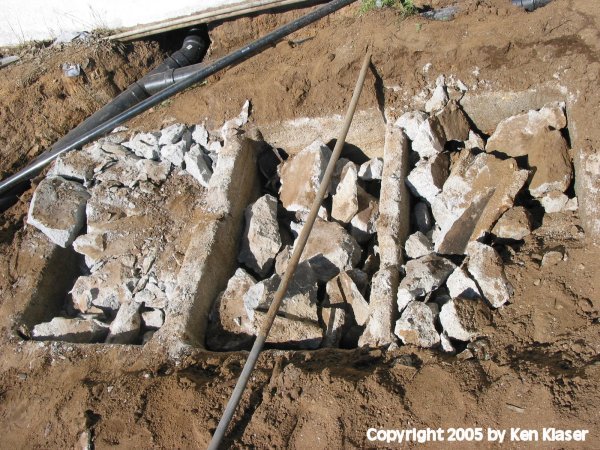
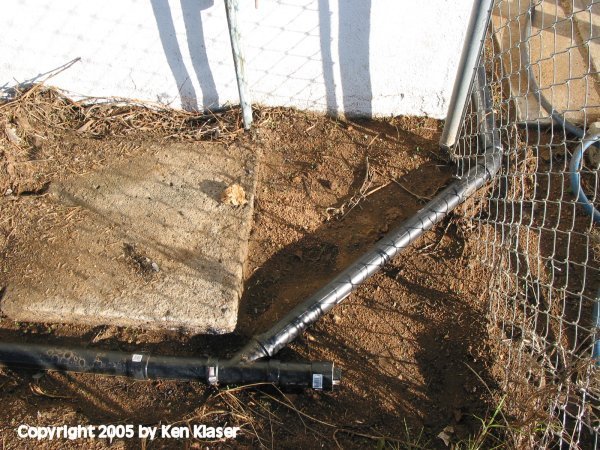
5. Stepping outside, we are looking at the new replaced pipe. On the left is where the sewer goes to the street. We rubber-coupled into the old iron pipe just a few feet to the left of the left edge of this photo, which will make replacing the rest of the remaining iron to the street relatively easy. Here we can see three Ys. The first Y runs at a 45 degree angle towards the house’s foundation, shortly before passing under it, the pipe Ys again, one leg running parallel to the foundation, the other going through the hole seen in the adjoining room photo. The other Y branching off the main and seen in the lower portion of the photo is 2″ pipe, it is the kitchen drain line which had previously been replaced with ABS. To the right of he vertical and open 4″ pipe, is an old septic tank that cannot be easily removed.

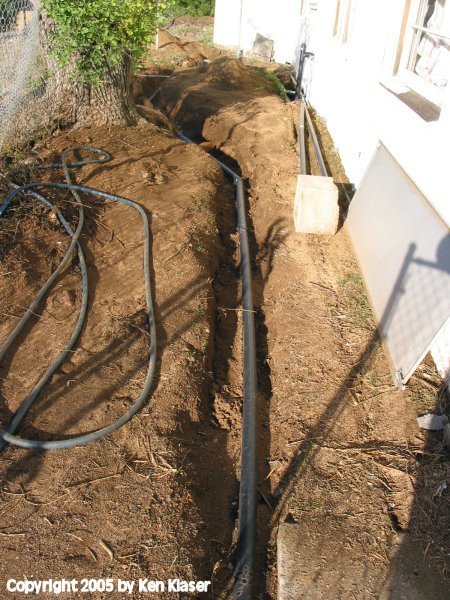
6. More of the kitchen drain line. Even though this pipe had previously been replaced, we found that it hadn’t been leveled properly, and for a distance of about one third its length, it flowed poorly “uphill”, essentially creating a stagnant and smelly “lake” within the pipe. While we didn’t expect this diversion, we re-leveled the pipe so it flowed downhill—drains seem to work best that way—the downhill slope goal was 1/4″ drop per foot of length. The small hill of moved dirt covers an old septic tank, no longer used.

7. Because the top of the 3-section septic tank had 6″ holes in the center of each section of the lid, presenting a stepping hazard to people, we hammered the lid before refilling the ditches and covering the tank with topsoil. It may settle some, but no one will step into a hole and injure themselves. We guess that this septic tank must have been for a previous structure because the tank is elevated to a higher level than the current home’s drain pipes.
8. This is another view of the kitchen drain line, the septic tank is near the top of the photo, past the tree stump, which was also removed while we were working outside.
9. Relative to the previous photo, our perspective is now looking down and rotated 90-degrees to the right; this is the corner of the house where the drain line turns before passing through the outside wall to the kitchen sink. The old septic tank is to the left of this photo.
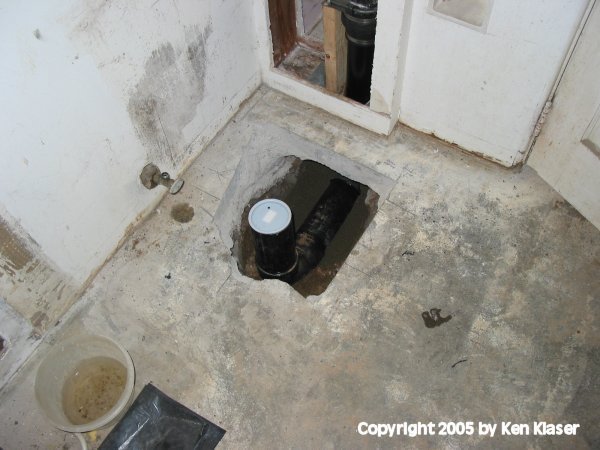
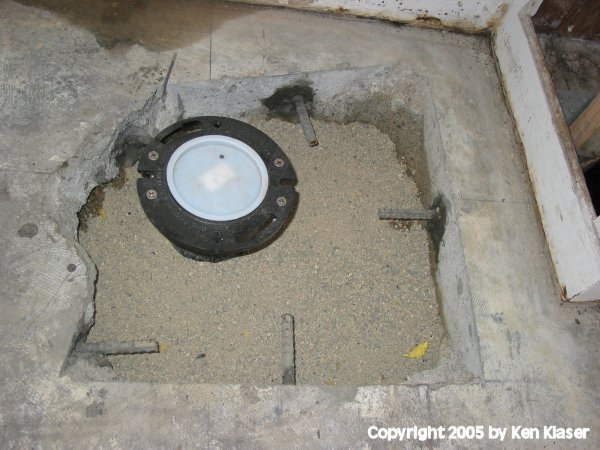
10. Returning back inside, this is a photo of the new toilet drain in position. The “closet flange” hasn’t yet been installed, it’s what the toilet bolts attach to.
11. This is a view of the bathroom sink drain line, the old, leaking valves on the water supply haven’t yet been swapped out. You can also see some no-longer-used galvanized iron water supply lines that originally ran under the slab. Someone had already replaced these with a copper water-piping system than circumnavigates the foundation outside.

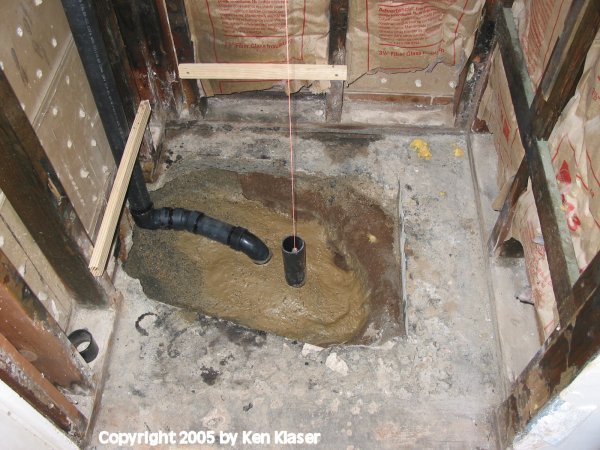
12. We used a plumb line to center the shower drain. Placing the fiberglass shower pan into position, we then centered the plumb line to the center of the pan’s drain hole. Then I carefully lifted the line out of the way, removed the pan, re-placed the plumb line, then placed the shower drain using this old-fashioned method. The plumb line was simply a string with a nut tied to its end. By the time this photo was taken, we’d already begun filling the inside trenches with sand.
13. Here the shower area is filled as high with sand as we intended; you can also see #4 rebar dowels (4/8″ = 1/2″), about 8″ long each, that have been anchored into the old slab to pin the new concrete to the old.
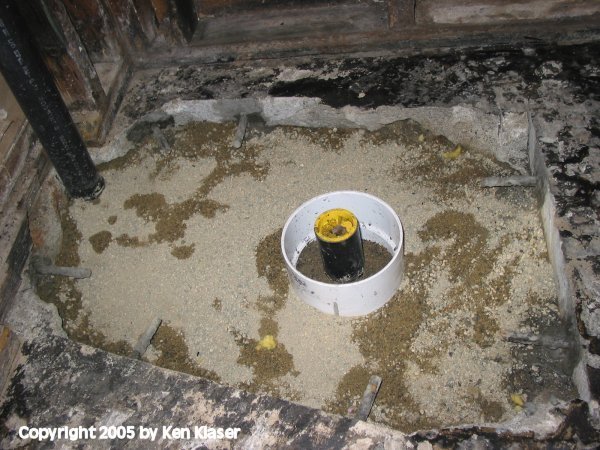
14. We did the same with the toilet, and all other slab cuts, carefully packing the sand by tamping, wetting, then tamping some more. Tunnels from room to room were horizontally tamped. We opted to place the toilet flange on the pipe at this point of the project, typically, this is done after concrete and any flooring is installed.
However, had we done it in that order, we could have only placed a male, instead of female, flange. By using the female closet flange, there is the added opportunity at some time in the future, if someone decides to place another floor over this one, essentially adding height, to add a male flange for additional flange height without needing to break out any concrete and/or perform any pipe work. This probably isn’t likely, and doing it this way is more tedious from a measuring standpoint, as the final height of the floor must be estimated.
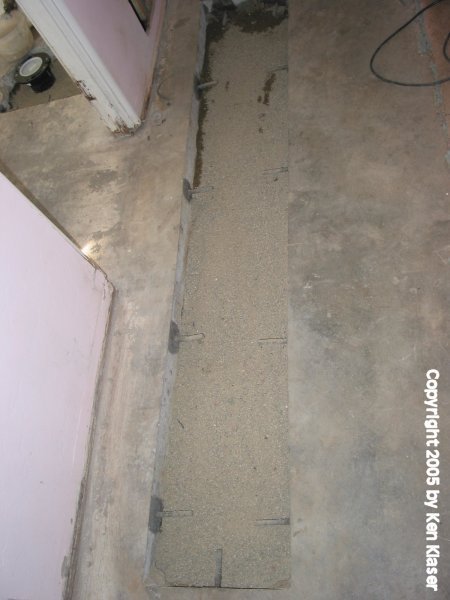
15. The adjoining room’s trench filled with sand, dowel pinned, and ready for concrete.
16. Here the concrete has been poured and leveled. The green wood was a new wall we built to fit the smaller 32″ shower chosen. The old tile shower had been 36″ in width. The reason the wood is green is that it’s been painted with several coats of a product called Termin (or something similar to Termin). This coating was applied to the wood after cutting, but before assembly.
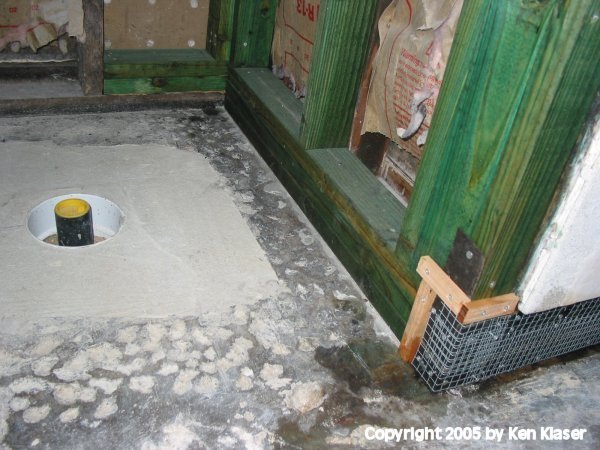
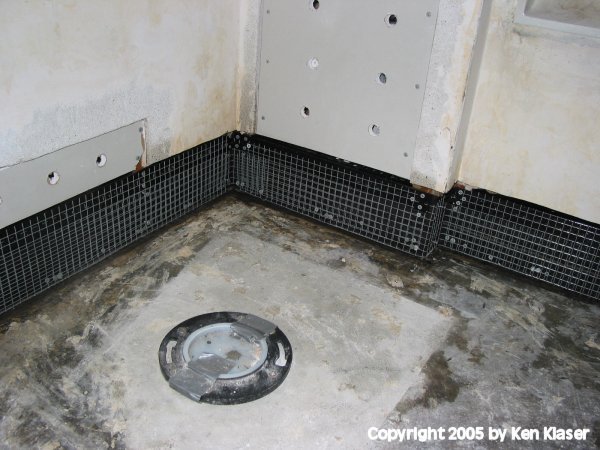
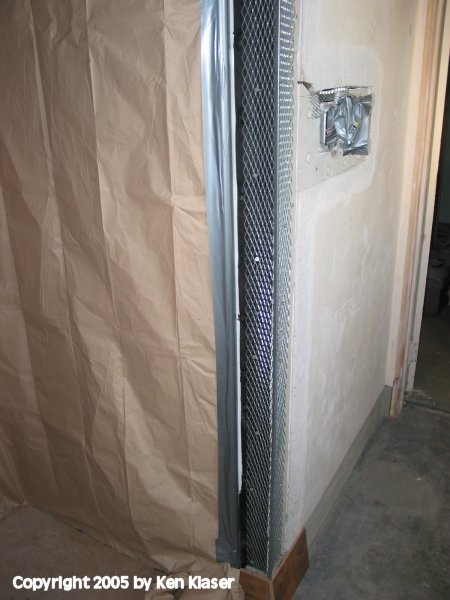
17. Closet Flange installed and concrete poured. You can also see that we’ve removed the plaster and underlying button board from the lower 6″ of the walls. It’s our intent to place porcelain tile cove basing on this lower section of the plaster walls. You can’t see that we placed a notched angel iron, painted with tar, at the top edge of each of the vertical wall studs, to stabilize the top edge of the tile’s underlying mud coat, covered the 6″ strip to the floor with thick roofing felt then galvanized hardware cloth. By removing the button board underlayment, we can inset this tile so its surface is level to the wall surface. You can also see that we’ve added an approximation of what used to be called button board over the holes cut in the wall to access the vents, prepping them to accept plaster using the same method as the original walls. Button board doesn’t seem to be available anymore, and blue board, its replacement, apparently isn’t available locally in the thinness required, 3/8″. We felt it was better to try to reproduce the original plaster walls as closely as possible to help prevent cracking over time, so we perforated 3/8″ drywall ourselves.
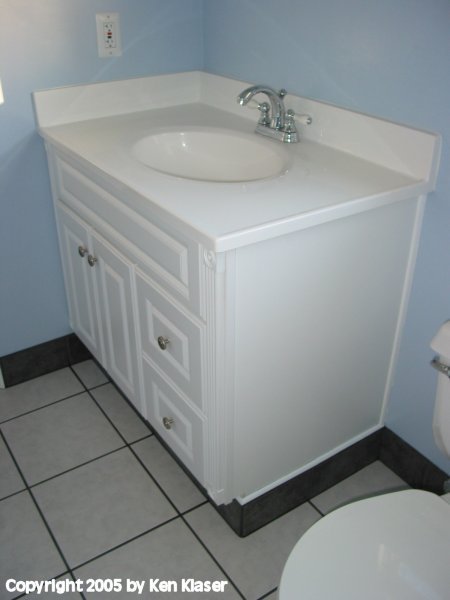
18. Here’s where the sink cabinet will be placed, the new 1/4-turn water supply ball valves have now been installed.

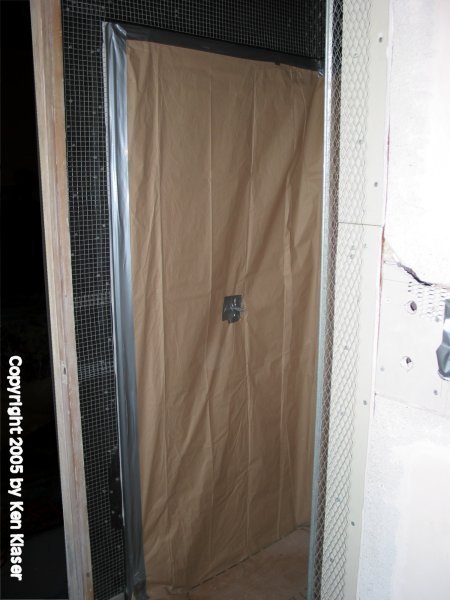
19. The shower has been installed and masked. While I didn’t take a picture of the old shower, it’s ceiling dropped very low, about to the level of the top of the room’s doorjambs. Because of the bend in the shower head pipe and the additional height lost due to the shower head itself, only a short person could shower without stooping forward to lower their head. So we removed that box over the shower, raising the shower-stall height to the same as the rest of the bathroom. It should let a little more light and air in. In this photo, we’ve already placed tar-felt and hardware cloth on the studs with corner reinforcements: the stall is ready to be plastered. We thought this substrate would be more water resistant than plaster over button board for the shower stall itself.

20. The corner bead reinforcement on the shower’s right side.
21. The left side of the shower before plaster.
22. Apparently, I missed taking some photos! Here we jump ahead past the plastering and topcoats, stripping of all the old paint, sanding, and many other painstaking details. We stripped the concrete floor of paint and residues, then chemically etched it. We installed floor tile into polymer-modified thinset, then grouted the 1/4″ tile spacing. Next, we masked the tile and anything else we didn’t want paint drippings on, then painted the walls with an oil-based substrate paint (primer-surfacer) that would stick well to the old marble-dust plaster topcoat. After that primer dried we applied two coats of a good quality latex paint with mildewcide added. The painting took several days because we wanted each thin coat to dry properly before the next.

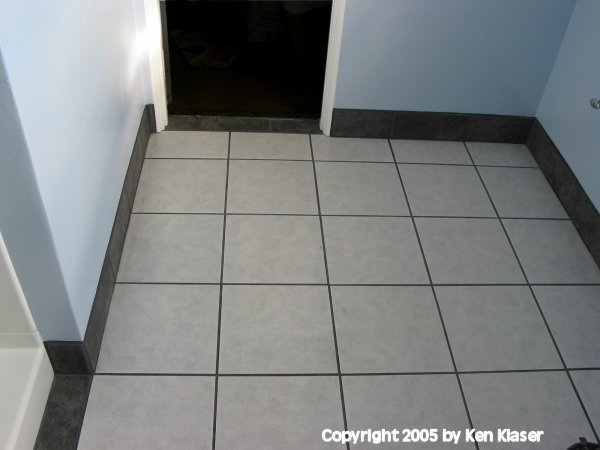
23. We’ve stepped back for a wider view including the toilet’s closet flange.

24. Here we’ve turned our perspective about 35 degrees to the left, facing east.
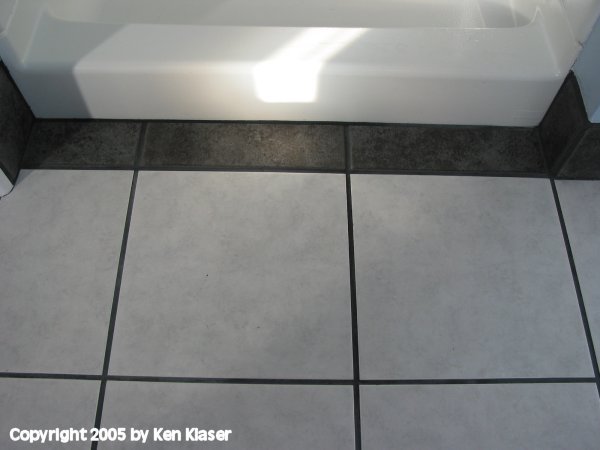
25. Here’s a close-up view of the step into the shower. We decided to put a little of the porcelain tile on the floor here, as a visual clue to “step” into the shower.
26. Stepping back for a wider view.

27. Here I stood where the sink cabinet was to be placed, and had turned the camera 45 degrees to the left for this shot. A small section of the closet flange is visible.
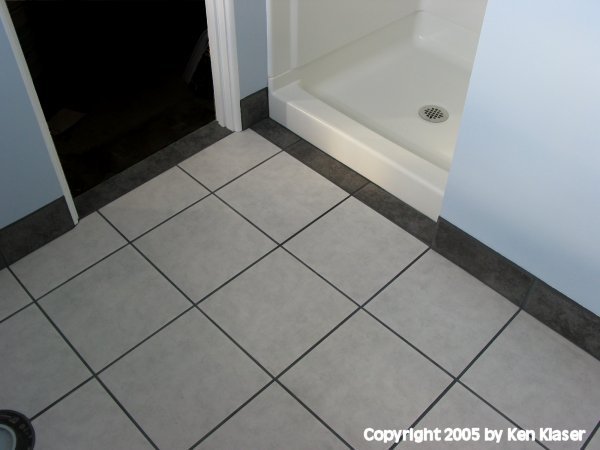
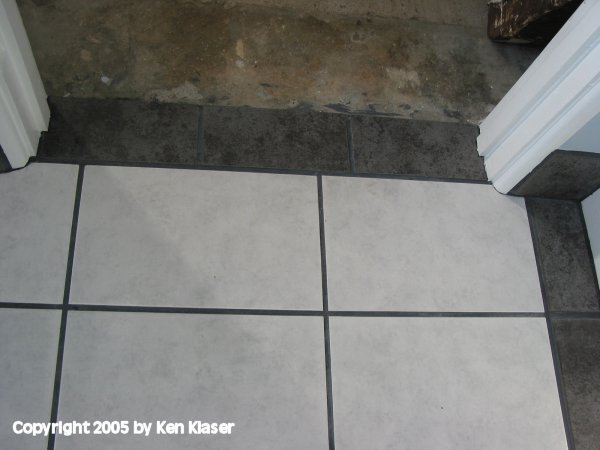
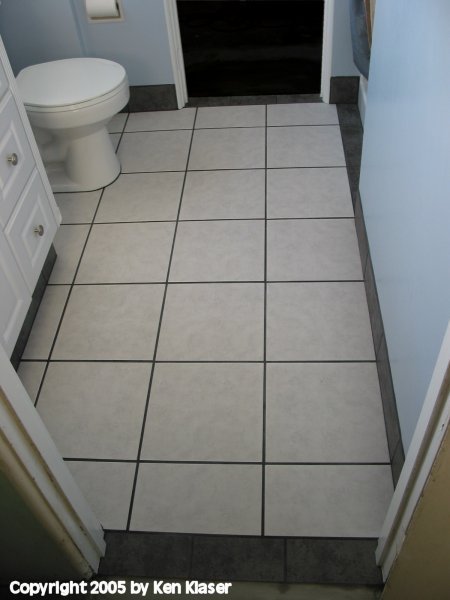
28. This is a close-up view of the doorway transition to the next room. Just as we placed a little of the dark gray tile on the floor in front of the shower as a visual clue, we also placed more of the same tile used on the cove base in the two doorways. The shower is to the right.
29. We’re ready to install the toilet. Instead of a new one, the old was cleaned up of any water scale, deposits, stains, and any paint on it with appropriate cleaners, and the plumbing inside the tank was replaced. It was already a 1.6 gallon toilet, likely replaced within the last 15 years. A new plastic seat was installed.

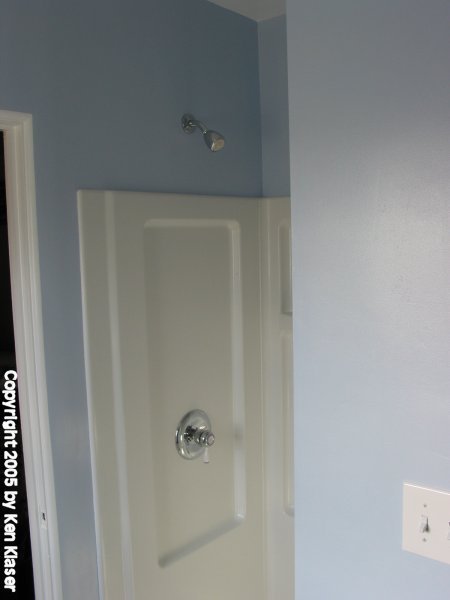
30. A view of the shower with its fixtures installed.
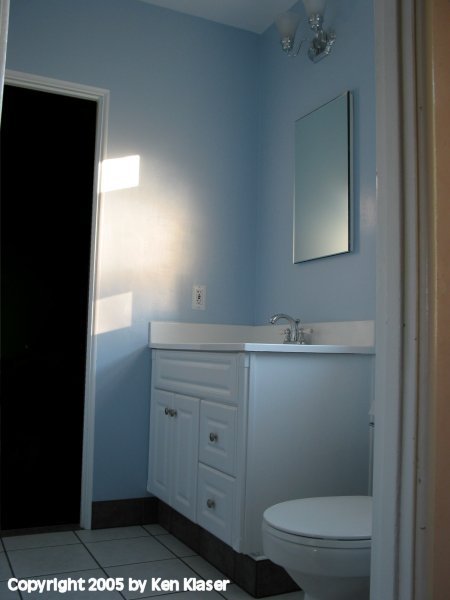
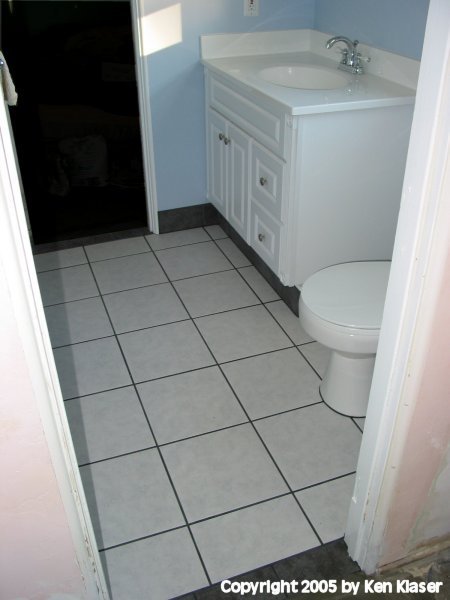
31. A view of the sink cabinet, now installed, showing the medicine cabinet and light fixture above it. You can also see we’ve now installed the refurbished toilet. We used plaster of paris to adhere it to the tile, and a wax ring on the flange. Any uncured gypsum that had oozed into the outer groove and floor surface mating the toilet to the floor, was scraped and sponged. Leveling wedges were used to support the toilet’s weight until the gypsum was cured, The following day this groove was grouted with the same color grout used with the floor tiles, a dark, bluish gray. Using the plaster of paris should allow the toilet to be more easily removed than had we set it solely in grout.
32. Here we’ve stepped back, through the doorway, for a different view.
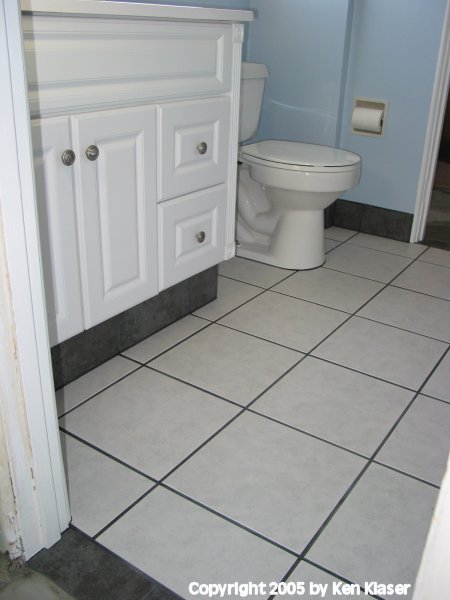
33. A close-up view of the sink cabinet, showing the cove-base tile installed around its base. Epoxy was used to adhere the tiles to the front and side of the cabinet’s base. Before installing the cabinet, we reinforced the backside of these boards specifically for this purpose, so they were rigid. After the epoxy cured, we used the same color grout as elsewhere on the floor.
34. A photo view from the opposite doorway, showing the tile on the front of the cabinet.
35. Here we’ve turned the camera’s perspective about 25 degrees to the right.
36. The last photo. It shows an installed towel bar and separate ring.

This project took about 3 months to complete. I’ve often found that, by going slowly, it’s much easier paying attention to painstaking details that otherwise would get skipped because of “the hurry” for completion that is so common in today’s age. Believe me when I say I’m glad to be done with it(!), but I also enjoyed the work involved in this remodel immensely.
[begin 3.19.2009 edit] The 3-month figure above is actual calendar days from start to finish, not labor hours. Because of a comment left below, I thought additional time-to-completion information would be a good idea. This job took about 262 of my labor hours to complete. Presuming an 8 hour day, that is about 30 consecutive days. The owner also helped some. [end 3.19.2009 edit]
10/11/2006: Trackback to Chris Pirillo’s Home Improvement Tools.
>>>I’ve often found that, by going slowly, it’s much easier paying attention to painstaking details that otherwise would get skipped because of “the hurry†for completion that is so common in…
Todd, one more example of this is all the sinks that are dropped from above into a slightly smaller hole in the countertop, leaving a raised lip. When some water splashes or spills next to the sink, water from the countertop surface never drains into these types of sinks because of the raised lip, but must instead be wiped up each and every time there’s a splash or spill.
But for installers, it’s great! It saves time! Because it saves time, theoretically it saves (maybe) a little of the customer’s money spent on others’ labor! Who gives a hoot whether it’s slightly inconvenient on every single use for the lifespan of that sink and countertop?
(answer: ‘the user’ of the sink)
I received a referral from one of the search engines for the search string: how to put a shower over a toilet drain.
“No!” This won’t work well, and one reason is ‘sewer gas’. If you need more explanation:
A toilet has the water trap built into the ceramic toilet, the toilet drain itself has no such trap. You may be able to see the routing of this project’s toilet drain pipe in this photo. Note that the pipe has no trap. You can see the toilet drain’s vent through the cutout portion of the wall. You can make an inference regarding the toilet’s inner water routing in this side photo of the toilet used in the project above. The trap is what allows water to remain in the toilet’s bowl between flushes.
However, a shower or shower stall has no similar construct, so the water trap, which is needed on all inside sewer pipe drains, is placed in the pipe itself. One can see in one of the photos above that the shower drain has a trap. In that photo, the trap is the portion that is underneath the sand, so to be precise you can’t actually see it, but it’s simply a “U” that creates a low spot in the drain that always retains water. On the left side of the photo you can see a vertical pipe in the wall, this is the vent pipe. It goes straight up through the attic and terminates some short distance above the roof. The vent is open to outside air. An open and clear vent is critical to the proper operation of each water trap as it prevents siphoning.
If one built a shower over an existing toilet drain, besides any other issues you might have, sewer gases would enter the bathroom, and hence the whole house, through the drain. Any inside drain needs to have a water-retaining trap, as well as a vent on the downstream side of the it, to prevent these gases from accumulating inside the house.
Therefore, an existing toilet drain is unacceptable as a shower drain.
Very nicely done. This is great. I wish the pic were bigger and you had a few more of them but hey it was free. thanks for posting them I am linking this page from my site. great job
Pat
I understand we always want it done by yesterday but Good jobs take time to get done. You did a good job.
Thanks for the great pictures!What a project! That uphill drainpipe sounds like what happens around here when I start a project. Glad it worked out for you and didn’t slow you down too much. I found some good tips for bathroom remodeling at http://www.nouveaubathrooms.com/, it be of interest for you.
what a project, with detail instructions, and you did a good job !
Wow your project must have been a big succes, it looks great! Keep up the good work!
“I’ve often found that, by going slowly, it’s much easier paying attention to painstaking details that otherwise would get skipped because of the hurry for completion that is so common in today’s age.” – Absolutely Right. If you execute the work slow and steady you will get absolute perfection. The detailed explanation provides nice picture of what has to be done. What a cute story!
Amazing transformation. Nice to see it broken down like this in pictures.
I am very impressed all the time when I see job BEFORE and AFTER, especially this job done right. I am working for the company and we selling sinks, faucets…. And we are often seeing the final stage of projects. Believe me, you are much better than many “professional contractorsâ€. Nice Job!
http://www.expressdecor.com
Very impressive job. My remodel did not go so well…ended up having to find a contractor to fix my mistakes!
Wow – that’s quite a good rundown with all those photos! Spot on about taking things slowly though. Half the work a lot of tradesmen get is basically fixing poor jobs. I swear if everyone took their time and did things properly, we’d get a lot less work.
Great walk through for your remodel!
Careful planning is the key to a successful bathroom-remodeling project. My suggestion is that before anyone begins any work in the bathroom, create a budget, a floor plan, a list of supplies, a timetable, and important legal considerations.
“Still, I occasionally take on a project like this for its diversion from my normal routine.” – Absolutely Right. Remodeling works is always very challenging and interesting. It breaks our monotonous lifestyle and adds interest to our life. What a Great Story!
Great story.
It reminds me of the enjoyment I got out of replacing our old rotting wood deck with new composite decking and rails a few summers ago. I spend too much time behind the computer as well and it was great to have a diversion and go at my own pace – I can totally relate.
Wow… It sounds like you had to go through pretty much every step in the process. All the way to the street. Ugh.
As much as it’s a pain at the time, when you’re finished it does feel like you’ve earned it.
Thanks for the pictures.
Brent
Classic Clawfoot Tubs
I can really appreciate the entire process, especially the nightmare of having to replace the pipes all the way to septic system. It is sometimes hard for people toi really understand how much time and work goes into a project like this until they are able to see in pictueres what it takes. Projects like this are not for the feint of heart but they are so rewarding when they are completed.
the bathroom look fabulous now, really good job.
Gladys.
taps
I think there is always a good time for making some changes at house. Enjoy it!
regards
Ugh! I feel your pain of remodeling a master bathroom. We had ours done last year. It’s a beauty now, but 6 weeks of construction was not exactly fun.
I think it’s important to note that when remodeling a bathroom – master bathroom or guest – doesn’t matter, that adding a ventilation fan is one of the best ‘bang for the buck’ things you can do.
It doesn’t cost as much as you might think, and the benefits are outstanding as you might imagine – afterall, if you don’t know why you need a bathroom fan, then you don’t need a bathroom fan.
Good job on the pics, very impressive. Looks like a job well one.
Tee
glass bathroom tile
Great, thanks! Planning to do this myself, needed a couple of tips.
Impressing job, it looks great!
Interesting to see how you did and I must say that the result looks good, Marble was a good choice, i hope you enjoy your new bathroom.
Man that was a lot of work and a lot of time. I really liked the way you tied the border tile in with the baseboard and shower. Great job and hope you enjoy.
This is amazing transformation. The way you did it is just tremendous. Bravo
You can get everything you have always wanted from cozy Jacuzzi to heated bathroom floors along with the proper lighting to make your bathing experience really pleasurable. Well these home remodeling companies make sure to transform your ordinary bathroom into a five star spa without having you to pay more. You always wanted that 5 star luxury bathroom for your home but the idea seemed too good to be true. Along with the kitchens, bathrooms are also one of the major areas of homes. So recommend you to consult one of the best companies that can make your house kitchens, bathrooms, rooms as beautiful as you want.
Well done. I am a Southern California Kitchen and Bathroom remodeling contractor and I APPRECIATE the carefully-take pictures and the concise order that you then set them up here with the descriptions. I just wish the pictures were BIGGER, or I could click on them and they would enlarge sometimes. Of course I am a big picture fanatic – so again. OUTSTANDING!
Great step by step process!
…snipped by admin 12:50 PM
Wow. This post has been up for 5 years. I’m no longer looking for this type of work, thus I’m closing this post to further comments. Perhaps younger folks will get something from it, at least until I pull the website.