It’s been a long time since I wrote about making bread, according to the pictures I’ve uploaded, very roughly 3 years. Prior posts on the subject were located here. It’s kind of hard to believe I’ve been making my own bread, instead of purchasing it, that entire time.
A problem I’ve been having with baking bread is determining when dough is over-fermented. Proof of this can be seen in some of the prior posts of bread that has collapsed and has the classic “U” shaped top characteristic of over-proofing. Recently I started using an oral syringe to measure dough-proofing height. A photo of such a fermentation-expanded syringe is near the bottom of this post, along with an explanation of how I’ve been using it to determine when the dough is ready to bake.
I’ve also been working on a reconstituted wheat bread formula. By reconstituted, I mean that I use white flours and add bran and germ in a desired ratio. I’m not trying to duplicate the ratios that naturally exist in whole wheat, so I won’t refer to it as such. I call it wheat germ bran bread.
One benefit of this reconstitution is that only the germ needs to be refrigerated for storage. Whole wheat flour turns rancid when stored at room temperature for more than a few months, and this rancidity seems due to the germ fraction. White flours store well at room temperature for extended periods of time, and so does bran. This means the purchase of a 50 lb bag of white flour will not go to waste, even if it takes a year or more to use all of it when stored at room temperature.
It seems quite difficult to get a well-risen loaf when the formula includes bran, as well as raw germ; however, I’m reasonably happy with the result.
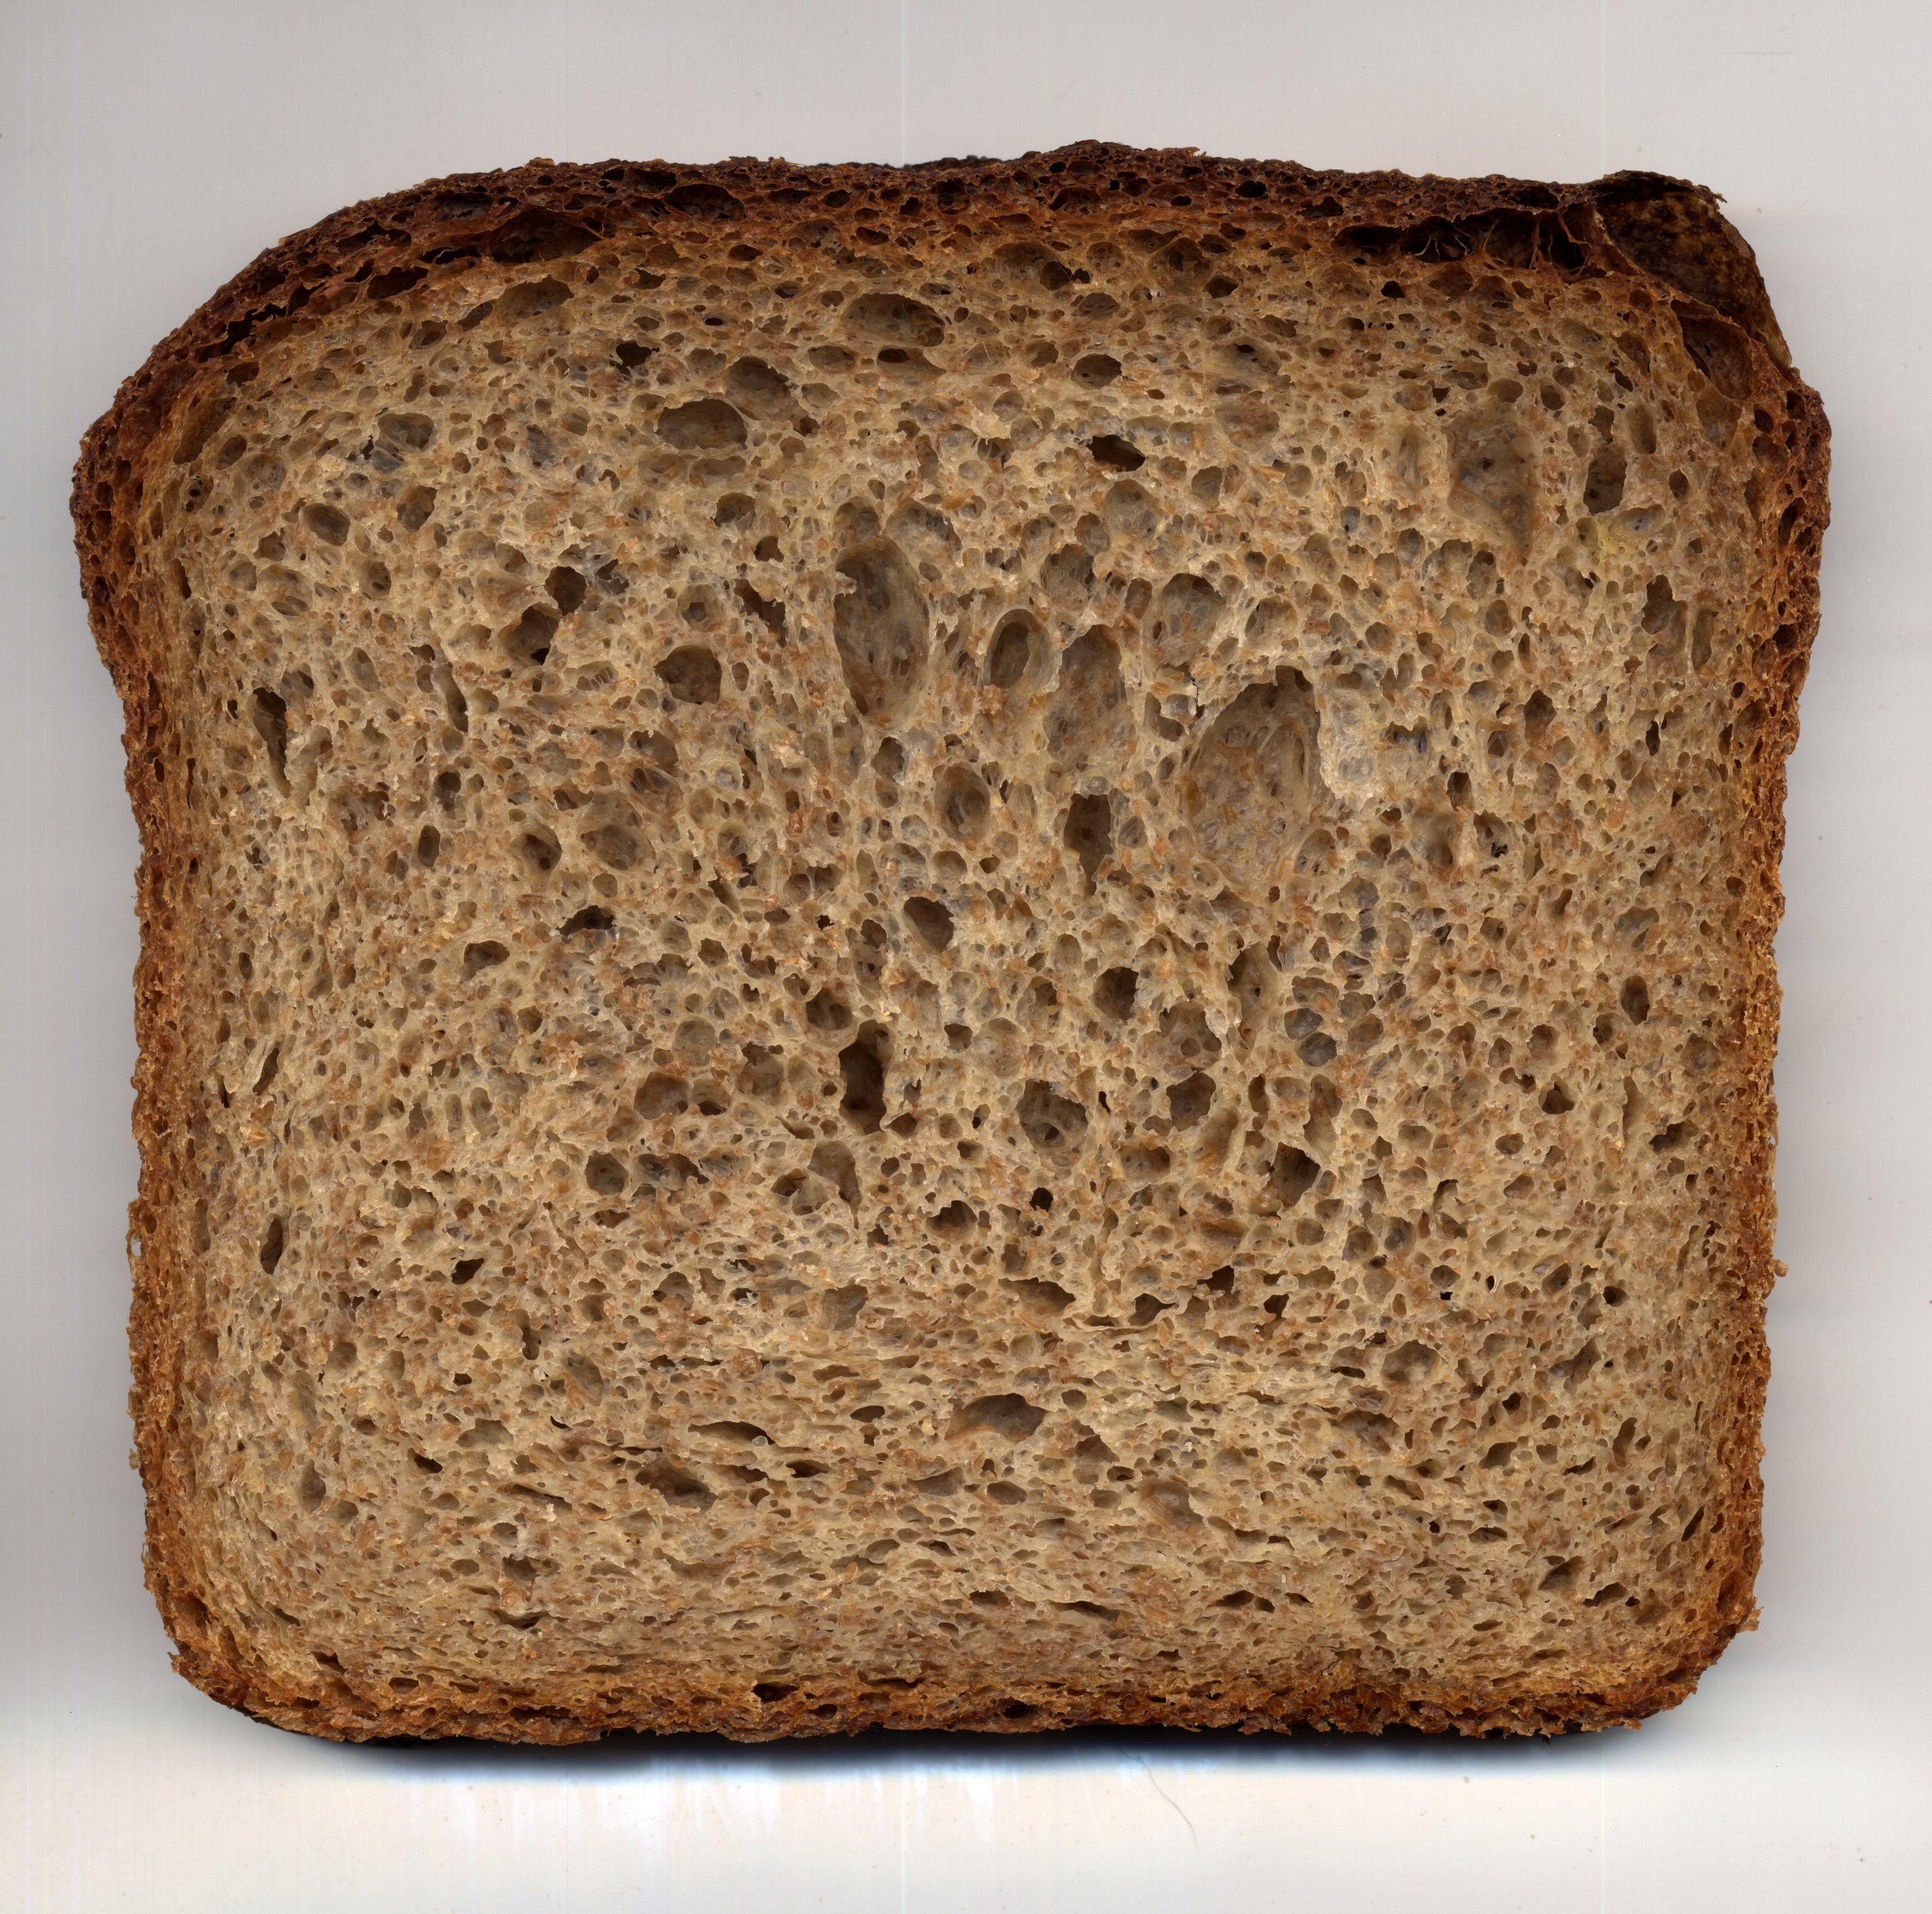
The oven temperatures are still not optimal, you can see this bread was loaded into a very hot natural-gas oven, one which was preheated to 550 °F. In future batches, I intend to decrease that initial temperature. There is some crust burning, and the crumb holes are larger in the center, which I believe is due to the excessive heat (I like those larger holes for sandwich bread, as they hold more mayonnaise). Upon loading the bread, I reduce the oven thermostat to 325 °F. The bread is steamed for the first 20 minutes using the converted pressure-cooker I’ve described in prior posts, and during most of this time, as the oven is cooling down, the burner does not cycle on. At 550 °F, loading the bread as quickly as I can causes a 75 °F loss in oven temperature due to opening the oven door.
The reason I’m operating the oven this way is to try to prevent the burner from cycling on during the steaming time. I presume an electric oven would need a different baking strategy. Because gas ovens need to be vented, when the burner cycles on, the convection causes increased airflow through the vents, one that exhausts the steam, which has a drying effect. I’ve seen drawings of old fashioned ovens that allowed the operator to open and close vents manually, but the one I’m using has no such control. The application of steam is to prevent the crust from drying. When the burner turns on, the steam gets exhausted at a faster rate, so having the burner on at the same time that steam is applied would seem to cancel each other’s effects to some degree.
The bakers’ percentage formula for the total dough follows (total dough = pre-ferments + final dough). You’ll note the formula has a rather large amount of germ, much more than whole wheat, and a low amount of bran, an amount roughly equivalent to half white flour and half whole wheat flour:
| 15.98% | High Gluten Flour |
| 62.00% | Baker’s Flour, bleached, enriched |
| 0.675% | All Purpose Flour |
| 0.348% | Cake Flour |
| 7.00% | Wheat Bran |
| 14.00% | Wheat Germ, toasted |
| 70.00% | Water |
| 4.00% | Olive oil |
| 4.00% | Sugar, sucrose |
| 1.00% | Liquid Malt Extract (Amber) |
| 2.00% | Salt |
| 0.0015% | L-Ascorbic Acid |
| 0.1061% | IDY, Instant Dry Yeast |
| 181.11% | Formula Percentage (sum of bakers’ percentages) |
| 12.01% | Endosperm-restricted protein percentage |
I use a digital jewelry scale with a readability or resolution of 1/1000th of a gram to measure both the IDY and the ascorbic acid, as most kitchen scales do not have the required accuracy when making small dough amounts such as a loaf or two of bread.
The magic of getting the open structure in a bran-containing bread is much like discovering the esoteric side of a religion, its essence well concealed and occult, while appearing the opposite. In that spirit, be advised there is not currently a complete written documentation of how I produced this bread, and if you try to duplicate it, your results will likely differ. Perhaps someday I will write out all the instructions.
While the above formula is reflective of the ingredients, the magic certainly lies in the process. It’s tedious and time consuming, if you don’t want to use all the fancy synthetic chemicals industry has designed to shorten the process. However, this is the first batch that I’ve used L-ascorbic acid, and it seems to have added to the burned look of the top crust. I’ve described in prior posts that the flours I purchase do not contain ascorbic acid. Some flours labeled as bread flours already contain it. I seem to recall that ascorbic acid hinders amylase (enzyme) activity slightly, so I prefer that flour used for sponges which grow and multiply yeast not contain it (see the 2009.Aug.06 entry in this post for references). In this batch, I dissolved it in the final dough’s water. In my next batch, I intend to increase the PPM of ascorbic acid to 15 based on total dough weight, this batch it was about 8. I couldn’t taste the ascorbic acid, though my taste buds may be unsophisticated.
15% of the total white flour weight is allocated to sourdough pre-fermentation, and is why the flour portions of the formula contain cake flour and all purpose flour: I keep my sourdough in the refrigerator, for making an occasional batch of sourdough pancakes. All purpose flour mixed with cake flour makes tender pancakes, it’s hydrated to 165% of the flour weight, so it’s of a batter consistency. I need to refresh the refrigerated sourdough about once per month; on that day, in order to avoid dough discard, it’s sourdough pancake day! I used to dislike sourdough, though that has changed some in the last few years!
I have found an inexpensive thermostatic stove, one that is able to adjust to and maintain a low temperature (thank you!). I utilize it to provide the desired temperatures to pre-fermenting doughs. It took a little while to learn to use it, to map the control settings to those low temperatures. I utilize a pan of water, most often premixed with hot water at the sink to the desired temperature, placing jars containing dough in it. The temperature of the water bath actually oscillates up and down slightly as the thermostat turns the electric element or burner on and off. This oscillation is minimized and smoothed by increasing the mass of water in the water-bath pan. There also seem to be heat convection currents in the water bath, but that’s a minor issue.
Before making bread with the refrigerated sourdough starter, I give the batter a refreshment two days before baking, so it’s fully active. I use the water bath on the thermostatic stove to bring the jar, which contains the refreshed starter, quickly to 85-90 °F. Once the starter begins its froth (bubbles on top, at first they’re large and few, but later many small “froth” type bubbles form), it’s done, I make my pancakes (using baking soda), then refrigerate the remainder. Early the next day, the day before bread-bake day, I take a very small amount of it, and increase it in a total of three refreshments using baker’s flour. The sourdough is adjusted to a hydration of about 60% on the first refreshment. The three refreshments are allowed to ferment entirely at 80 °F, the first one for 12 hours, the second for 8 hours overnight, and the third and final refreshment before the final dough for 4 hours. The prior refreshment’s flour weight is 27% of the new refreshment’s flour weight. Because the flour-weight-based refreshment ratio is constant, and the time intervals shorten or accelerate, the first refreshment, during its fermentation, should reach a lower pH than the final ones. It seems to work okay, particularly since I’m not trying to make the bread sour. At 15% of the total white flour as sourdough pre-ferment, there is only the slightest after-hint of sourness balanced against the sugar and malt which gives a pleasing, if subtle, sweet-sour bread flavor.
45% of the white flour or endosperm weight is an under-fermented sponge of 4 hours: sponge, as I’m using the term, means based on commercial baker’s yeast. This shares the water bath of 80 °F, however, in its own larger jar (a glass crock). I’m currently using instant dry yeast, as the active dry yeast brand I used prior has been changed. The manufacturer was bought by another company, who began using a different strain, even though the package design and corporate name or logo on it appear the same. When I queried them, they confirmed they changed the strain, but would not disclose which strain they had changed to, or which strain had been used prior. I knew it was no longer working the same, as it didn’t develop a nice krausen after testing it in a little sucrose mixed with water.
In the final dough, I’m mixing sourdough pre-ferment and baker’s-yeast-based sponges, and adding a very small amount of additional IDY. I’m thinking of eliminating that final IDY addition, as it’s not needed so long as the sponge is truly under-fermented and the yeast die-off has not yet begun. However, there’s a certain logic to redundancy of the processes, if one fails for some unexpected reason, there’s a backup process which may attenuate the failure and salvage the soon-to-be bread.
On baking day, the stand mixer I’m using optimally mixes only 1/4 of the total dough at a time (2 loaves total, 2.5 lbs flour weight each, so dough for 1/2 loaf of bread), and the process involves dividing the dough into 4 pieces, mixing each one, then flattening each into a pancake shape, stacked on top of each other, then dividing into pie-shaped quarters, for more mixing. This is repeated four times, and takes about an hour, even though each mixing only occurs for 2 minutes on low speed. I add the salt last at mixing batch number 3 (of 4 quarters each batch). All the dough will fit into the mixer bowl at once, but that much dough won’t mix well. Currently I only make and bake two loaves at a time, due to limited freezer storage space, and I find the concept that the mixer will only optimally mix half a loaf of bread dough to be a bit maddening. I think the problem is that the mixer is designed for consumers, instead of serious bread bakers. A commercial dough mixer costs several thousand dollars, and it’s difficult to justify that kind of an expense, unless you are not only making your own bread, but also are in the business of selling it, which I am not. I think this may be a big reason why so many baker-authors promote hand kneading, as most people probably cannot afford a mixer that will truly exceed the job our hands can do. I prefer using the machine, as I have always liked tools. But it would sure be nice to be able to optimally mix 2-4 loaves of bread dough at once, without division of the total dough and mixing in batches, and it seems like any mixer advertised as suitable for mixing bread dough should optimally mix one large loaf’s dough at a time.
But lets move on to the main topic of this post, using a syringe to measure dough proofing height. When a yeast-based dough is not baked soon enough, the bubbles in the dough can grow too large, leading to its collapse during baking. Here’s an old photo of an over-fermented batch, showing the classic “U” shaped top of over-fermentation:
Too many of my prior loaves have been over-fermented, simply because I judged their proof-height visually, without using any kind of measuring tool other than my eye. The poke method doesn’t seem to provide enough accuracy (for me), and the time and temperature method changes with each significant formula or process change. An over-fermented loaf is always visually disappointing, though it’s perfectly edible. Solving this problem in a simple way has bugged me for some period of time. Well, here’s what I’ve discovered that seems to work well, a tool which includes a built-in measurement index:
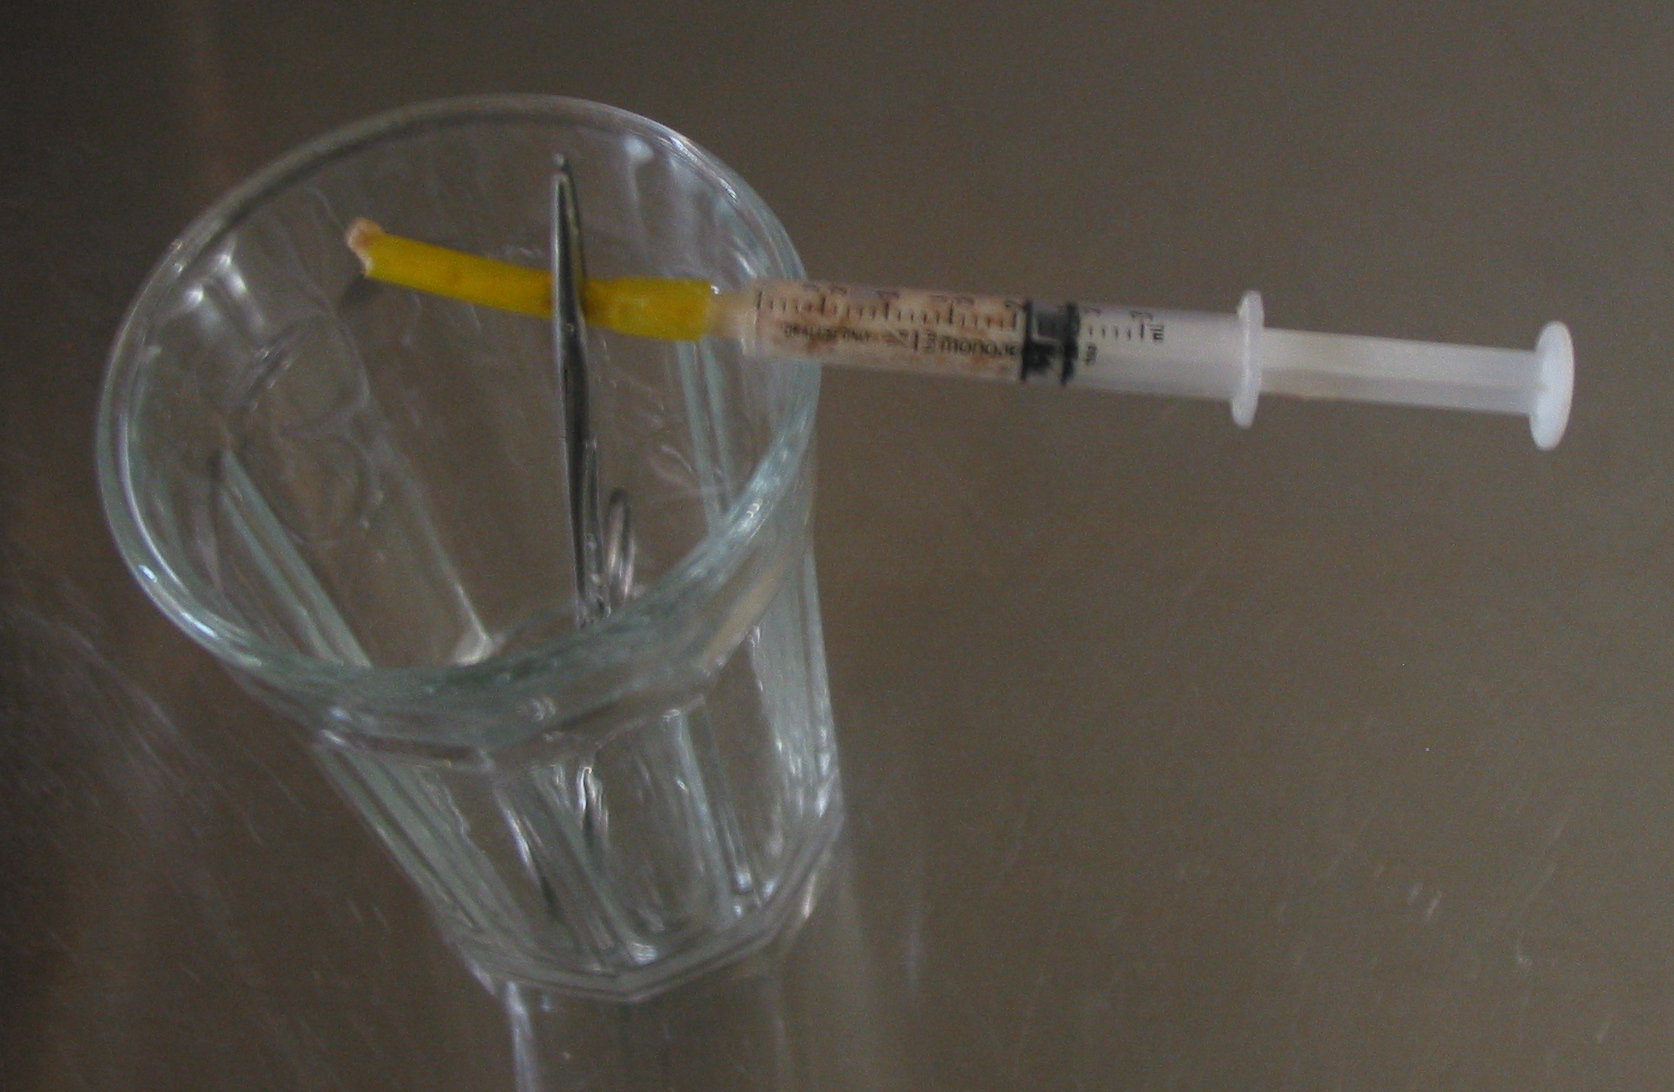
What is pictured is an “oral” syringe of 3 mL total capacity, one which I acquired from a veterinarian. The syringe has a yellow hose on it, this is one of my cat-feeding syringes. The tubing is softer than the hard plastic of the syringe body, and is easier for the feline to accept. The tubing is a transparent, flexible plastic, somewhat similar to silicone tubing, though it is sold as “fuel hose” at the local lawn mower parts supplier. The clamp used on the yellow tubing is a tool known as a hemostat. I was inspired to use a syringe after reading Shogren & Finney’s Bread-Making Test for 10 Grams of Flour, specifically after viewing their Figure 5 drawing, and meditating about it for awhile.
After mixing the final dough, and before panning, I remove the syringe plunger, pinch a small amount of dough, and press it into the plunger end of the syringe body, being careful to not trap any air bubbles. Once filled with a sufficient amount of dough, I place the plunger in the syringe body, and press it down to the 1 mL mark, squeezing excess dough out the hose end. Then I clamp the yellow hose with the hemostat. A warning worth mentioning is that the inside diameter of the hole at the hose end of the syringe is small, and I doubt this tool would work well if the dough contained whole grains, as squeezing some dough out is necessary to set the plunger at 1 mL.
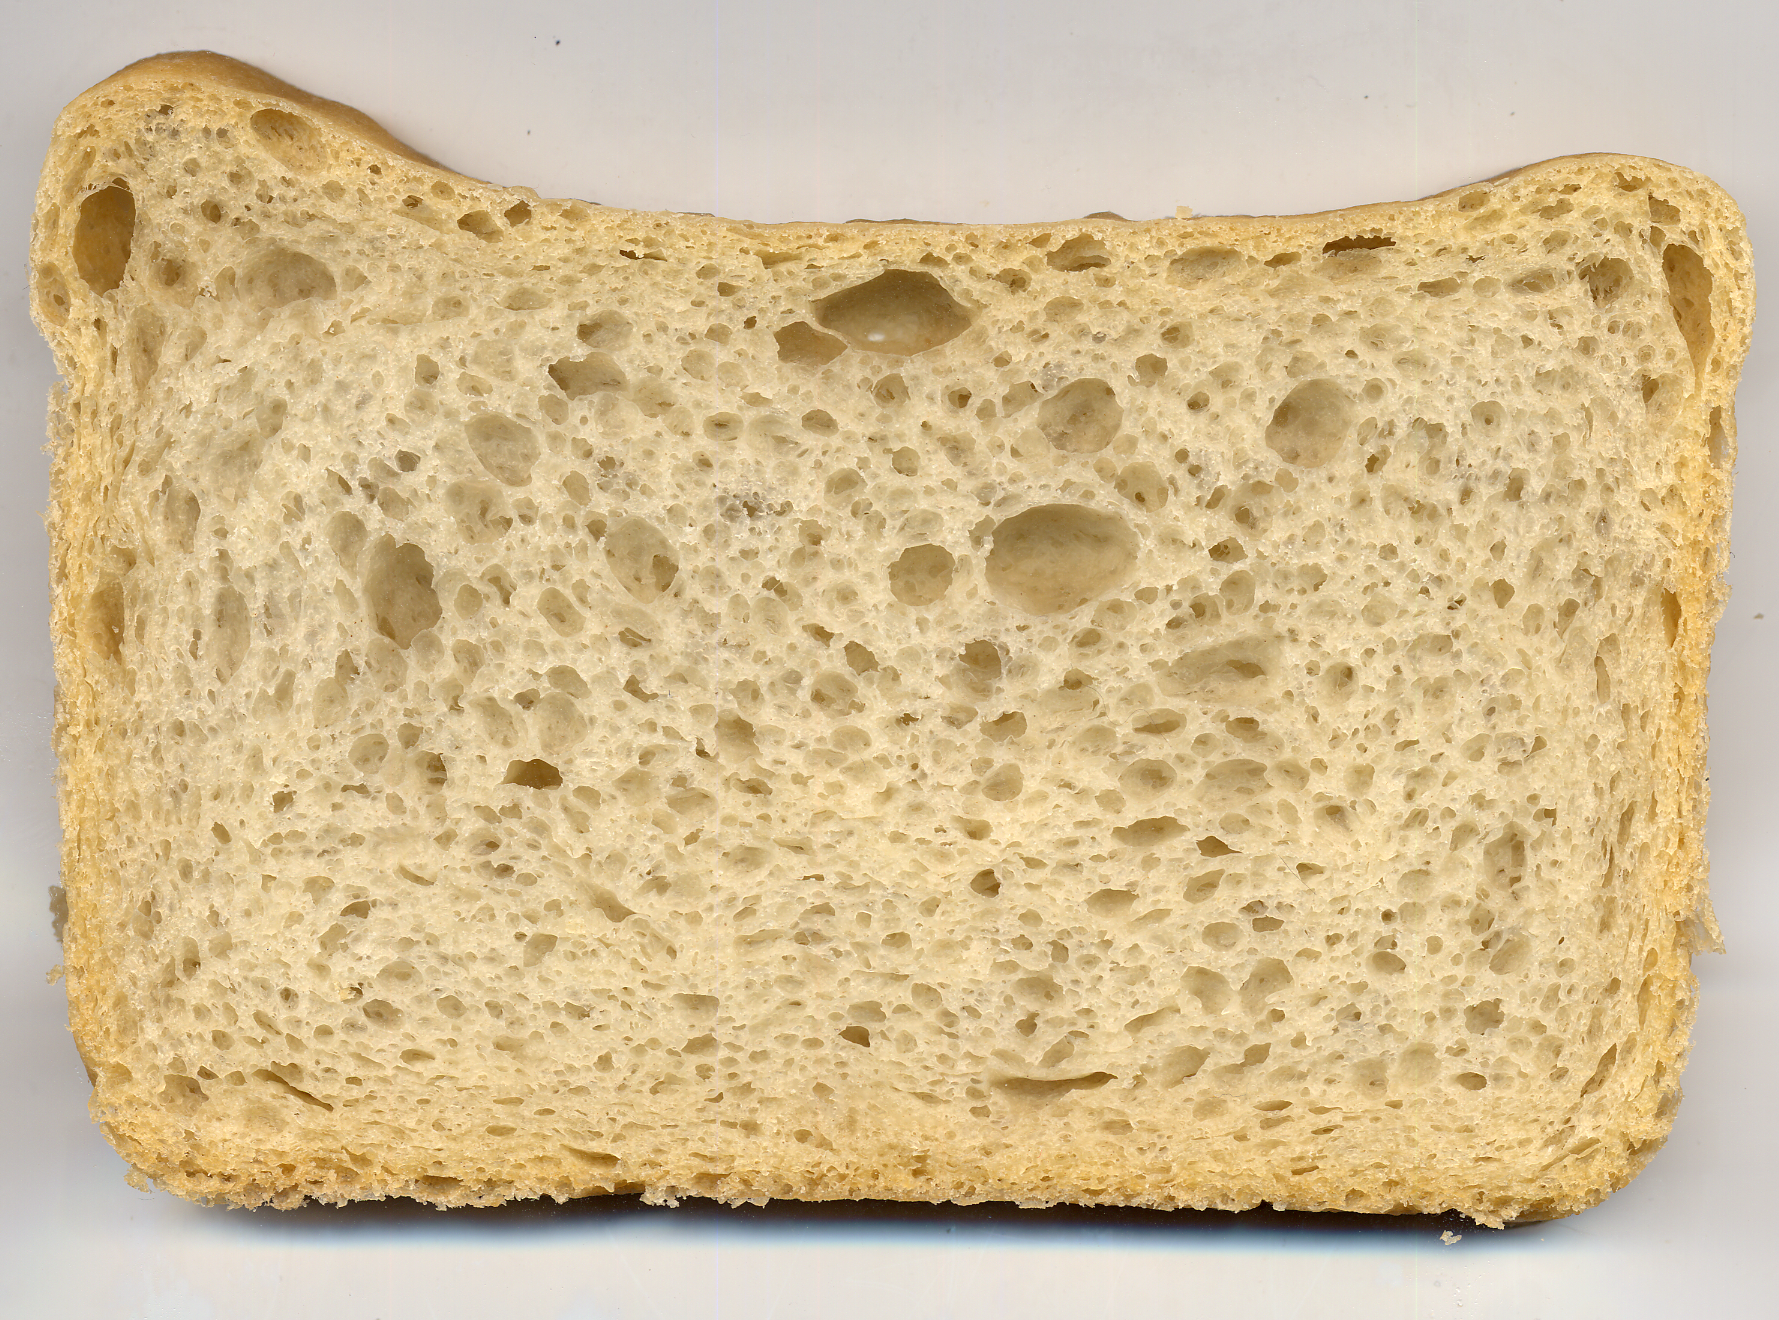
I keep this syringe in the same area as the panned dough, so both will hopefully be at the same temperature. As the dough ferments, because of the fact the hose end of the syringe is clamped, and that the plunger has its own seal, the expanding dough pushes on and moves the plunger. With the above pictured bread’s formula, when the syringe reported 2.1, the dough was placed into the preheated oven to bake. Starting from 1 mL of dough, 2.1 mL of risen or expanded dough represents slightly more than a volume doubling. I do not bake the syringe, or the dough in it, it would melt the plastic! When I’ve used this syringe to measure white-bread rise, I can allow the reading to be about 2.4-2.5 before baking (I no longer use straight-dough methods, but with them I’d expect the expansion number to be lower). So, it seems, the amount of proof allowed before collapsed baked bread is somewhat dependent upon the formula or ingredients and the processes used to create the final dough. This is similar to the changes that occur with the time and temperature method calculated against the yeast inoculation as formulas and processes are modified, but syringe measurement seems a lot easier, and redundancy is sometimes a good thing.
At first the syringe plunger moves relatively slowly, if at all, but it picks up speed as fermentation progresses, and it is moving relatively fast at the time when it’s doubled. This explains why it is so easy to over-ferment. The oven must be ready to load.
It seems that what the syringe measures is the inoculated dough’s gas output, and it seems probable there’s a close correlation of that to dough proofing height. The clearish plastic of the syringe body allows us to see the dough bubbles as they form and grow, and it allows us to see the dough expand as a result. The volumetric index printed on the syringe body allows us to measure the expansion.
After the proofed dough is placed in the oven, the syringe has served its usefulness. I remove the hemostat and squeeze the rest of the dough out of the syringe and discard that dough, then I disassemble the syringe and wash it to clean it up. As a point of maintenance, these syringes do not last forever, and the rubber seal at the end seems to degrade and swell quickly if petroleum jelly is used in the syringe, such as for feline hairball remedy, or to lubricate the black-rubber seal. I have found that a sparing application of silicone-based plumbers’ grease seems to work okay, should lubrication be desired.
I tend to be satisfied with the bake, it’s done, when the bread’s internal temperature reaches 208.5 °F.
2013.May.7
Gas-to-Dough Expansion ratio
We have measured the unexpanded or initial dough volume (1.0 mL), as well as the expanded dough volume when we placed it in to bake (2.1 mL), which lets us calculate the gas volume: 2.1-1.0=1.1 mL. We can express that as a ratio of gas/dough: 1.1/1.0, or simply 1.1. The same or similar formula is used by Romano, Toraldo, Cavella, and Masi, in their “Description of leavening of bread dough with mathematical modelling.” They called it “volume expansion ratio”, and defined it as (V(t)-V(0))/V(0) where V is dough volume at time t. While occasionally baking authors mention using a graduated cylinder to measure dough height, few mention the formula to use and the data points to collect.
Regardless of what the ratio is named, it lets us use any initial volume, and calculate any desired proof or dough expansion at point of bake. If we can measure dough volume as it proofs, we can choose when to move from proof to bake, and have repeatable results. Maybe we don’t have a syringe, but instead a graduated cylinder, or perhaps a tall narrow drinking glass with no marks (straighter sided is preferred), or perhaps a pint or quart jar, or a clear plastic drinking straw and a small cork to seal one end. Something (Figure 1?). You pack some final dough in the bottom of the glass, mark the bottom and top of the dough, measure the distance between the two marks, then multiply that distance, whatever it is, by the desired expansion ratio, and then measuring from the prior top mark, add that longer distance and mark it as a second spot on the glass. When the dough reaches that expansion mark, it is ready to bake.
This ratio would also let us accurately communicate how proofed another formula should be at the point of dough development when it is best moved from proof to bake, rather than the ambiguous phrasing, “We’re going to let this proof about 1 1/2 hours.” In this case, time and the implied temperature are rather important to judging proof development, perhaps along with poke-the-dough methods. Instead we could precisely say, “When the proofing dough reaches a gas/dough ratio of 1.1”—or any other desired ratio—“it is baked.” In this latter instance, we’re measuring the actual expansion, and thus we may care a bit less about poking the dough or tracking the elapsed time.
2013.Aug.30
I have removed the ascorbic acid from my formula (updated above). After I made it and ate the first slices, afterward I got classic gluten intolerance symptoms, and I’ve never had those before. I stopped eating it for a few days, then reintroduced it, however, I could not duplicate the symptoms, nor find any scientific information on such a cause.
In using the syringe measurement method for some time now, I have identified one problem with it: because the mass of dough in it is small, it is more subject to temperature fluctuations than the dough that is rising and which is of much greater mass. My strategy to deal with this is to try to eliminate or minimize any such fluctuations.
I would like to make bread, but, like any interest or task, I would first like to have a thorough understanding of it. This post is the kind of detailed, comprehensive literature I have been seeking and had not found in all the searches conducted previously. Thank you.