This is a continuation of my prior post titled Experimenting With Bread Dough Moisture, Sandwich Slices, and Oven Spring. I kept adding text to that post at the bottom, but due to some errors of unknown origin, the frequently re-saved post started losing large sections of text. At some point while investigating the issue, I found that shorter posts worked fine as a workaround.
The continuation here was of text snipped from the bottom of that post, and is why the date of this post is later than some of the entries.
2009.Jul.27
Massive volume increase! Wow! This was the first dough I’ve made that passed the windowpane test without tearing before light was visible through the stretched dough.
I diverged from the scientific process of making only one change at a time, so some of the results cannot easily be traced to particular changes made. The following batch used a strictly-defined autolyse rest, and the fermentation was similar to a sponge as well as a biga, but it uses 100% of the formula’s flour, thus cannot be called either.
The major change made in this batch was one of process, or the order in which various ingredients were added. The following ingredient list or formula is not reflective of that order.
| Scale Recipe Here | Flour | Total # | Total g |
| Flour Weight per pan |
Weight | of pans | per pan |
| 827 | 1654 | 2 | 1348.84 |
| ingredient | Baker’s | normal | Weight |
| Percent | percent | grams | |
| High Gluten Flour | 28.00% | 0.1717 | 463.12 |
| Baker’s Flour (11.8% protien) |
72.00% | 0.4414 | 1190.88 |
| Salt | 1.23% | 0.0075 | 20.34 |
| Instant Dry Yeast | 0.64% | 0.0039 | 10.59 |
| Olive oil | 4.00% | 0.0245 | 66.16 |
| Water | 57.23% | 0.3509 | 946.58 |
| Totals | 163.10% | 1 | 2697.67 |
| Flour Sub-Totals | 100.00% | 1654 |
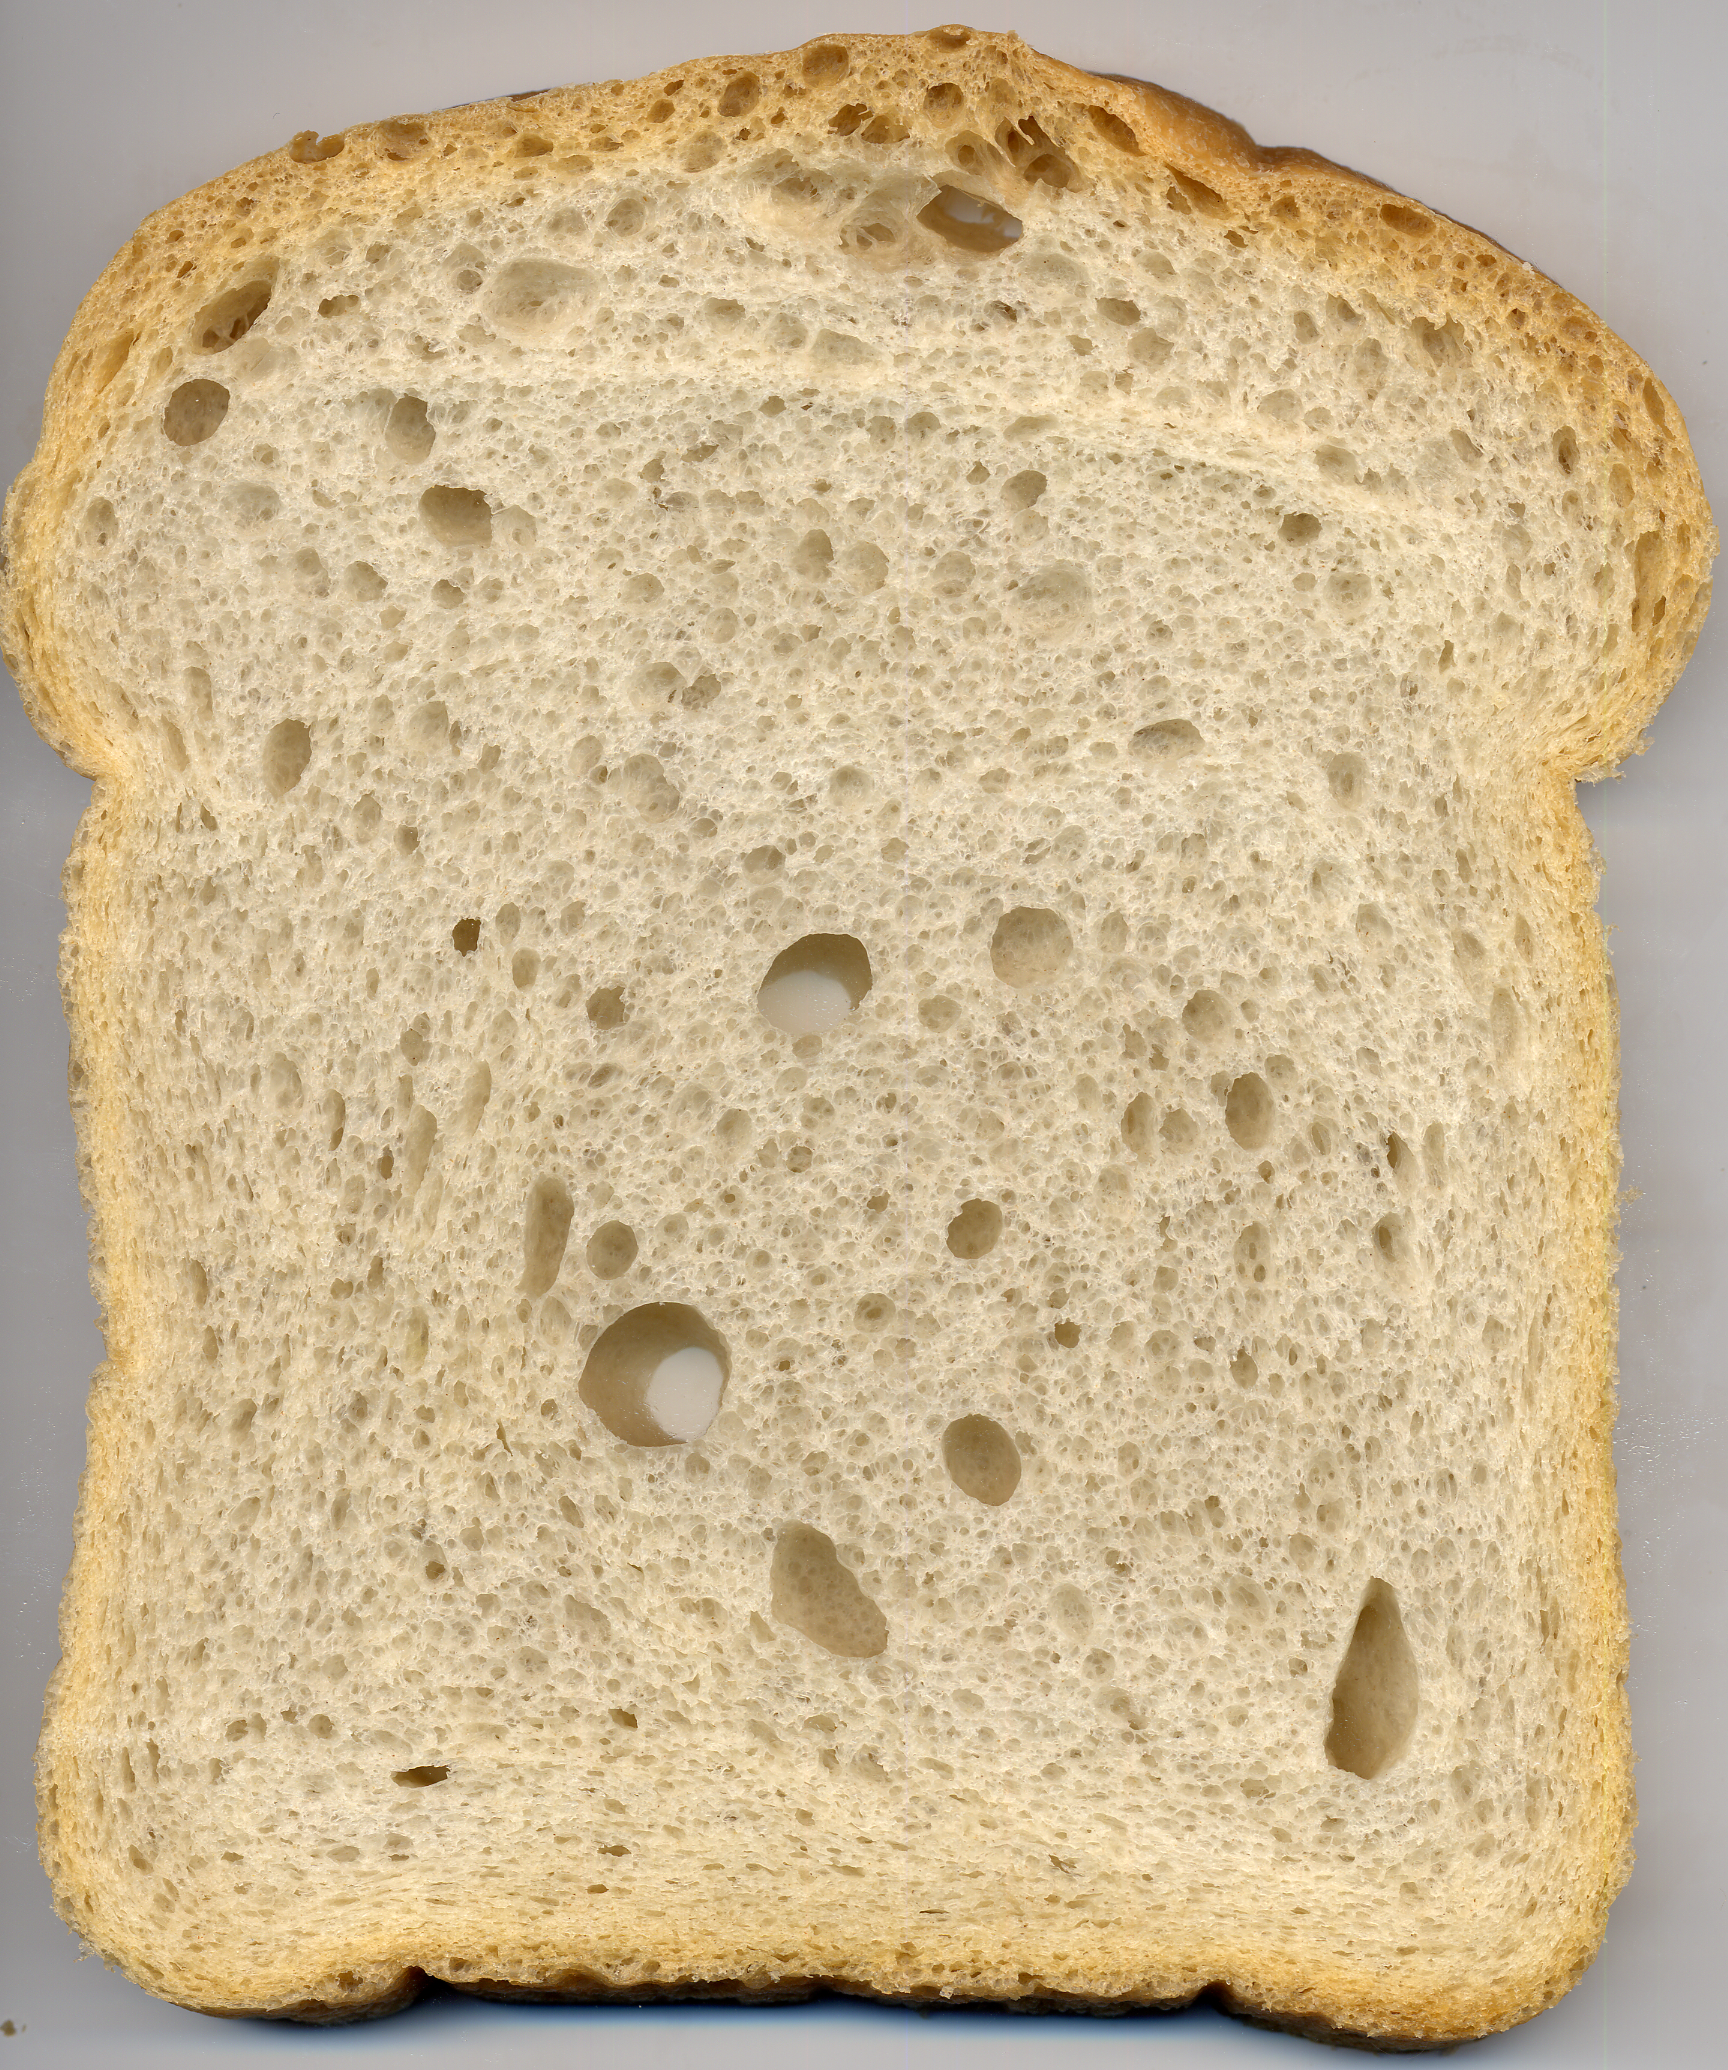
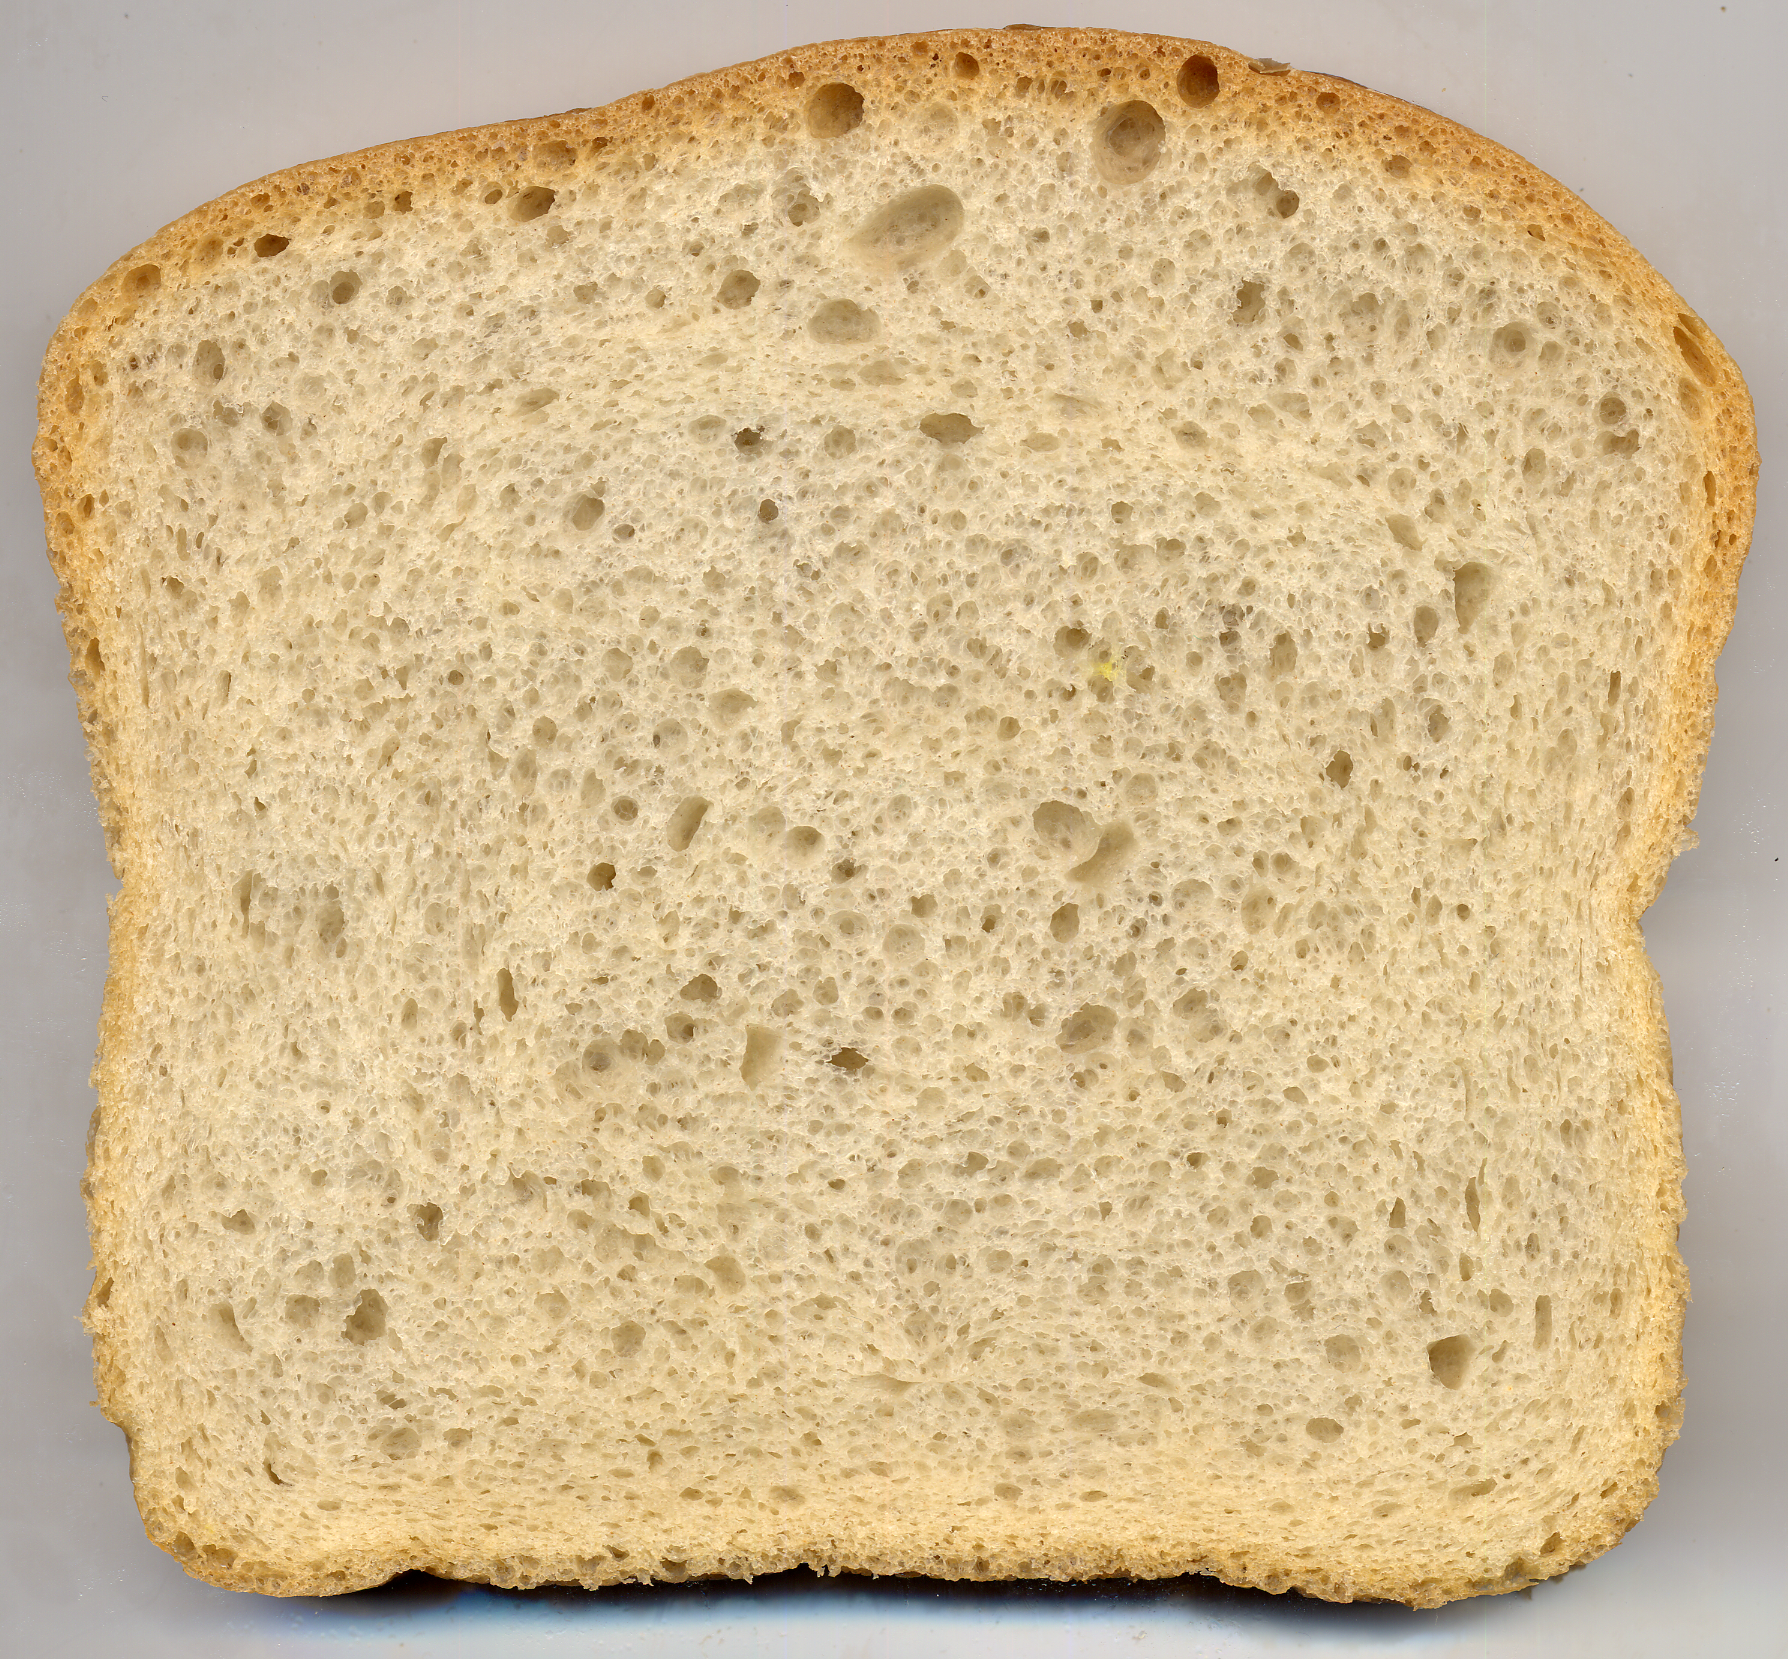
These loaves were scaled to have 827g of flour in each (the same as many of those above of 55% water), but the increase in volume can be noted by the slice’s changed x:y axes ratio in the photo below. These loaves are MUCH taller (compared to photos located in the earlier post). The protein ratio is about the same at 12.14%, but the crumb is much softer, more “squishy” and less springy.
The post-autolyse kneading failed in the food processor (first time this has ever happened), the dough was so sticky that it stuck to the plastic bowl’s upper sides, it didn’t want to drop down into the spinning blades, so the stand mixer was used to incorporate the instant dry yeast. However, after adding the yeast and following the refrigerated fermentation period, and the numerous chemical reactions that occur, the dough could once again be blade-mixed in the food processor, that’s the tool I used to later add the oil.
The biga-like primofermentation (defined below) was placed in the refrigerator for 18 hours. The next day salt was added to 2/3 of the fermented dough during stand-mixer kneading, then allowed to rest, while the oil was separately whipped into 1/3 of the dough using the food processor and metal cutting blade. Specifically, I poured the oil into the food processor, and added a golf-ball sized piece of dough, then blade-mixed it for a few seconds; then added another golf-ball sized piece of dough, and mixed it again for a few seconds; I kept repeating this until the dough started balling up in the food processor like it does when it’s kneading, then I added the rest of the unsalted dough, and blade-mixed for a few more seconds. It’s possible there’s a faster way to do this.
Once fully mixed, the oil-incorporated dough was added to the salted dough that was resting in the stand mixer, and another short kneading ensued to fully mix the the two together. Since I’ve noted that salt doesn’t typically dissolve in oil, and that oil and water don’t mix together well (unless there’s an emulsifier added, like egg yolks and-or lecithin: mayonnaise, for example) I wanted the salt added to hydrated dough that had no oil added, so the added oil would not first coat any of the salt grains, potentially isolating them from hydration. I’m not sure if hydration is the best word to use, as salt attracts moisture. Hopefully it carries meaning. In any case, I felt an oil barrier on a salt grain could restrict the particle’s access to free water existing in the dough matrix.
You’ll note that I’ve removed the vinegar from the formula. For a number of years I’ve used the vinegar to lower the pH of straight doughs mixed, risen, and baked on the same day, as I noted the baked loaves seemed to stay fresh a little longer when the vinegar was added. However, many sources say that with longer fermentation times, dough pH decreases naturally as a result of the CO2 production of yeast over time, and in fact, bubbling CO2 through water is one of the ways that alkaline water’s pH can be lowered. Theartisan.net has a chart of dough pH versus fermentation time. Unfortunately, I do not have the equipment or knowledge to quantify this pH change in my dough, it’s apparently more involved than just measuring dough pH, there are buffers in the dough and these must also be accounted for with some kind of special measuring chemicals, standard sodium hydroxide solution, and equipment. It’s not my intent to be a chemist, though for those so inclined, this could be quantified (hmm, the more I’m thinking about this, the more I’m realizing that being able to accurately measure dough pH would be quite useful).
The USDA Nutrient Data Laboratory had a database entry that said vinegar is about 94.78% water, so I multiplied the old vinegar amount by the vinegar water-percentage, then added that much to the formula’s water percentage, (strictly speaking, I should have done this on the normal percent instead of the baker’s percent [note to myself, the normal percent figure calculates to a baker’s percent water content of 2.14, so 55+2.14=57.14]), to keep the dough moisture about the same as the prior batch’s 55% formulas.
I also changed the flour mix, as I’d been wanting to get away from using all purpose flour, which while it wasn’t specified on the label, may have been made from some percentage of soft wheat. However, the new flour mix (baker’s flour and high-gluten flour) was adjusted to have roughly the same protein level as the prior batches. The Baker’s Flour is said to be composed of a mix of hard red spring and hard red winter wheat according to a manufacturer’s specification sheet. Apparently, hard red spring tends to higher protein than hard red winter wheat.
The proofing process was also changed slightly to accommodate a different baking procedure. After 2.5 hours of proofing on a day so hot the proofing light never turned on (because the daytime temp was over 86F), I removed the panned and proofed dough from the oven, placed them elsewhere to continue their proof, and preheated the oven to 500F. At 2 hours, 50 minutes into the proofing time period, the pans of proofed dough were placed into the oven for baking.
The oven spring was about one and a half, maybe two inches, and occurred within the first 2 or 3 minutes. When zooming in on the crumb (click on photo for higher resolution), subjectively it appears there’s a lot less tunneling than in prior straight-dough batches.
It’s my current belief the larger holes nearer the bottom than the top the were likely caused by the changed baking procedure, which involved preheating the oven to 500F, inserting the panned and proofed dough, baking with steam for the first 15 min, keeping the oven at 500F for 5 minutes, then reducing the oven’s thermostat to 300F for the remainder of the baking period. It seems this higher initial temperature created steam internally in the baking dough at a faster rate, which was contained by some of the lower CO2 bubble walls and caused them to expand. In other words, the higher oven temperature heated up the stainless steel pans faster, thereby creating more steam over a shorter time period that, at least for a short time, remained internal to the baking dough. However, it’s just a guess, and some of the prior loaves using a different baking process also had larger holes, even if some weren’t as spherical, which suggests the answer is elsewhere.
Barry Harmon says that holes in the crumb are a characteristic of yeast-leavened breads. He also writes about a “flying crust” problem. If that flying crust is on the outer ring of a pizza crust, I’ll prefer it every time.
Another set of yeast issues to work out appeared. During the refrigeration period, I noted the dough peaked at about 5-6 hours into the refrigeration process (I mentioned above I needed to “tune” the yeast amounts), instead of at 18 hours. There are various strategies to remedy this, among them are decreasing the added yeast and-or decreasing the temperature of the dough and-or adding some salt to this fermentation stage of the process. While I did not track the internal temperature of the dough during this observation, I have noted in the past that the dough’s temperature was always warmer than the refrigerator temperature, apparently the activity of the various processes it’s undergoing add heat. Before placing the dough in the refrigerator, I raised the almost-a-biga’s temperature to 83-84F (by machine kneading). My reason for doing this is I want the yeast to be activated and actively multiplying (68-78F degree range from information I’ve seen), however, this undoubtedly keeps the dough’s temperature higher for at least some portion of the refrigeration process. I needed to go to sleep, and didn’t want to bake it until the following day, so there it remained.
I may, or may not, make a flow chart, but until then, this is the process I used for the best batch so far:
Water and flour mixed until all flour was moistened —> Autolyse (I used about a 4-hour autolyse period that included a cool down of about 90F dough to 60F [freezer was used some of the time, refrigerator wasn’t cooling it fast enough]) —> add yeast and knead until 84F —> Refrigerate for 18 hours —> Knead salt into 2/3 (approximately) of the dough, then rest —> Whip oil into 1/3 (approximately) of the dough with metal blade food processor —> Put oil whipped dough into stand mixer with salted dough, and knead until well mixed —> Divide and scale dough for pans, then round each piece, let it rest for up to 20 minutes —> Prepare pans with organic palm oil shortening, a thin but very even coating, including pan lip —> Roll dough into cylinders, oil each cylinder with fully refined peanut oil, placing each into the prepared pans —> Proof for 2 hours, 50 minutes at 86F —> Put in oven preheated to 500F, with steam having been pumped into it for at least a couple of minutes prior —> Bake at 500F for 5 minutes, reduce oven thermostat to 300F —> Turn off steam at 15 minutes into baking process —> remove from oven at 1 hr 30 minutes, check that internal temperature is at least 200F —> let cool on cooling rack for several hours —> bag in plastic until following day without eating any (I can’t do this yet, still trying though) —> slice following morning and re-bag in two separately sealed plastic bags to freeze —> Place in freezer, being careful not to let anything weigh down on top of them, or press on their sides, until they’re fully frozen.
An interesting thing occurred when I sliced the few pieces I wanted to eat right away, the crust, while crisp, was much more tender, and it was possible to slice through without cracking and flaking using the freshly-sharpened non-serrated knife. I reckon it’s the flour mix, but like I said, I can only guess, since I made so many changes at once. It’s also clear from this baking result that process is critical to outcome.
2009.Aug.1
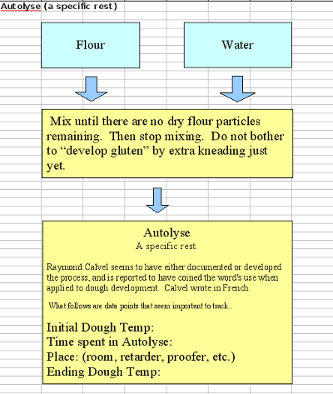
Autolyse flow chart
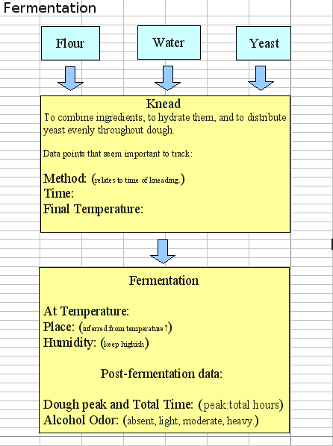
Fermentation flow chart
The image above has evolved through several versions. As of 2009.Aug.10, I’ve decided to call it the more generalized term Fermentation and stop at that. Trying to further define it at this point simply gets into pre-conceived weeds, so to say.
At one point, I called it Primoferment, short for Primary Fermentation, but then found that other baking authors had semantically or logistically connected primary fermentation to bulk fermentation. Originally, I called it “Sponge flow chart”, and used the term pre-ferment in the lower block. I still believe it’s a sponge, because it doesn’t have salt, oil, or other ingredients yet, but some notable baking authors claim a sponge can only be less than 100% of the flour (I guess 100% of the flour is like a sponge asymptote).
A number of baking authors say “pre-ferment” has a similar 100% flour restriction, therefore what I’m doing is not a pre-ferment. Anyway, the term “pre-ferment” doesn’t make a lot of sense to me, because once yeast has been added to wheat flour and water, fermentation begins. The prefix “pre” generally means before, so pre-ferment would seem to mean before fermentation, but adding the yeast begins fermentation, so it makes little sense to call a step after adding yeast the pre-ferment, regardless of the percent of the total flour amount. I’m going to need to train myself to avoid using the term, as it appears inherently contradictory, and as such is confusing. At best the term seems an oxymoron.
The bottom line is that I believe the above flow chart is a sponge, due to the hierarchy of ingredients and the order all ingredients are eventually added to dough. It seems there are different logical ways of organizing the various steps, and to some degree, this creates inflexibility.
I’m also going to start tracking the odor of alcohol as a subjective data point, it may be that relates to the bread’s final baked flavor. Don’t worry, the alcohol boils out during baking when it reaches about 172F degrees.
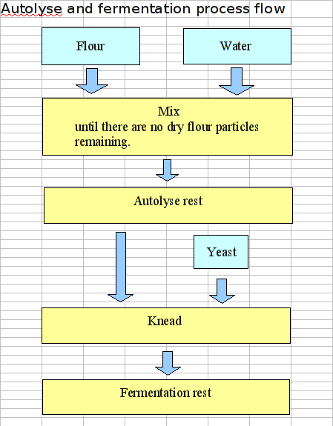
When looking at only the two flow charts (directly above), it’s very easy to see a progression of ingredients that could extend beyond the second flow chart, to a third, even a fourth. It would make some sense for specific, named stages of pre-bake yeast-dough to follow such a progression of ingredients, similar to that progression as seen from autolyse to ferment. Perhaps that was one of Calvel’s messages to bakers. Perhaps another message is not how many separate rests interspersed by kneadings there are, but simply the order that ingredients are mixed (kneaded) into the dough.
One aspect that seems to differentiate the autolyse (as a rest) from the others is that its a dead mixture (containing no added yeasts or bacteria, in reality its probably hard to work only with sterile flour and sterile water and-or not accidentally inoculate the dough. I also presume that trying to sterilize the flour would likely affect enzymes and possibly its other chemical structures, including any wild yeasts, spores, and bacteria that may exist naturally on or in a wheat grain or flour product). Once yeast has been added, the mix is no longer dead, life has been added to it. Autolyse no longer seems as logical a term for a process once life is thriving.
With my most recent batch, I logistically nested the dough from the autolyse into the “water” and “flour” primary fermentation ingredients (light green). Another way of stating this is that after the autolyse, I added yeast and kneaded to incorporate only the yeast into the dough, thus transforming the autolysed dough into one that would ferment.
Both poolish and biga are sponge pre-ferments, but they’re terms that are slightly more specific with respect to added water and moisture level. Since my latest batch was ~57% moisture, that lies within the 50-60% water guidelines that I’ve seen that define the term biga, therefore I called it biga-like. Any biga is also a sponge, and so is a poolish, as I understand the terms. However, since mine uses 100% of the formula’s flour, according to some recently-published baking authors, I cannot call it either sponge or biga. Nor is it straight dough, as the order of the ingredients added to the flour, with the multiple rests and mixings, surely excludes that as well.
Wikipedia says a biga can be as low as 45% water, and theartisan.net, 42%, however, as a practical matter with the flours I’ve worked with, getting under 50% and having it fully hydrate is questionable. I did try a series of tests of “cracker” pizza doughs that had somewhere near 42% hydration, but the flour after mixing, and I mean vigorous cutter-blade mixing as well, remained mealy, and would only stick together if pressed together. During that time was when I noted that it was near the 50% water level that allowed a dough’s gluten to fully develop, however, I didn’t try a series of experiments dialing it in at 1% increments, so my figure is approximate. Another factor that I haven’t yet explored is that those levels I tried were with straight dough formulations. Clearly, the autolyse rest changes hydration significantly, as evidenced by the vastly increased stickiness of a ~57% water-level dough subject to it. So, perhaps it is possible to obtain lower hydration levels in any flour using Calvel’s autolyse technique. More things to explore….
I happened across a very interesting related paragraph the other day in a book originally published sometime in the 1940s, re-published at chestofbooks.com, the title is “Experimental Cookery From The Chemical And Physical Standpoint”, by Belle Lowe:
Distribution of water in dough. Alsberg in “Starch and Flour Quality” states that in bread dough about 50 per cent of the water is bound moisture or water of hydration incapable of serving as a solvent for other substances. The starch holds approximately half of this bound water, the gluten the remainder. Starch at room temperature can absorb about 30 per cent of its weight of water, whereas gluten may absorb 200 per cent of its weight. But starch constitutes so great a percentage of the flour that as a result the quantity of water it binds is nearly as great as that bound by gluten. The remaining 50 per cent of the water in bread dough, which may serve as a solvent for other substances and form steam, cannot be separated readily from the dough by mechanical means. It is held in the interstices of the dough by surface and mechanical forces.
It seems to me that if the purpose is to grow and multiply yeast, having free water available for them “in the interstices” would be somewhat helpful, though it’s just a guess, as I’m no microbiologist. It’s my belief, since I’m trying to multiply yeast, that fully hydrating the flour is important, particularly since I’m using dry yeast that needs moisture, presumably “non-bound” or free water, to hydrate. While I still occasionally look, I have been unable to find those little foil-wrapped cubes of cake yeast in the local stores’ refrigerator section that I recall finding some 40-years ago. The instant dry yeast seems to work okay, and it’s my understanding that baker’s yeast, in its various forms, can be substituted for each other.
The other notable thing I see in that paragraph is that as a wheat flour’s protein content rises relative to its starch content, it should require a higher hydration because the gluten (protein) is said to absorb so much more water than starch. Perhaps this relates to baker’s and recipe author’s frequent use of the phrase, “develop the gluten.”
In the case of my most recent loaves, 100% of the flour was processed through the primoferment step, as well, 100% went through the autolyse.
That said, if theartisan.net’s strict biga guide is authoritative, then my dough used too much water to qualify to be called biga, nor were my temperatures in their given biga ranges. However, even their own references elsewhere on their site state that a biga can be of 60% hydration. I refer specifically to their referenced Indirect Method #1 formula for “Pane Casereccio”, the formula for a 16-2/3% biga dough. I say 16-2/3% because the biga comprises only 100 flour grams of a 600 flour gram formula.
And since we’ve now brought the divergent terms “direct” and “indirect” into the discussion, it appears to me that:
Direct dough = Straight dough

Indirect dough = Sponge dough
Perhaps the formulas using very low biga-hydration levels are using low-protein flours. I believe I also read somewhere that flours manufactured in different places are dehydrated to different levels. If true, then a flour that has a higher inherent moisture content should require less added moisture to “develop the gluten”, than a drier but otherwise equivalent flour with a lower inherent moisture level. I would also presume that storage humidity, as well as ambient weather conditions, could affect this, including those in the home.
I also had a few melancholy remembrances during the last few days. I was about 13, maybe younger, and sitting at the kitchen table reading through a large cookbook. When it started discussing sponge methods, sourdough was mentioned. This pattern repeated through several other cookbooks over the course of some period of years, so I learned way back then that sponge methods were only meant for sourdough, and since I didn’t care for sourdough’s flavor, why would I ever waste my time learning to make sponge dough or using sponge methods. I’m sure glad that myth has finally been put to rest.
2009.Aug.2
Just some sundry reading, Bread, The Staff of Life. After reading that I was reminded about the squishy and non-springy nature of this most recent batch. I’m certain that that aspect of the batch was not an improvement, and my plan is to increase the protein ratio to a higher level. However, that is not my primary concern at this point, tuning the yeast amount and fermentation temperatures are much higher on the priority list.
2009.Aug.3
The initial temperature of the primoferment before placing in the refrigerator for the retarded fermentation probably gives a great deal of control over the time intervals required for the rising dough to peak, besides just the initial seed or inoculation amount of yeast.
As I’ve been looking around for the math equations, I’ve increasingly been reminded of my capacitor solutions post and the project it describes.
I’ve noted that not one of my cookbooks has simplistic equations to calculate the dough peaks, and even more more to the point, to calculate shifting the peak to a sooner or later time interval which may involve temperature more than initial yeast inoculation. One of the books does have simple formulas for dough temperature (mixing flour of a temperature with water of another temperature to calculate mixed temperature), protein ratios, and some other things, so I find the absence of a simple equation for bakers to model yeast curious. So, if you’re a mathematician, or perhaps a molecular biologist, consider hooking up with a bread baking artisan/author, and devise a simple temperature and yeast growth formula so that us home bakers can plug some numbers into our spreadsheets so we can accurately shift the time our fermenting-dough peaks occur by changing the seed yeast amount and-or by changing the fermentation temperature.
The most comprehensive set of formulas I can find: sourdough yeast and bacilli culture mathematically modeled.
However, I feel that currently attempting to understand those will require more time-investment and lack-of-joy than I desire (just following the references to other studies is time consuming, then often they’re not publicly available anyway, so then one goes on a “hunting” trip to libraries and such looking… can potentially be a big waste of time).
Here are a few other links regarding yeast-growth modeling.
http://www.pizzamaking.com/forum/index.php/topic,5028.msg42572.html
(this pizzamaking.com reference isn’t yeast-growth modeling per se, but it’s interesting nontheless that a pizza baker modeled a dough formula)
http://blowers.chee.arizona.edu/cooking/kinetics/bread.html
However, this has the most simplistic formulas, scroll around the page some:
http://regentsprep.org/REgents/math/ALGEBRA/AE7/ExpDecayL.htm
These last ones probably won’t work very well, but because they are so very simple, trying them isn’t a huge time investment. The doubling formula doesn’t take account of temperature, which is a major failing.
[This section is to continue adding links as I find them that relate to yeast-growth modeling, regardless of the date I find them]
http://archives.math.utk.edu/ICTCM/VOL18/W013/paper.pdf
This model seems to incorporate a bound point, and includes a simple graph.
[/end.link.section]
So I decided, in order to avoid going down this particular math rabbit hole right now, losing any joy the bread baking has been giving and instead having a month or two long math refresher cram session and lots-of-work, to instead simply cut the initial yeast amount in half, and make another batch, keeping the temperatures as constant as I can keep them. By selecting a yeast amount that is exactly half the value as that used in the last batch, then observing any increase in the time to the new batch’s retarded-fermentation dough peak, I should get a rough idea of the time interval required for yeast numbers to “double” under those conditions by observing the height of the peak, as well as the time intervals that have passed until the peak occurs.
This may give me some insight into whether it’s possible to shift the dough peak to something other than a 5-6 hour time-interval point, or whether yeast wants to follow a more time-fixed growth curve, particularly in the event the dough peak doesn’t time-shift much at all. It’s possible that the height of the peak will change more than any time-interval shift. In that case, my guess will be that it’s better to modulate the dough’s initial temperature going into the refrigerated fermentation, to decrease it some to slow growth versus changing the initial yeast added.
2009.Aug.4
I haven’t yet flow charted the the proof, and may not. It is my understanding that the yeast consumes a very limited amount of food composed of broken starch chains that comprise at most 1-2% of the total flour weight. It seems to me that with too many fermentations (that have kneadings or foldings between), the yeast will eventually consume all the available broken starches, at least with a lean dough that has no added sugar. Therefore, it seems there would be a point at which even viable yeast would fail to thrive. I also understand this can result in a pale colored crust, as it’s these same sugars that are responsible for what is called the Maillard reaction which results in the crust color. Diastatic malts seem to typically be used for this, to increase the yeasts’ food supply. Apparently the difference between malt powder and diastatic malt powder is that with the former, the enzymes and such have been inactivated, but in the latter, they remain active. I’ve also seen some references to malt syrups used in baking, but whether they are diastatic, or not, is often unknown.
Most of the flours I’ve purchased over the years state they have some malted barley added (the High Gluten flour I use does not state this on the packaging, but it does say enzymes), so if one uses a flour without such an addition, the importance of adding these yeast foods probably increases, and in the event those aren’t added, likely so does the yeasts tendency to consume its available food supply faster, as it seems its total food supply would be decreased.
Here’s an interesting page about making your own diastatic malt at home. A similar page. We used to buy some breads years ago at a particular market that also had its own bakery, most of their breads were whole grains of various kinds, some of which had the word “sprouted” in their name. One day they stopped making their one-of-a-kind Sprouted Triticale bread. That was a sad day.
Anyway, the bottom line of my current thinking is that the more fermentation rest periods there are (with the very important disclaimer of 100% of the flour), the more yeast food (simple sugars of some name, might be maltose) has been consumed by the growing until-the-bake—or—run-out-of-food yeast, particularly in a lean dough. It seems the advantage of the enzymes is that they seem to make the needed simple sugars from the more complex starch chains (undoubtedly an oversimplification). Another set of explorations could investigate the effect of food-starved yeast on the final proof, besides just a lack of color in the crust. My guess is that it wouldn’t rise as much, and be denser and chewier.
2009.Aug.06
I was just grocery shopping, and also reading labels once again, a habit of mine, and I saw that a similar flour with a higher protein ratio, labeled as “Bread Flour”, also contained ascorbic acid. The “Baker’s Flour” didn’t claim any ascorbic acid. Ascorbic acid is used as a dough conditioner, and current references seem to say it interferes with alpha amylase enzymes, while ascorbic acid’s inhibitory effect on beta amylase has been known for a number of decades. While it’s just a guess, with straight dough formulas such as those of a typical bread machine, ascorbic acid inhibition of amylase wouldn’t seem to matter as much. However, with longer dough development processes such as sponge doughs, amylase enzymes would seem critical to breaking down longer starch chains into simpler sugars that yeast can feed upon over longer time periods. Whether these enzymes are active or not at the lower fermentation temperatures typically used during bulk-fermentation and proofing, or whether they are only active at the higher temperatures found typically during the bake cycle, or whether the amounts of added ascorbic acid are sufficient to significantly affect these enzymatic processes are unknown by me. These two flours are from one manufacturer, whom I haven’t named, nevertheless, they seem important things to look for on the product labels, depending upon one’s intended usage.
I’m feeling like I’m going down the baker’s rabbit hole, without even getting into math.
2009.Aug.8
I’m still reading and searching for information about amylase, and trying to determine whether it is active at the lower temperatures typically used during bulk-fermentation and proofing, as well as wanting to know if it is active at typical refrigerator temperatures. The following page is about industrial enzymes added to bread, but their first sentence, at least to me, implies that amylase enzymes are active at temperatures typically used in bread-dough fermentation, i.e., “Maximises the fermentation process…” The temperatures aren’t specified, and beer-making guidelines say that the optimum temperature for amylase activity is higher than fermentation temperatures (temperatures at which yeast lives), the linked image appears on this page. It’s a little hard to reconcile the two, unless the wort mashing guidelines are idealized to optimum points but that the given enzyme activity also occurs outside the image’s given temperature and pH bounds.
One of the curious processes when using a poolish, is that dry flour is typically added between the poolish stage and bulk fermentation or later proof, adding more broken starch chains, effectively supplying fresh food for the yeast. However, if one wishes to autolyse that dry flour first, autolyse with only water at non-yeast modified pH levels, then the percentage amount of poolish used must decrease in the final dough (by the amount of water added to the flour for the autolyse process, water which once used there is not available to have used it in greater percentage amounts in the poolish). By definition, a poolish is of 100% hydration, or equal weights of flour and water. This is one of the reasons why I wanted to try the biga (whether biga or pseudo-biga) first.
One thing I need to be aware of when altering the yeast amounts to tune when the dough peak occurs is that I may begin to alter “older dough” into “newer dough”, which may alter flavor. My prior batch had the peak occur at 5-6 hours, which means the dough continued fermenting for another 12-hours, so the ratio of 6:18 (18 derived from 12+6, or the total retarded bulk-fermentation time) may be important. The last batch I made had a ‘very light’ scent of alcohol at the end of bulk-fermentation. Some of the prior batches, before I practiced more care with temperature and time, had stronger alcohol smells at similar process points. So, if the dough peak is altered, I need to also specifically note any odor changes, as it may be the dough’s alcohol that slightly alters the baked bread’s flavor. This may be something worthwhile to note on the flow charts, besides just the current data points which are mostly time and temperature. I’m sure the pros probably have a test of some kind they can perform to provide a precise alcohol content datapoint; I’ll have to be satisfied with the subjective smell test for now.
So, two new datapoints to add to fermentation flow charts. The ratio of the dough peak to the total fermentation time, and the subjective smell test. The data points might be irrelevant, and they might not be, the only way for me to know is to track the information then perform the highly subjective taste test.
I think I’ll go back and alter at least one of those flow charts above to include these data points, and while I’m at it I’ll delete the silly term pre-ferment.
2009.Aug.9
For some reason, the use of the term pre-ferment by so many other published bakers has stuck in my mind as a misuse of the root words, particularly the prefix. This morning, it occurred to use the term “primary” as a word in the phrase “primary fermentation” instead. I’m sure I’ve seen the term used elsewhere in this context. However, it’s tempting to turn “primary” into the shortened prefix “pri”, unfortunately, I cannot find “pri” listed as a prefix in any English-only dictionary (but I haven’t yet checked OED). I’ll probably go back and change my usages of the term “pre-ferment” to “primary ferment” or “primary fermentation.” Maybe someday “pri” will be considered a valid English prefix, if so, then I can shorten it to pri-ferment; further, pre-ferment and pri-ferment might or could be homonyms.
Someone asked WikiAnswers what the prefix meaning “first” is, the answer given is “primo-“. So, “primo-fermentation”? But I’m not going to take WikiAnswers as authoritative, I still need to check OED. My little unabridged dictionary doesn’t list “primo” as a valid prefix, nor does a define:primo Google search turn it up as a valid English prefix, though the unabridged dictionary I commonly use does have the word-fragment “primo” preceding other words when not using the hyphen, such as primogenitor, and indeed it seems to mean “first.” So, maybe primofermentation and primoferment fits better, but today, that doesn’t seem to be a “recognized” word. Perhaps I’ll start using it anyway. Yes. I will “coin” the word primoferment and the variant primofermentation, as well as plurals with an added “s” at the end. I will define it thusly: First and-or Primary Fermentation. When used in reference to baking bread, as I have used it, it specifically allows any flour amount, either less than, equal to, or greater than 100% of the flour (if a single batch of primoferment was for multiple specific and different formulas, and the total primoferment was divided to make each one, it could have a larger amount of flour than 100% of any given specific formula).
The purpose for my use of this word is that in the case of the term “sponge”, as well as “pre-ferment”, the explicit meanings as used by published bakers evidently excludes using 100% of the flour. Thus, I will use the term primoferment to mean the first fermentation, regardless of the percentage of the final dough’s flour amount. A primoferment could also be a sponge, or even the oxymoronic preferment, as those terms have apparently come to be defined by bakers. While I’ve never made a sourdough culture due to personal taste preferences that I learned of when a child, if such a culture is or was the first fermentation, the term primofermentation could also apply to that.
I’ve just discovered that the bi-metallic refrigerator thermometer that I’ve been using in my “warm” refrigerator is now defective (I believe it worked fine when it was new). Putting it into a non-defrosting chest freezer with a newer, fluid-based refrigerator/freezer thermometer (AKA “bulb” thermometer, but inside some kind of plastic and metal case) shows that its error is huge: Fluid-thermometer reads -15F, while bi-metallic reads 42F. So, while I was believing that my dough retarder (it’s a spare fridge, an old keg cooler I found rusty in a backyard back in the 1980s — it needed a minor repair, a start capacitor for the compressor–I love it because it doesn’t have a defroster-heat cycle, thus it uses very little power) was warm, evidently my thermometer was misreporting the temperature. I do know the old keg cooler doesn’t freeze water, so it’s above 32F. I moved the fluid-based thermometer into it, and it seems to read 38F. I guess it’s time to buy more refrigerator thermometers, and I hope to get the fluid type (maybe they’ll last longer). So all that prior data where I believed my retarder was warm at about 45 or thereabouts is wrong, based upon the reporting of a defective thermometer.
But before doing any of that, I’m getting low on baked bread…
2009.Aug.10
| High Gluten Flour | 28.00% | 0.1720 | 463.12 |
| Baker’s Flour (11.8% protien) |
72.00% | 0.4423 | 1190.88 |
| Salt | 1.23% | 0.0076 | 20.34 |
| Instant Dry Yeast | 0.32% | 0.0020 | 5.29 |
| Olive Oil | 4.00% | 0.0246 | 66.16 |
| Water (dechlorinated, demineralized) | 57.23% | 0.3516 | 946.58 |
This is a test of halving the added yeast. The process is about the same as the prior “Wow!” batch above. When I say, “about the same”, I mean as precisely the same as I’m humanely able to duplicate it. I’m trying to find out if and how much the dough peak time-shifts with a refrigerated bulk-fermentation process, due to so many claims on others’ sites that reducing the yeast amount shifts the dough peak to a longer time interval.
The following observations were made on the same day as baking (very fresh).
Crumb Texture: The cell sizes are smaller, and overall, because the proof didn’t rise as high in the pan (reduced absolute yeast numbers is my guess), the bread is more dense. It isn’t as “squishy” though it’s still soft, (softer than the straight-dough series of 55% water and about same size and total weight), but the crumb springs back after squeezing (similar squeeze to what happens when eating a sandwich). Not a very heavy squeeze, but a compression of a slightly thick slice to about 1/8″.
This bread is almost tasteless. Reminds me slightly of factory made hamburger or hotdog buns, shape excepted, though this is probably springier, and crust is thicker. Tasteless quality persists with toast. This size does allow 4 slices to fit in the toaster oven simultaneously. Two differences with prior batch: Reduced yeast numbers, and probably related, absence of alcohol odor.
I’ve updated the most recent dough formula to be more specific with regards to the water I use, and have used in the past. Chlorine in the water may act to inhibit yeast growth, and I understand dissolved minerals such as calcium raise pH.
Next comes the retarded dough-peak data, it peaks at roughly the same time as the prior batches where the initial temperature was 84F and the total dough-ball weight was about 2600g, though the height of the peak is about 2 inches less. The row that says ‘”s to top’ means the inches to the top of the pan, the number decreases as the dough rises higher.
| Interval (h) |
0 | 3 | 6 | 9 | 12 | 15.75 | 18 |
| clock says |
2:45 PM | 5:45 PM | 8:45 PM | 11:45 PM | 2:45 AM | 6:30 AM | 8:45 AM |
| “s to top |
n/a | 2.75 | 2.5 | 2.5 | n/a | 2.5 | 2.5 |
| d. temp (F) |
84.5 | 65 | 56.3 | 53.6 | n/a | 48.3 | 47.6 |
The problem with shifting the dough peak is that the dough is cooling off within 6 hours to a temperature below yeast multiplication levels, given the 84F initial dough temp when placing it there. So the answer appears that the dough peak does not time-shift significantly with this type of changing-temperature process. The reduced height of the peak could be considered a type of shift, but it doesn’t appear as a time shift. My guess is that the total yeast numbers are reduced throughout the entire yeast active temperatures. Since there wasn’t increased time at active temperatures, yeast didn’t multiply to greater numbers needed to rise dough higher, and effect other dough chemical changes, such as decreased stickiness (stickiness that first showed up with the autolyse process, but that disappeared relatively more after other batches’ retarded bulk-fermentation, batches when yeast numbers would seem higher).
The major out-gassing of the yeast seems to stop or slow somewhere between 65 – 56.3F, as my non-calibrated black digital probe reports. I can think of three possible ways to extend the fermentation peak given the apparent problem: Do some of the fermentation outside the 38F cooler, say, 6 hours or so, then place it in the cooler for the remaining 12 hours; raise the dough temperature some (I estimate it needs to be raised to about 100F for a 12:18 Peak:Totaltime, which is kind of a high dough temperature, though it might make an interesting test to sample the effects of a partial higher-temperature fermentation on autolysed dough) before placing in fridge; or a combination of the two. Oh, another possibility is to connect the thermostat used for the proofing light to the fridge, then set the temperature higher than 38 (it’s trivial wiring, but I would prefer a process that uses a typical refrigerator temperature, though being able to retard to any desired stable temperature is possibly/probably the best solution.)
My current guess is that the dough peak would shift as a point-in-fermentation time provided that fermentation temperatures were constant and of a level that was between yeast activity temperatures. My understanding is that those temperatures would typically be between 68 – 105F to possibly a little higher, though the rising data of this latest batch also shows activity at lower temperatures including 65F and a bit lower. This is why being able to set the retarder’s or refrigerator’s temperature somewhat higher than 38F would be preferable. Since my non-calibrated temperature probe indicated that yeast activity (outgassing) slowed to a stop somewhere between 65 – 56.3F, setting a fermentation temperature at those levels (whatever the actual temp is, my black digital probe has an unknown amount of error, possibly 5 degrees high or slightly more) would provide the slowest dough rise and associated yeast multiplication. If I could set the retarder to 65F, it seems it would be a slow, steady rise, and if I could set it to 64F, then 63F on a different batch, and keep lowering the temperature over successive batches, I could probably find the lowest temperature point where this particular yeast strain appears to go into dormancy. As a related issue, I recall reading somewhere that yeast lagers (a beer type) are typically cold fermented (I don’t recall the precise temperature). Ales are fermented at warmer temperatures than lagers.
| Digital Thermometers, freeze and boiling test | ||||||||
| All readings Fahrenheit. |
||||||||
| out-of-freezer | boiling water | |||||||
| but still in crushed ice w/water | ||||||||
| 1/2 min | diff | 10 min | diff | 15 min | diff | |||
| later | later | later | diff | |||||
| Black | 33.9 | 1.9 | 37.5 | 1.7 | 40.6 | 2 | 208.4 | −0.6 |
| Green | 32.0 | 35.8 | 38.6 | 209 | ||||
To do the freeze test, I filled a drinking glass that was tall enough for the stainless probes to be completely submerged, filled the glass with crushed ice, then placed the black and green thermometers in the ice with their probes touching the bottom (both have probes of roughly equal length), then filled the glass with water up to the bottom of the thermometers’ plastic circuit-containers or the point where the stainless probe is fully submerged, the same as the level of crushed ice. Then I placed it all in the freezer for 20 minutes. Then I removed the glass and thermometers from the freezer to take temperature readings. When looking at the data, it seems to me that the thermometers’ circuit-cases, when they warm up in room-temperature air, increase the reading, though I’d like to have confirmation of that, such as with an accurate bulb thermometer. I have trouble believing that a fully filled glass of ice with some icewater is as high as 38F, the ice should have been more melted at that point, but I don’t have a calibrated bulb thermometer to test it against. What I’m saying is the temperature measurement may not be well isolated to the probe itself, never mind only the tip of the probe. So, next time I measure bulk dough rising temperature, I will use the green digital thermometer, and leave it in the dough while the dough is in the refrigerator, that may get the plastic circuit case closer to the same temperature (upon a reread, this also runs the risk of skewing the temperature reading to the low side, if the probe is not well temperature isolated and the center of the dough is warmer than the surrounding air, such as in a refrigerator).
The reason I’ve preferred using the black digital thermometer was that when pressing its on-off button to turn it on, it had the last used F or C setting saved, so all I had to do was turn it on and wait for the reading to stabilize. With the green thermometer, it always defaults to C (centigrade) when turned on, meaning I have to press two buttons to use it. First, turn it on by pressing one button, and press the other C-F button to change it to F.
I prefer thinking of baking-related temperatures in Fahrenheit because the oven’s thermostat knob is scaled only in Fahrenheit, so it makes more sense for me to think in relative terms to Fahrenheit. If the oven knob had both scales printed on it, I doubt if I’d care which scale I used.
I’ve noticed when I make one loaf and refrigerate the dough, it rises less than when I make two loaves. Two loaves worth of risen dough, about 2600g, fully fills the large pan and lid I use in the retarder when the dough has expanded to the point it typically falls (the “peak”). This point may be between 4 and 6 times its starting volume. Anyway, as the mass placed in the pan increases, it seems to take longer to cool off, so the dough rises a little more because it’s at a higher temperature for a bit longer time, keeping the yeast active for longer. So, another strategy would be to get a larger pan (expensive, particularly for stainless steel, personally I wouldn’t want to use aluminum due to dough acids that form – certain food-grade plastics would probably be okay, if the dough can be removed without adding oil to its surfaces), and make four loaves at a time, refrigerating all the dough starting as a single rounded ball.
When I wrote “food-grade plastics” in the paragraph above, it flashed into my mind that yet another tactic would be to insulate the rising container, so that the heat transfers out of the dough slower. Plastic alone insulates more than stainless steel. So it seems there are a lot of strategies that could increase the current 4:18 – 6:18 peak ratio.
This dough was stickier than the prior batch when it came out of the retarder, I presume because the reduced yeast numbers didn’t effect as many dough changes in the first 4-6 hours when the yeast was active and before cold put them into dormancy.
No alcohol odor after fermentation was noticed. One possibility for this is that due to frequent temperature checking, the fermentation pan kept having its lid taken off, then replaced. I forgot to specifically sniff-test this post-fermentation dough. With some prior batches, alcohol odor was obvious without intentional sniff or smell test. However, my belief is that yeast numbers weren’t yet high enough during temperature-active bulk-fermentation periods to produce a higher level of dough alcohol that would have been of obvious odor.
2009.Aug.12
One more piece of data that I haven’t been explicitly tracking, and which certainly seems important, is the total time in fermentation. In other words, the clock time and date when yeast is added to the flour and water, and the clock time and date when the shaped and proofed dough is placed into the oven for baking, which shortly thereafter kills the yeast (said to be 140F). For the purposes of consistency from batch to batch, this total fermentation time seems quite important, though the varying temperatures tend to alter the yeast growth as well. Most of the interim fermentation steps already have an associated time and temperature, so tracking the total time also seems important as a double check that process was repeated accurately.
Additionally, I still need to develop a shorter and more concise method of conveying all the process steps, the time and temperature in each. The flow charts are okay-to-superior for understanding the general process, but they’re text-based objects, not data cells that can easily be altered with a glance and a keystroke or two.
It’s my understanding, from reading, that the large bread factories have gotten to the stage of near total flour-to-bread automation, which, whatever the weaknesses of their final product, at the very least provides a high level of batch-to-batch consistency, something which is hard to characterize as anything other than a definite strength.
2009.Aug.24 SNIP
The entries that were here have been moved into a new post with the title Part 2: Experimenting with Bread Dough Process. This snip, like the prior one, is due to difficulties updating when the post length exceeds some length amount. I started having trouble with this post when it contained about ~12,000 words. Apparently I will need to plan to have multiple posts, rather than one long one which was the original plan, and when the posts start reaching the 8K-10K word level, to start looking for a break point.
There is definately a science to baking, not only breads but cakes and different pastries aswell, thansk for the breakdown interesting info here good post
Sounds interesting. Good explanation. Even though its too long it explains alot and I’ve learned from it. Thanks for sharing.
somewhat mad what people can come across while browsing the internet, especially weblogs. Quite a few include people’s experiences and others are straight facts. Each in my opinion are great and also helpful. I have bookmarked this blog and also look forward to looking at much more in the future. Many thanks