A long time ago I posted one of my bread recipes, honey wheat berry bread, a clone of a bread I sometimes like. That was a time of increased interest and study regarding bread dough, and I posted much of what I learned in the comment section of that post. The Internet really opened up the information available to average folks! Much gratitude to the computer and Internet architects, and to all the folks who’ve added their knowledge!
Unfortunately, study and reading can take one only so far, sometimes you have to actually do it to learn more. So, after getting a scale to weigh ingredients, a vast improvement in the consistency of batch-to-batch results occurred, but then more questions arose.
I decided to increase the moisture of the white bread recipe that I use for toast and sandwich slices from 51% to 53%, where the water weight is expressed as percentage of flour weight, and further, this percentage doesn’t include all the water, as vinegar presumably is mostly water. Some may prefer to conceive of this 51–53% change as a 53.35–55.35%, or imprecisely by rounding to zero decimals, 53–55% change. The recipe is given below for further analysis. For a number of years I have put some amount of vinegar in my breads because I’ve noted the bread takes longer to stale when it has this ingredient added, or restating, gives it a longer shelf life, and I’ve never been able to taste it, so I see no downside to doing so.
As it happens, I ended up rising and baking this batch on a rainy and somewhat colder day, the rise took longer (around 5 hours) than it typically does on a warmer day (3.5-4 hours). I’m not sure how much of this change is related to the dough’s moisture change. (We get so little rain in Southern California, I decided to take an umbrella for a walk while I waited the extra time. Thank you Gaia, I love your rain!)
I prefer the french-bread taste of sandwich-style white bread made from dough that has aged in the refrigerator overnight, this isn’t done so much for the yeast to have a slower rise (though that is an effect), it is said to break down some of the carbohydrates differently, and the results are both tasted in an altered flavor, and seen as a slightly different color of crust in the baked product.
I rise the refrigerator-temperature dough in the pans it will be baked in, in the same room temperature oven in which it will later be baked. Because the oven is not humidified without the addition of heat, the weighed and pre-shaped dough pieces, before they’re put in the pans, are smeared with oil, and so too are the pans. This prevents a skin from forming during the rise in the absence of a humidified and temperature-controlled rising chamber, as well as providing a release agent for easing the removal of the baked loaves from their pans.
It seems one trick is to be patient with the rise, however, with this 53% moisture dough, I was quite surprised with how much it rose during the initial portion of baking, sometimes referred to as oven spring.
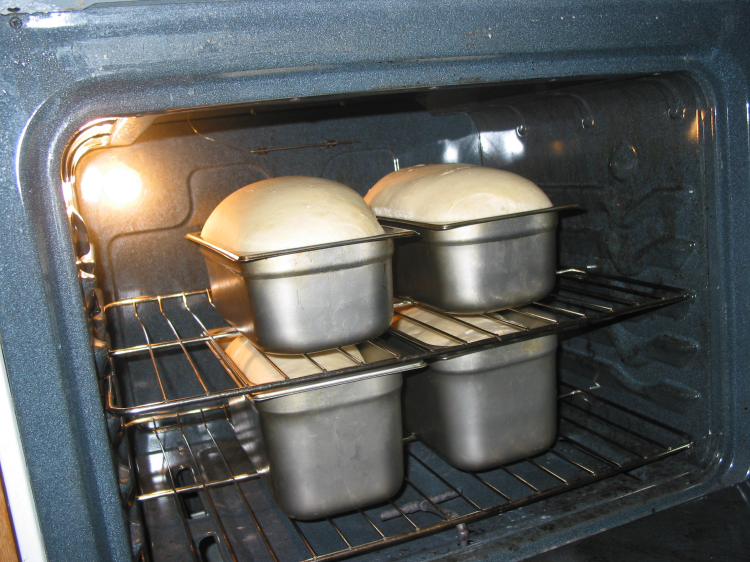
For each loaf, the dough weighed approximately 1300-1400 grams (which is 1.3-1.4 kilograms), this provides a nicely-sized sandwich slice that really is larger than a typical soda cracker! It takes 1 hour, 35 minutes of baking to reach 199F internal temperature, in a thermostat-reported 300F degree oven, and this includes our oven’s warm-up time. Higher baking temperatures seem to result in a crust that is too dark and thick for my sandwich-slice preferences, at least when baking these rather large loaves.
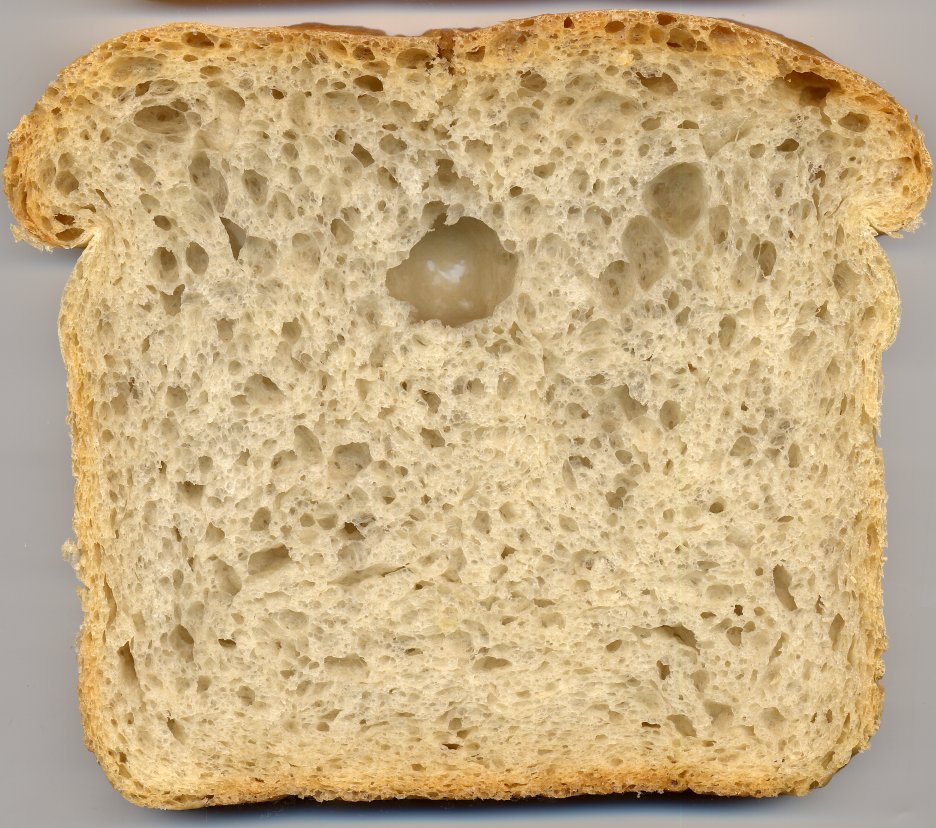
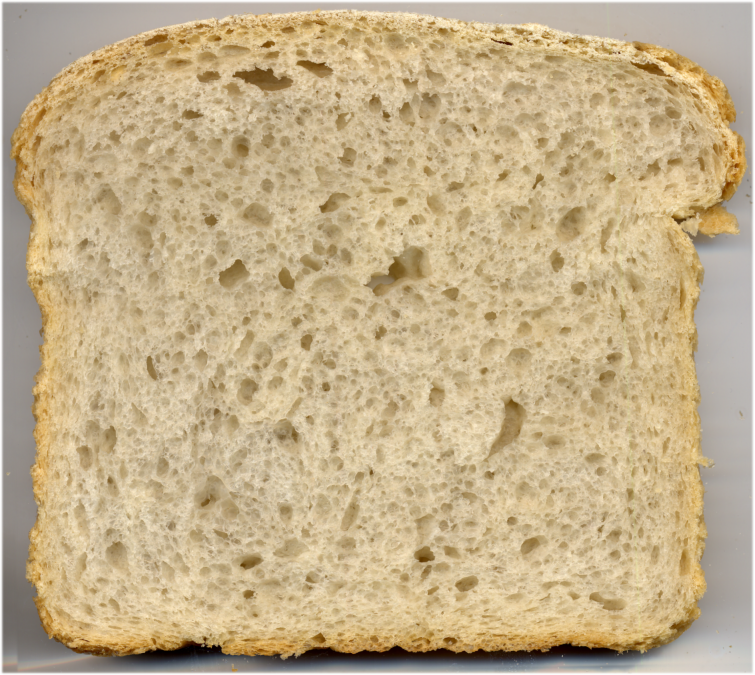
With respect to 51% moisture dough, the crumb of the baked product has fairly regular or consistently-sized holes, but at 53%, it appears that it’s beginning to get those odd, irregular holes some like so much. The photo that follows is of sliced bread from 53% moisture dough. I’m not at all certain whether I like these larger holes for sandwich slices, who wants a peanut butter and honey or jelly sandwich dripping all over their fingers? In any case it’s sometimes fun trying slightly different things, so long as the bread is still edible (one downside of making multiple loaves at the same time is that when something goes seriously wrong, it can be a lot of waste).

You probably didn’t notice the steam injector at the bottom of the oven. This really is a huge improvement to the equipment to bake bread.
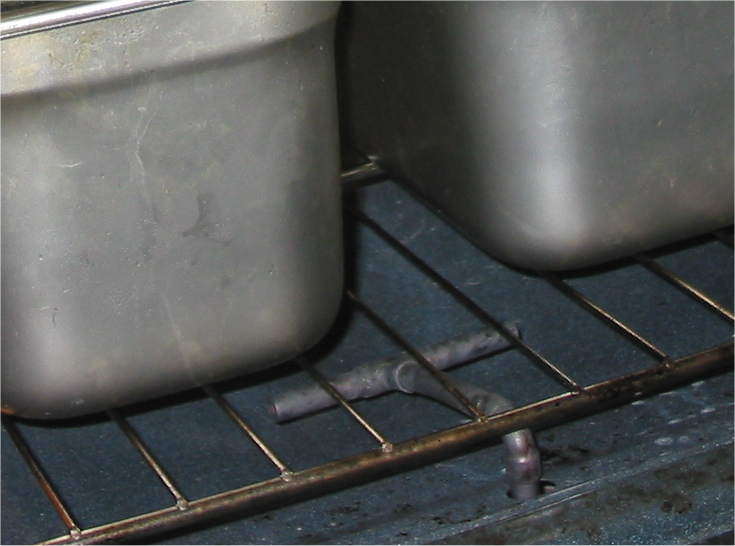
The other end connects to a slightly modified pressure cooker that sits on the stove, it’s what produces the steam for the injection. Since we have a gas oven, I was able to find an existing hole to route the pipe into the oven, rather than needing to drill one. Drilling may have required a specialized bit, such as diamond coated, to get through any ceramic, porcelain, or possibly enameled surface without damage. What is pictured is made from 3/8″ copper refrigeration pipe, but do not presume the 90-degree elbow and T coupler are soldered! I brazed them with, I believe, 95% copper rod! I didn’t think the low-temperature melting-point of solder would be good for use in a hot oven. Further, one connection remains a slip fit so the oven’s panels can still be disassembled, should the need arise. It probably would have been prettier had I sand blasted the nozzle after brazing to remove the heat discoloration, then polished it, but it’s perfectly functional as it is.
I found the following page when researching steam injection for bread baking several years ago, probably around the same time I published the other bread recipe: home oven steam injector. I thought this author’s design was brilliant, so I implemented a slight variation of it in my oven!
Adding steam during the first portion of baking delays a skin from forming, allowing more freedom to the yeast to provide additional rise before the yeasts’ production of C02 begins to fall as temperature increases. Once a crust (a.k.a. “skin”) begins to form, it seems likely that oven spring would be hindered or held back to some degree or another, until it develops enough internal pressure that it cracks the skin.
I’d also guess that the humidity of an electric oven, when using steam injection, would likely be higher than a gas oven, as a gas oven is typically vented, and has a resulting convection or air circulation from the bottom where dry, heated air enters, to the top where it vents outward. So, I’m using a rather large pressure cooker, to hopefully increase the amount of moisture during the time that the steam is applied.
The other important thing I’ve learned for sandwich slices is not to use a serrated knife to cut bread that will be frozen afterward. It seems to leave a rougher surface that interlocks with adjoining frozen slices, making separation in the frozen state somewhat harder than if the slices are made with a razor-sharp straight-edge blade.
After discovering this, I reshaped the edge of a slightly longer than 12″ serrated knife, said to be for roasts, to a straight edge. It has only one side beveled and sharpened, the other side is essentially flat. The one flat side seems to help achieve a straighter slice versus a knife that is sharpened on both sides. Unfortunately, since the edge isn’t bisymmetrical, it’s not equally as useful to both right- and left-handed folks. In spite of being a high-carbon stainless-steel alloy of some kind, it still needs sharpening with each batch of 4 loaves sliced. It’s amazing how fast soft bread can slightly dull its edge.
The cooled loaf is easier to slice if it is placed in a plastic bag overnight, as this softens the crust.
I’d venture a guess that kitchens of the future will require a computer workstation, as working with paper and baker’s percentages sans a spreadsheet seems less than ideal.
Baker’s |
|
| Ingredients | Percentage |
| High Gluten Flour |
66% |
| All Purpose Flour |
34% |
| Salt | 1.23% |
| Instant Dry Yeast |
0.64% |
| Oil or Butter |
4% |
| Water | 53% |
| Vinegar | 2.35% |
| Total | 161.22% |
| Flours’ Sub-Total |
100% |
These spreadsheets have a slightly higher functionality that make it easy to scale to large or small recipe amounts: An ODS (Openoffice.org) spreadsheet, and an XLS (Excel) spreadsheet.
Short and important note about bread flours. There are a lot of confusions for home bakers in regards to flour names, as flour mills are said to use a completely different flour grading system, and nomenclature or names, for their products versus the names cited for retail purchasers. This seems to result in some amount of variety in the characteristics of homebaked breads depending upon the precise flours used. There’s further information about this if you look around for it. So, you may need to experiment with the flours you have available in your area until you find something that works well enough for you.
3/9/2009:
I just made another batch, and confirmed the 53% moisture dough still has these slightly larger and more irregular hole sizes. However, I may have learned something else about Baker’s percentages relating to why bakers track the flour as 100%.
I designed a different spreadsheet that keeps the total dough weight placed in each pan constant, even though the weight of the water increases the total dough weight versus a lower water percentage dough (I’m not sure that’s phrased well). This spreadsheet automatically decreases the flour weight as a result, keeping the *total* dough weight placed in the pan constant to the 51% formula. I’m not publishing this spreadsheet at this time, as I’m not sure my formulas are as simplified as they could be, and I currently have two different calculation routines (I guess they’re essentially algorithms) that give the same answer as a double check, so it’s a more complicated spreadsheet to know how to use.
The total batch’s flour weight was reduced to 3397.33 grams by the calculations.
I tried this flour-weight reduction manipulation to keep total pan *dough weight* constant because I felt that with the increased hole sizes of the 53% bread, the baked volume of the loaves and size of the resulting slices was slightly larger than I wanted or was used to (they no longer fit in the toaster quite as well).
Anyway, I found the same baking time resulted in an increased and final internal bread temperature of 201F degrees, instead of the 199F that I’ve received repeatedly over at least 7-8 batches.
So, my tentative hypothesis is that a fixed amount of flour in each fixed size pan results in a consistent and final baked internal temperature assuming a fixed baking time and oven temperature, and it’s corollary, that a varying weight of flour in each fixed size pan results in a higher or lower final baked internal temperature assuming a fixed baking time and oven temperature.
If this is true, then an increase from 53% to 55% moisture, using the constant *total* weight formulas, should result in loaves that after baking for 1:35 minutes using the same rising and baking procedures, should further result in a final bread internal temperature of higher than 201F degrees, perhaps 203 degrees or thereabouts. Perhaps I should test that out with a 1 loaf batch of dough only, and see if these irregular sized holes in the crumb continue to increase along with the dough’s moisture increase.
It may also be possible to predict final baked-loaf temperatures with different baking times, possibly by basing a formula upon some kind of ratio between flour weight and total pan weight, presuming a fixed and consistent baking temperature. This may relate somehow to the somewhat unusual and greater than 100% total percentage.
I would think that having a consistent baking time to a particular final internal temperature would be useful to bakers, regardless of the number of fixed-size pans they’re dividing the total mixed dough into.
2009.04.08
I’ve been continuing to experiment, particularly trying to see if increasing the water content to 55% results in still larger holes.
| Baker’s | |
| Ingredients | Percentage |
| High Gluten Flour |
66% |
| All Purpose Flour |
34% |
| Salt | 1.23% |
| Instant Dry Yeast |
0.64% |
| Oil or Butter (~80% oil) |
4% |
| Water | 55% |
| Vinegar | 2.35% |
| Total | 163.22% |
| Flours’ Sub-Total |
100% |
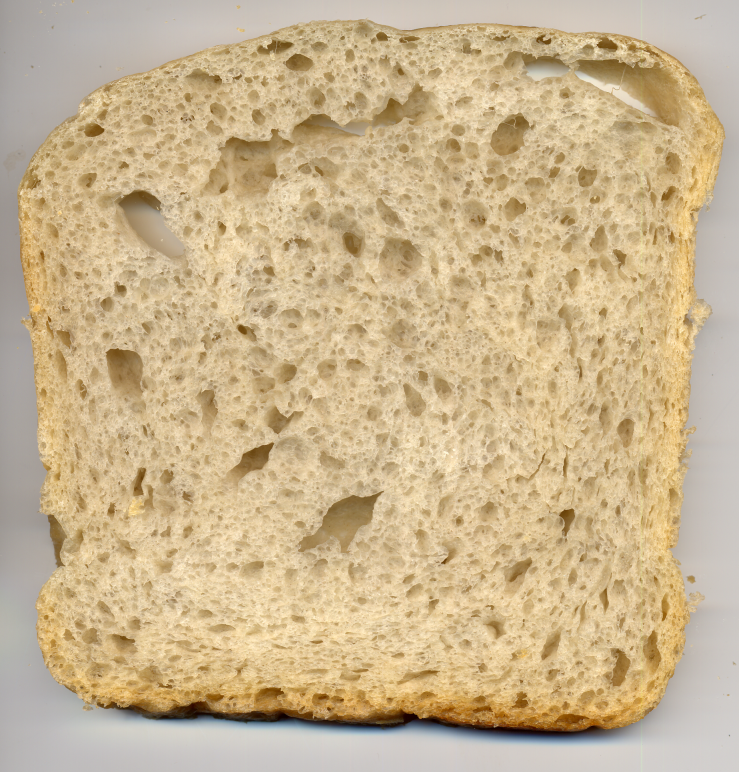
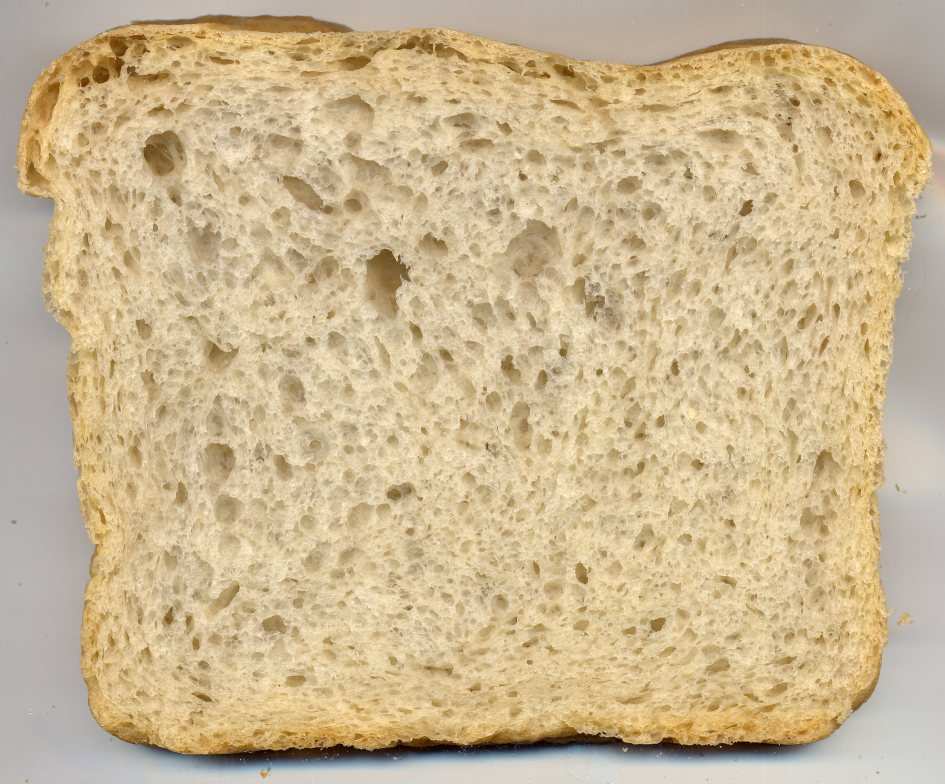
Results were mixed until I slightly increased the yeast and salt amounts, then it appears the answer is yes. To verify this, I reduced the yeast and salt back to the old measure. Unfortunately, I made a two mistakes. First, after mixing, I left the dough too long before putting it in the refrigerator, then secondly, on baking day something came up that required attention, and I wasn’t able to be near the oven until it was too late in the day to begin, so the dough sat in the 40F (somewhat warmish) fridge an extra day. I’m not certain I fully liked the results, but larger holes were definitely apparent.
Here are the results visually, and this time the image was made with a scanner instead of a camera. The colors seem more yellow than the bread actually appears, probably something to do with a computer color-profile setting.
You can see that during the baking, the top fell slightly, which is possibly due to letting it rise a little too long. So possibly a third mistake was made. This mistake laden batch rose much faster than I expected. I ran some errands during the rise, and when I got home there should have been plenty of time left to the beginning of the baking process, but there wasn’t! Because of the faster rise, coupled with the decreased yeast versus the prior loaf (not documented here, just mentioned), I presume there must have been yeast growth or multiplication of some kind, though that’s just a guess.
I noticed two things that seemed to have changed that I don’t care for. When slicing the bread, there was a slightly different odor, more vinegary is how I would describe it, and that would be consistent with aging of dough tending toward more acidic. If I wanted to explore this further, it might be worthwhile eliminating the recipe’s added vinegar. Also, there was the barest hint of a sharpness, perhaps subtle sourness, to its taste. I’ve never been a fan of sour breads, even though many love that flavor. I’m not sure if this slightly off flavor was solely due to acidity, or if I’m tasting the beginnings of a wild-yeast growth. The crumb also seemed a little less tender. So I have to try this precise recipe once again, but with only one day of refrigeration time, and with more care about not having extra time from initial mixing of the dough to the time it’s put in the refrigerator.
BTW, I’m currently only baking one loaf at a time, because I’m trying all these minute variations. During one set of tests, I mixed the dough with ice-temperature water, and immediately refrigerated it, trying to keep it as cold as possible until the next day’s rise. Another batch, I used room temp water, and allowed the mixing to increase its warmth more than usual (by mixing for longer), then refrigerated it after setting at room temperature for exactly 1 hour. The latter method resulted in a lighter, more airy crumb. So something desirable is happening during the slow cooling off process that occurs during the first four-to-six hours in the refrigerator, coupled with the slow warm up process during the rise after placing in the pans.
Oh, and at 55% water percentage, and a constant pan dough weight, the bread now almost reaches 203F degrees after baking for 1 hour and 35 minutes.
I’m believing my favorite so far is the 53% + 2.35% formula, but it’s still kind of fun, and a learning process, to see how slightly changing the values in the recipe and even processes change the end product. Evidently, for years, I’ve made my pizza doughs slightly too dry!
I’ve also been experimenting with different oils used for pan release agents, and have been surprised to find they are not all the same. Fully refined oils seem to work better than more virgin oils, as the latter seem to leave more crust on the pan after removal, and generally are more frustrating during the bread removal process. I’m guessing this is due to impurities in the oil that give it particular characteristics. The best oil I’ve found so far for pan release is *fully refined* peanut oil. Fully refined soybean oil, while it provides a nice release, tends to leave a yellowish sediment on the pan that after several baking cycles seems to build up and is somewhat hard to remove. However, I just obtained some 100% Organic Palm Oil, which is *not* hydrogenated, and which is quite easy to smear on the inside of the pan, which I then follow up with a saturated-with-same paper towel to leave only a very thin coating on the pan’s surface. The package label actually calls it “shortening”, but it’s still hard to find, not one grocer in our little town had any. Anyway I was really happy with the results as far as releasing the bread from the pan was concerned, and it doesn’t seem to be building up on the stainless-steel pan’s surface, which is preferable. Palm oil reportedly has a high smoke point, something around 450F degrees, I believe, so it’s a good match for the peanut oil, which I still smear on the dough before placing in the pan, to prevent a skin from forming during the rise.
2009.05.23
I was mixing up another batch, when I realized I never placed the pictures or improvements for the last batch. The photos are dated April 23, so it appears we eat about 4 loaves every month. I slightly increased the yeast amount for this batch.
| Baker’s | |
| Ingredients | Percentage |
| High Gluten Flour |
66% |
| All Purpose Flour |
34% |
| Salt | 1.42% |
| Instant Dry Yeast |
0.74% |
| Oil or Butter (~80% oil) |
4% |
| Water | 55% |
| Vinegar | 2.35% |
| Total | 163.51% |
| Flours’ Sub-Total |
100% |
With this particular batch, as well as the last one, I encountered an old problem with the process: erratic rising results, the dough rose much more than it should have in the time allotted before placing it in the fridge. Anyway, here are the results of this mistake:
In spite of worrying that either peanut butter or jelly would squeeze through these holes, it’s not that much of a problem due to compromise! When using this bread for grilled cheese sandwiches, the outer grilled surfaces turn out much crisper than it has with any prior formula, and toast is divine. So I guess I’m deciding I like the holes this size for an all-purpose white bread.
This particular batch (last month’s) surprised me when it rose far too much before placing it in the refrigerator, so I reread some references that I’ve read in the past, before I had actually started using baker’s percentages, or even knew what they were, that at the time were somewhat confusing. This time through the text made a lot more sense, due to much more baker’s percentage familiarity. The text (link below) reminded me that I wasn’t keeping track of the temperature of the air, the dough or flour, or the water used for the dough. While I don’t really like needing to track another set of data points, I’ve found somewhat different rising results at different times, and this has been a matter of curiosity and consternation. As soon as I would start assigning a set time amount for a part of the process, it would go as expected for a time or two, then it would fail miserably (well, not miserably, it was still edible). I believe I found the main source of the problem: we have a copper 3/8″ water line that travels through the attic from the garage, where the water filtration system is located, to the kitchen sink.
Today, as I was weighing the water, I also took its temperature, and found that it was in excess of 80F degrees, far too warm given that mixing the dough adds heat. I’m guessing that last month, since the daytime weather was reasonably warm, the bread dough temperature must have reached 90-100F degrees after mixing, which would have accelerated rise times.
When the drinking water line was installed, cutting the slab to put the pipe underground was considered only for the briefest of moments, but that would have insured that any water in the pipe would be at ground temperature, usually a stable value around 57F or so. Alternatively, putting the entire unit under the sink poses a problem with filter replacements and maintenance, so I put the line in the attic. During warm summer days when the sun is directly overhead, the water that is not flowing in the attic line gets quite warm, hot even.
So today I used a few ice cubes, weighed with the water for the total weighed amount, and got the water to 66F degrees when the added ice cubes were completely melted. I’ll need to rethink this process, but it worked well enough this time (I may just use chilled water that’s very cold, and microwave it until it reaches the desired temperature). After mixing, the dough was 81F degrees, which is right in my target range for yeast multiplication (as opposed to warmer temps for maximum CO2 production). I use a far-too-small food-processor using the blade for final mixing (for these four loaves it’s 8 “food processor” batches), and it’s known that this type of blade kneading adds dough heat quickly. Outside air temperatures were 70F according to the thermometer, and inside air temperatures were 76 or thereabouts.
The dough that’s rising right now (in the refrigerator, it takes time for it to cool) and made at these temperatures is not rising fast, but slow once again, much the same as it tended to do during the winter, when the water running through that supply pipe doesn’t get nearly as hot (I’ve known this for a long time, I don’t know why it never occurred to me as important for bread dough, duh). I may decide to move the drinking water storage tank to under the sink, but until I actually do that, simply being aware of the water temperature added to the flour should be sufficient to be able to adjust it to a reasonable value.
Apparently, what started my interest in bakers percentages was John Correls’s site about how to make pizza dough. He tells us of a temperature formula used in the industry. He tracks the flour temperature, the air temperature, and the water temperature, algebraically manipulating the formula to solve for water temperature of the current batch.
Another site with similar dough-temperature information.
So, I have a few more data points to track, and since there’s always some inaccuracy in any single set of measurements, for now my desired dough temperature will be around 80F degrees, probably 78F, or so, for this slow-rise refrigerator dough, never more as that moves into a faster fermentation range which I wish to avoid until the final pan rise or proof then bake. Since I’m trying for a little yeast multiplication before refrigeration and cool down, I probably want the dough at least 68F, so this gives a range of 68-78 to play around with. It’s important to realize that there’s additional heat added by kneading.
It looks like this is another good science-based cookbook. It’s a bit pricey.
My notes indicate I’ve already tried one batch in this series of recipes using very cold water (as cold as ice would make it), and I didn’t care for it as well as this method. My notes indicate it didn’t rise as well as a comparison batch made with room temp water (all other processes were the same, overnight refrigeration, etc.). I presume this is because the yeast didn’t have a chance to begin to multiply before the cool down of refrigeration. I’ve generally tried to minimize the initial yeast amount added to avoid a “yeasty” flavor, though I may have minimized it too much. That is one of the reasons I increased the yeast percentage slightly (and salt, to keep salt:yeast constant), I probably erroneously believed it may have been responsible for the erratic results.
I have about 8 feet of bookshelf space devoted to cookbooks, collected during the 1980s-present and only one, published recently, has anything about baker’s percentages. I’m thinking it may be time to have a book burning.
2009.05.24
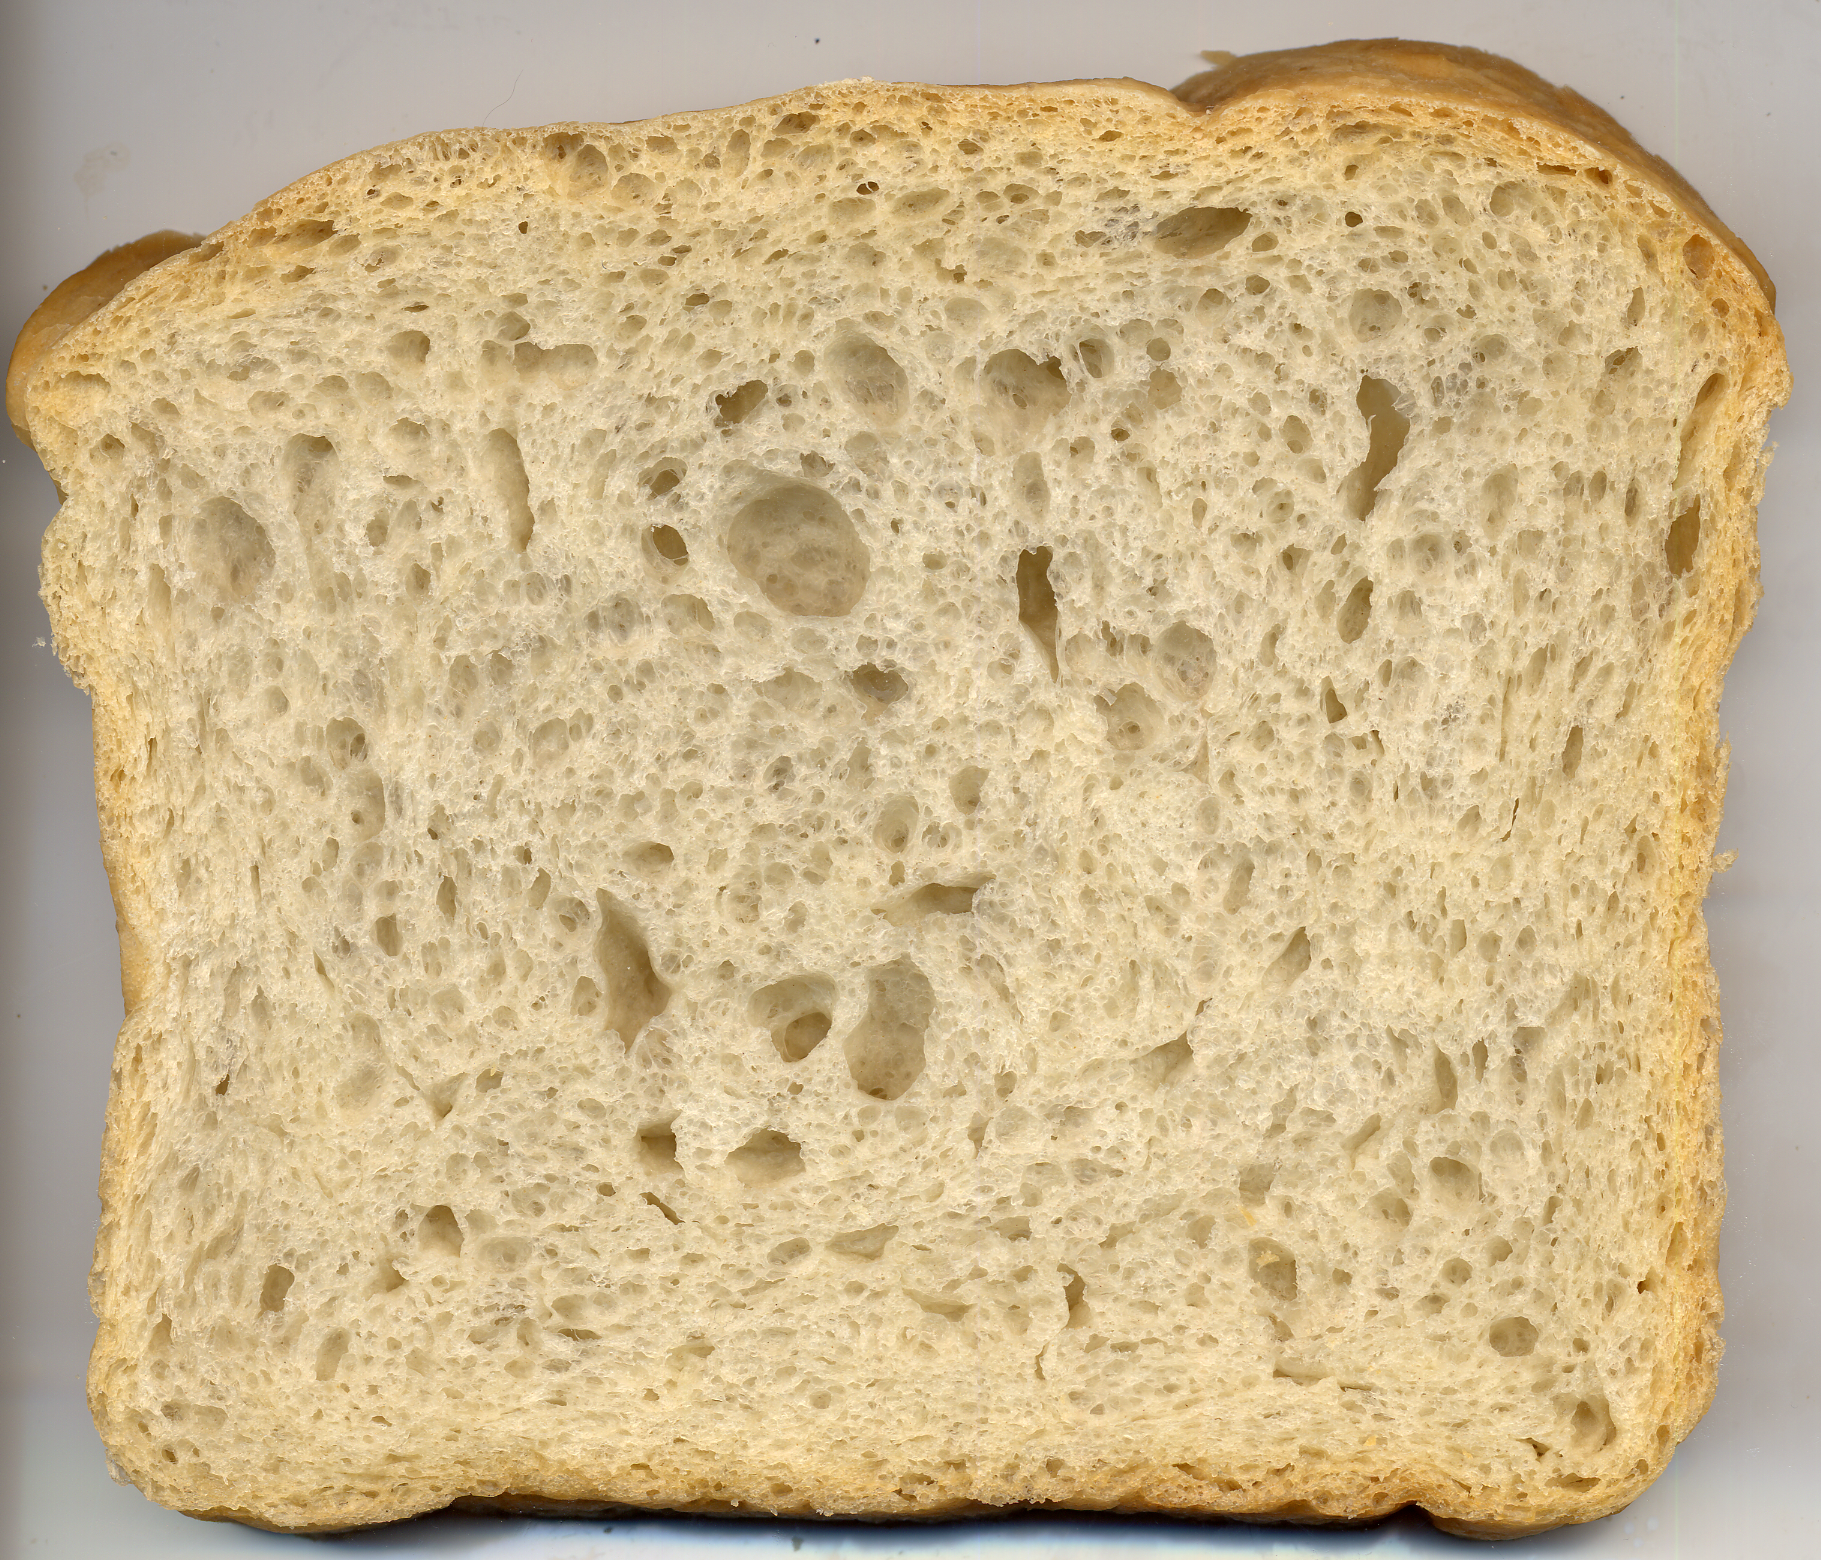
I used the same baker’s percentage recipe as last month. This morning I divided the dough, oiled the pans, and proofed. It’s baking as I write this, but I wanted to get a few short thoughts down. This time proofing took 3 hours from the time the pans with cold dough were placed in the cool oven, which is approximately how I remember it when making this during the winter. Actually, prior proof times I believe were 3.5 hours, so this is a little faster. I did keep the oven light on the entire proofing time, some day I’m going to need to measure the difference in temperature between light on and light off. Room temperature was 74F. The dough rose a little higher in the pan than I wanted, so it seems I need to cut the yeast and salt back down to the older, lower percentages (why use more if it’s not needed?). It appears that awareness of the temperature of water added to the dry ingredients, and how it relates to the final dough temperature before refrigeration, has tentatively helped to resolve this curious little repeatability and timing problem I’ve been experiencing. I wonder how many of my prior tries, and any conclusions I may have made as a result, were tainted by a varying water temperature and failure to track the dough temperature, which mostly likely allowed the pre-refrigeration dough to go well into fermentation temperatures.
It’s done baking, it’s cooled, and here’s an image of one slice:
As you can see, the holes appear a little smaller. It’s also soft, light, tender, and springy, as well the odor of the bread is more “normal”. I’m much happier with this batch. I’ll need to see how it works out as toast and when using it for grilled cheese sandwiches. I’ll also need to think on this for a few days, or wait for inspiration, to see which way further experimentation might go. I think I’d like to reduce the total mass in each pan, perhaps about 40 grams, and to let it rise for the full 3.5 hours as I typically did during winter.
It would also be a good idea to get confirmation that ~95F degree dough, with all other procedures the same, repeats the results of the prior batches that I considered “mistakes” written about above. It should have larger holes, all other things the same, if my hypothesis about the water temperature being too hot from attic heat was correct.
May 25, 2009: Toast from this last batch is nice and crisp, and so are grilled cheese sandwiches.
I’m coming to the slow and melancholy realization that I’ll have to make a whole series of tests again of 51%, 53%, 55% (all +2.35% vinegar), to compare against each other, this time holding the dough temperature, as measured immediately following blade kneading, at a constant value.
2009.05.26
I’ve added some calculations to the spreadsheet to track dough temperature, and decided to test it out on a batch with 100F degree dough, using the same ingredient percentages as the last one above. Measuring that kneaded dough with a thermometer, the calculations accurately predicted temperature to about 1F degree accuracy. It appears that the blade kneading method I’m using adds about 11F degrees to the total. Tomorrow, I’ll bake this batch, and also find out if the bread is similar to the “mistakes” written about above. The water temperature used was 123F degrees. Once mixed, I put it in the refrigerator, and it took “about” 2-3 hours (I didn’t set a timer) before the dough temperature decreased to 68F. So, this should be a good test of overly fermented dough.
Another interesting thing I noted about the calculations, providing they are accurate, was that if I want dough temperature to be as low as 68F degrees right after blade kneading, the water temperature needs to be 26.9F (ice), so that’s not possible to do only by lowering the water temperature (the salt could be added to the water, that should lower its freezing temperature some, but I’ve found that inhibits the yeast quite a lot), additional interventions would seem required, interventions such as refrigerating the flour ahead of time.
2009.05.27
During the molding stage, I note that this dough is not as relaxed as the 78F dough was (that was easy to mold and pan), and didn’t need additional time to relax (I believe this is called autolysis [note of 2009.06.27: Glissen says autolyse rest is performed at an early dough stage when ingredients added are limited to only water and flour (Professional Baking, 5th Edition, pg. 136), Reinhart seems to say the same thing (Bread Baker’s Apprentice, pg. 58)]). I’ve noticed this before with some of the batches. So perhaps this is one symptom of over-fermented dough. Otherwise, the ingredient formulas are as much the same as I can make them. This batch took 4 hours to proof before I turned on the oven, but I did not proof it with the oven light on. I did measure the light on-off temperature difference, and it jumped about 8.5°F higher after 20 minutes or so with the 40-watt incandescent bulb on.
The crumb does have larger more irregular holes than the 78°F batch, but they aren’t as large as the “mistake-laden” batches. As I’ve been pondering over this, I wonder if I’ve consistently used the same punchdown process, which has been a fast blade kneading. It’s possible that I did not, but I think it’s unlikely, I believe I would have remembered. Going from memory and rereading what I wrote above, the mistake laden batches required more proofing time, sometimes as long as 5 hours. The picture directly above took 4 hours, versus the batch with the light on that took 3 hours.
The need to track the dough temperature has had a positive impact on my spreadsheet for baker’s percentages, I’ve added a module for that, and I’m also realizing I need to pay more strict attention to times for the various processes, in order to have more consistent results. If I’ve made mistakes, which some batches above surely prove, and I’m unable to completely replicate those mistake results, then it seems I’m not tracking enough information about each batch.
How to incorporate those into the spreadsheet as a set of data points is going to require further thought and experience. I believe I’m going to need a better method of controlling the oven proofing temperature than simply having the light on or off, and that even seems like an inefficient way to add heat, the oven bulb seems mostly designed to add light. The oven’s existing thermostat isn’t accurate enough to control just-above-room temperatures well or within +/- 1°ForC.
2009.05.29
[diversion] I won’t need any bread for a month or so, and ran across this wonderful description of how to make croissants from Pilmico (*.Doc). Those instructions provide a nice interplay or complement to the SFBI newsletter webpage, particularly the Spring 2005 (PDF) issue, where croissants are discussed.
While playing around with the oven today, I noted that its cold temperature was below room temperature, so I’m thinking the problems with the mistake laden batches are related to too low of a proofing or fermentation temperature, and that would explain the long times for rise that I was experiencing during some of the winter months. In the old days, a gas oven would have had a pilot light that would have provided some minor warmth, though it wouldn’t have been particularly controllable (the pilot was always lit, keeping the gas-valve thermocouple warm and ready to turn on). U.S. or California natural gas ovens these days use a sparking mechanism to light the burner, so there’s no residual warmth from a pilot light. I suppose I could put a votive type candle in there during the rise, but maybe there’s a better way, though there’s probably not a less expensive one. I don’t know if that would impart any undesirable flavors to the bread.
2009.06.03
Regarding raising the oven proofing temperatures to an optimal fermentation range: Another idea is to use different wattage light bulbs, depending upon the degree of temperature increase needed on the day when fermenting. This isn’t a bad idea, and is relatively cheap, but the oven already has a 40watt bulb, and that’s the highest wattage “appliance-type” bulb I can find. Perhaps any kind of incandescent bulb would work?
If I didn’t mind rewiring the oven slightly (I do mind, don’t want to modify the basic mechanism, UL approval, etc.), then a very high wattage bulb could possibly be installed, and a dimmer switch wired into it, so that one could modulate the light output of the bulb, and this would presumably modify the bulb’s related heat output. Like I said, not a bad idea, but it would need to be adjusted each and every time the oven was used for proofing and fermentation depending upon room temperature and the amount of temperature rise needed. It takes at least 20-40 minutes for the oven’s temperature rise and to stabilize once the light is on, so this requires checking the oven temperatures, with possible readjustment, followed by another wait, etc. There would still be the problem of using a light bulb to create heat, instead of something designed specifically to add heat, so presumably it would be somewhat inefficient for the purposes of adding heat instead of light. In this design, there would be no feedback from the oven regarding the inside temperature, so this method would always need manual adjustment and oven temperature checks. It’s also possible the wiring of the oven’s light-bulb socket is not of sufficient wire gauge to support a higher wattage bulb.
There are bulbs that are available that make no visible light, for example, some are made to make heat for keeping aquariums and reptiles and such warm, and they’ve available in what seem to be reasonable wattages. However, if the desire is to use the existing light bulb socket for one of these bulbs, possibly with a dimming circuit attached to modulate the power (downward) to it, then once the baking cycle begins, if light is desired, a bulb change would need to be made. Since I want a light occasionally during the actual baking, it seems like this would be somewhat inconvenient. Since the bulb socket is at the top back wall to the left (a bit hard to reach), the bulb itself also wouldn’t be pointed in the proper direction to warm the bottom center of the oven, presumably the best place for heat to be applied, since heat rises. This still would not provide any oven temperature feedback to the added dimmer control, meaning that any adjustment for temperature purposes would be manual. However, this would provide more flexible control of a higher wattage bulb, if for instance a non-available wattage, such as 47 or 38 or some other odd number of watts were optimally needed on that particular day.
So, perhaps I want a temperature controller that is entirely independent of any of the oven manufacturer’s circuitry. Ideally, it would have a digital readout of the current inside-the-oven temperature, and provide automatic on off switching of some kind based upon feedback from a temperature sensor. Then a ceramic infrared heater of a low wattage, perhaps like that used to provide heat to small animals could be placed underneath the baking chamber, where the gas burners are located, and this heat emitter or emitters could be pointed so they would warm the underside of the oven floor near the oven intake vents. Another option would be to string a heating wire directly below the vents. Any of these could be wired to automatically switch on to raise temperature and back off again when the controller’s set temperature is reached. I’m guessing this should be relatively power efficient compared to a manually operated light bulb, and as temperature accurate as the specifications of the HVAC controller allows, which seems to be +/- 1° for some that aren’t terribly expensive. In the event that the chosen heating element exceeds the power-supply capacity of the controller, then a relay will be needed between the two.
2009.06.04
Still thinking about making a temperature controlled fermentation chamber in the oven. Another option, when thinking of the relay, would be to find an electric oven’s lower heating element, and install that. This might be cheaper if a used but working oven can be obtained. However, once again I get into the problem of modifying an existing oven by such needed things as drilling holes, installing new wiring, etc. Along a similar line of thought, a somewhat standardized electric stove burner could be used, they’re often available at better hardware stores.
I guess I’m undecided as to the best way to go about this. It may be that a high wattage appliance light bulb installed in the oven, preferably halogen as they’re known to create quite a bit of heat as byproduct, and using a dimmer dial like would be used in a wall switch for a room light, would provide the necessary control modulation, and not be too expensive. However, halogen bulbs, so far as I know, don’t come in a design that screws into an existing socket.
I like the digital-thermostat operated idea best, as it would require the least amount of manual temperature evaluation and adjustment with each use, and seems very accurate. However, what type of heating element to use, something that is low cost and highly available in a generic sense, requires further thought. Our particular gas oven has a front mounted kick-plate that is removable (retained by springs), and there’s a space of about 6 inches in height from its metal floor to the gas burner. In many older ovens I’ve seen, this space typically would have been used for a broiler, but our model doesn’t have the drawer and broiler pans and such, just the kick-plate that opens into dead or unused space. This seems like a good place to put a low power electric heating element, as it wouldn’t require any drilling as might be required to install an element in the oven itself. A simple ceramic infrared heater bulb could easily be placed in this area, something below 120 watts total should allow this design to be operated directly by the controller, instead of needing a relay, but these bulb types run $20-$40 each. With the controller operating a relay, whose secondary circuit supplies the heating element’s power, then much higher wattage elements could be considered, such as a replacement electric stove coil, or an element from an electric oven itself. Oh, an electric water heater element might also be considered. However, these would have the very real possibility of getting far too hot, if, for example, the relay stuck in the on position (probably unlikely, but possible). So, while it may be slightly more costly, it seems like the ceramic infrared bulb of up to 120 watts is the safest, as well as least complicated in a wiring sense, way to go, and this bulb could be placed in the “missing broiler” space beneath the oven’s burner, which itself is below the baking chamber, and not require any permanent modifications to the inside of the oven. The controller’s temperature sensor can be placed within or fed down the oven’s existing exhaust vent, and may be removed when the oven is used for baking. In this way, the entire system that adds small amounts of heat for bread dough proofing and fermentation could be more like an attachment that is added when it’s needed (similar in concept to setting up the pressure cooker to apply steam at the beginning of baking), instead of being a permanent installation. If, at some point in the future, I decide to build or obtain a separate chamber or cabinet solely for proofing and fermentation of dough and whatnot, since this circuitry would not be permanently installed in the oven, it could easily be moved to the dedicated proofing cabinet.
For some reason, this is the solution I seem to be favoring. If one bulb in the oven’s lower chamber isn’t enough to get the baking chamber’s proofing temperature to 95°F (optimum yeast CO2 production temperature), then a second ceramic bulb could be added.
If I’m reading the specs correctly, the Johnson Controls A419ABC-1C controller seems to have enough capacity (15 non-inductive amps) in its built-in relay to support a small electric burner. It’s weakness seems to be that the temperature sensor probably/possibly cannot be permanently installed in the oven (doesn’t seem designed to take baking temperatures, though the metal portion of the probe is said to be stainless steel), it may need to be removed when baking. I believe this controller will do nicely, or at least nicely enough for my purposes.
2009.06.07
I went to the hardware store, they had outdoor halogen fixtures for less than half the cost of a ceramic reptile bulb, this fixture uses a single 118mm double ended halogen bulb, and which is available in 100, 150, 300, and 500-watt wattages. These bulbs put off quite a lot of heat, and it’s instant heat rather than the reported 8 minute warm up time of no-light ceramic infrared bulbs, so the halogen should be a good enough choice with the switched controller. Using a 100-watt bulb that was continuously on in the “missing broiler” space under the oven, the baking chamber reached 104F after 2 hours, which represents about a 30 degree increase over room temperature in what calculates to about 33 gallons of cubic space being warmed. Setting the dimmer to control the temperature is both difficult and iterative, so it seems the electronic controller switching the light on and off automatically based upon temperature feedback will probably work a lot better. The halogen fixture has a nice reflector built in to the metal & glass outdoor case, it only had one piece of plastic or rubber to seal the glass to the case, which I removed, then I pointed it up toward the burner, and it warms the baking chamber’s floor nicely.
For the time being, the entire unit will be removed when baking. Were I to decide to leave it in place during baking, I’d want interlocking ceramic beads installed over the power supply wiring, which itself would be replaced with 800+F approved wiring insulation.
I can see that in the future sometime, I’ll probably want to build a dedicated proofing chamber versus using the oven, but right now there isn’t space for one, so this will have to do.
2009.06.09
I’m finding that turning the light on for an initial time period and an hourly maintenance on-period is fairly satisfactory. For example, if room temp is 74F, and I want proofing at 78, turning the halogen bulb on for 10-15 minutes initially, turning it off, then every hour a 5 minute on cycle or thereabouts, seems to keep the oven temp about where I want it within about 2 degrees of accuracy. (Had I known this, it may have been sufficient to do this manual procedure with the regular oven’s light socket and a higher wattage bulb, but it may not be wired with sufficient gauge wire to support a 100 watt bulb. I just checked, and sure enough, the manual says no more than a 40 watt bulb, in fact, it says *only* a 40 watt bulb.)
I’ve also found that the oven continues to warm up a little over 1 degree after shutting the halogen bulb off with respect to the initial on cycle, this seems due to the heat on the floor of the oven continuing to dissipate into the chamber.
I originally wanted to find out what happened to bread dough at several different moisture levels, and so far, it seems that experiment has been somewhat of a failure. However, I’ve apparently learned a lot of other things:
- To calculate and measure dough temperature
- The need for more accurate temperature control during proofing
- Better pan release methods
- Baker’s and normal percentages, and use of grams and two scales (one more accurate for small amounts), which allows one to compare recipe-to-recipe patterns, which are obscured by U.S. Customary volume measures and conversion convolutions
Hopefully, with better temperature awareness and control, rising times will be much more accurate.
Now when I look at a recipe, I find myself wanting to convert it to percentages of some kind to see what is different about it and its various ratios versus another recipe. However, converting a volume-based recipe to weights, then to percents, takes a bit of study time, even if one is using approximate estimations instead of actual weights.
I recently obtained a copy of Professional Baking by Gisslen, 5th Edition, and was overjoyed that all the recipes are given in percentages, as well as weights in both ounces and grams, but the former, percentages, are what allows the similar and dissimilar patterns between recipes to be obvious. Reading though this book is fascinating, so many questions I’ve had over the years are being answered in the first chapters, before the recipes themselves.
2009.07.08
I decided to give it another try, after giving some thought to the discovered issues. This time I would make three loaves with different water percentages on the same day, refrigerating, fermenting, and proofing them all at the same time in the same chambers (refrigerator, oven-for-proofing, and oven-for-baking) in order to insure all timings and temperatures were more consistent between batches.
Scaling:
| Simple Straight Sandwich |
50.00% | 55.00% | 60.00% | |
| Mixing logistic (Variant A) |
water | water | water | |
| High Gluten Flour | 66.00% | 563.04 | 545.82 | 529.62 |
| All Purpose Flour | 34.00% | 290.05 | 281.18 | 272.84 |
| Salt | 1.42% | 12.11 | 11.74 | 11.39 |
| Instant Dry Yeast | 0.74% | 6.31 | 6.12 | 5.94 |
| Oil or Butter | 4.00% | 34.12 | 33.08 | 32.10 |
| Water | 50-60% | 426.54 | 454.85 | 481.48 |
| Vinegar | 2.35% | 20.05 | 19.43 | 18.86 |
| sums | 1352.23 | 1352.23 | 1352.23 |
The Protein level of the flour ratio used above is about 12.1%. I haven’t a clue what the glutenin/gliadin ratio is.
All the figures in the yellow area are given in grams.
With this set of batches, due to the scaling of the smaller yeast amounts involved in making one loaf of dough at a time, I moved to a balance that has 1/100g accuracy for weighing the yeast and the salt (even though the salt grams are slightly above 10). For the vinegar and oil, I used an electronic scale with an accuracy of 1/10th gram, and for the other ingredients, generally anything above 100g, I used a 1g accuracy scale. This scheme should keep any weighing errors at or below 1%, provided that there are no single recipe ingredients of less than 1 gram in any desired scaling. It’s also a good idea to round the numbers when using this method, it can be done automatically in a spreadsheet by formatting the cell to the desired number of digits, and that could be tailored to the accuracy of each scale used for each ingredient, but I haven’t done that in the table above, instead I just round the figure myself when weighing some ingredient, though this is likely more error prone.
Here’s a summary that shows how the error percentage increases on a 1-gram accuracy scale when values of less than 100 grams are weighed on it:
| scale |
min | max | ||
| accuracy | weight | max | weight | min |
| (grams) | (grams) | error | (grams) | error |
| 0.01 | 1 | 1.00% | 10 | 0.10% |
| 0.10 | 10 | 1.00% | 100 | 0.10% |
| 1.00 | 100 | 1.00% | 5000 | 0.02% |
| 1.00 | 10 | 10.00% | 5000 | 0.02% |
| 1.00 | 1 | 100.00% |
While I don’t have one, I have seen (online) relatively inexpensive 1/1000th gram accuracy scales. I actually don’t like using the balance, as it gives little warning when you’re getting close to the desired weight, so I’d use the 1/10th gram e-scale to get close, then I’d put it on the balance to finish.
Mixing: In the Straight Dough mixing method, basically everything is mixed together at once, and is kneaded only one time. So I guess this recipe’s method is now a *kind* of modified Straight Dough (not the process others call Modified Straight Dough), since it currently has an overnight retarded fermentation, and two kneadings. I want to make more changes to the logic of this, such as adding the salt after the overnight refrigeration, and changing when and how I add the oil. I will probably divide up the yeast, or use less of it as some future point-in-time, as the amount is not yet “tuned” to the overnight fermentation. Anyway, more changes planned.
The initial attraction of the Straight Dough method was simplicity — er, let me rephrase that, I initially devised this mixing method for simplicity (patterned after a bread machine method), then later learned that others called the method Straight Dough.
The target temperature of this set of batches, after removal from the food processor, was 84F. I used ice-cold water, room temp flour (about 73F) and kept blade mixing until dough temperature was 83-84F.
This mixing or kneading heat-rise happens faster than you might think when using this particular tool. Cutter-mixers, or fast food processors with either the metal blade or dough kneader attached, are known to add heat quickly to dough. While this can be a problem at times, it can also be useful at other times. Cutter-Mixers are known to be one of the fastest dough kneading methods.
Retarded Fermentation: 17-18 hours at 45F. Each mixture, due to the different formulas, was kept in a separate covered pan. (I would have called it “Retarded bulk fermentation” if I had mixed all the dough together, and at a later stage, divided it up for panning.)
Second Kneading, or punching: This time: 1 minute stand mixer, relatively slow speed, spiral hook.
Increase next time, try 2-3 minutes.
During the overnight refrigeration, even though the dough was placed in a covered pan with moistened lid for container humidity, the top surface of the dough always developed a dryer skin on it, and the bottom, where the dough touched the pan, was wetter. One drawback of the overnight retard is that it’s not possible to flip the dough over several times. So right now I feel the need for a more thorough kneading at this point, this set of dough batches didn’t blend this somewhat dryer skin with the moister portions as well as in the past (when I’ve used the blade mixer instead), that is the reason for a desired mixing-time increase.
Another tactic I could try would be to separate the skin from the rest of the dough, and blade mix only it, then place that dough portion into the stand mixer with the rest of the dough, but I want to try a longer stand mixer knead first to keep simplicity of process intact.
I’ve tried the plastic bag method some years ago, but had problems getting most of the dough back out of the bag, and promised myself I would never use it again (as I recall, getting the dough out was quite frustrating due to time consumption and being a sticky mess). It might work okay if one has the type of spray oil that has liquid lecithin added, and it’s applied to the bag before putting the dough in it, but that also would change the oil content of the dough some unknown amount, I would think.
Rounding and Benching: Round each dough piece then let it rest, about 20 minutes.
Makeup and Panning: Shape into torpedos or cylinders the same length as baking pans.
For pan release, I smeared pans with a thin coating of organic palm shortening. Then I oiled each torpedo or cylinder shaped dough piece with fully refined peanut oil, making sure to coat all surfaces, then placed that dough piece in its pan, flattening, stretching, and leveling as much as the dough would allow, then repeating the dough oiling and panning for each additional dough cylinder.
Proofing: Total of 3 hours @ 84F.
After the first 30 minutes, flatten and stretch dough to conform better to pan shape, if needed. Dough typically still feels cold to the touch at this point-in-time, though it is warming up, and doesn’t appear to have risen much, if any.
Improvement Note: With this set of batches, the oven’s initial proofing temperature was 72F, rather cold from overnight no doubt, and it took about 40 minutes or more to get up to 84F. In the future implement a process that prewarms the proofing chamber. Once implemented, proofing times should be reduced some unknown amount.
Baking: 1:35 minutes @ 300F. Because I have steam available, I generally use it for the first 15 minutes, but I don’t think it’s essential for this particular recipe’s process.
Cooling: Remove from pans, place on racks in a room-temperature location. Takes about 4 hours.
Pre-Storing to soften crust: Plastic bag overnight to soften crust for hand slicing with non-serrated bread knife next day.
Slicing: Slice bread the following day, after the crust has softened, due to equipment limitations.
Storing: Use two plastic bags, remove excess air from inside first bag, then close end up, repeat with second bag, then place in freezer.
50% (baker’s percentage) water:
55% (baker’s percentage) water:
60% (baker’s percentage) water:
My observations:
I was surprised at the large hole size in the 50% water batch, and I note those holes are nearly in the middle of the loaf. The 55% water batch seems to have a larger number of holes about the same size as the 50% loaf’s large holes, but the 55%’s batch seem to be migrating toward the top of the loaf, presumably this is happening during the proof period prior to baking. The 60% water batch clearly has even more large holes, and this migration towards the top of the loaf is more evident. The V-or U-shaped top is not a data outlier, I didn’t document a 65% water batch I made last week, and it looked much the same.
The loaf with the largest volume seems to be the 55% batch, but this seems due to the 60% batch’s fall that occurred during baking. I can no longer say this is due to overproofing (or would ruling that out be stupid?), as all the loaves had the same times and temperatures for all processes alloted to them, except for the retard and the fact that I couldn’t mix all the batches simultaneously. There’s about 1-hour difference in an approximate 18-hour retard between the loaves, with the 60% loaf having had the shortest retard, perhaps 17-hours, all in a 45F (warmish) refrigerator.
We know from making ciabatta that a high water content dough should not, solely because of its high water content, fall during the bake, in fact it seems to rise quite a bit after putting it into an already hot oven, preferably on a hot stone, or perhaps even better, a 1″ thick piece of steel with the oven burner directly beneath. This has me wondering about differences between ciabatta and this bread. While I suppose there probably is a ciabatta recipe based upon a straight dough mixing process, all the two loaves of it I’ve ever made were both based upon a poolish preferment. So, I guess I can think of four possibilities: my flour mix is not optimal for a 60% hydration dough, perhaps the gluten is causing too much elasticity; my low oven baking temperature, and warming of the oven up from the oven-as-proofing chamber with the panned dough remaining inside (which takes some time) changes the baked outcome (not putting proofed dough into an already hot oven), or the poolish method is effecting some enzymatic breakdowns of the dough that helps the crumb structure in some way that is lacking in the straight dough process; or, right in the face, too long of a proof period for a high-hydration dough, which perhaps needs a higher percentage oven spring versus proofing rise and less time for the pre-bake CO2 bubbles to migrate upward before baking expands then sets them. Perhaps it’s a combination of all four, or it could be something else entirely.
It is intriguing trying to puzzle this out. Some of these results seem to confirm some of the other results I had above.
I had already planned on changing my flour mix, as I’ve recently found some 11.8% protein flour that is said to be wholley milled from either hard red spring or hard red winter wheat, and I’m guessing the later due to the low-protein number. While it is relatively inexpensive, it is also bleached and contains a small amount of added malted barley (I’d love to find an unbleached hard wheat flour without additives, but local availability versus price is one hindrance). It makes a nice-enough Ciabatta, at least compared to this high-gluten/all-purpose flour mix.
With both the High Gluten flour I’ve purchased for years, and any one of a number of All Purpose flours, getting specifications such as wheat type, that go beyond the minimum required for the nutritional label, seems difficult if not impossible at times. This new-to-me flour at least has a manufacturer’s spec sheet with some of the desired information.
I’ve also been trying to logic out (flow chart above seems to help me) the various processes related to mixing, and finding information on their precise effects relative to each other is difficult, so I’m just going to keep plugging along with making variations of this basic recipe and bread style, changing minor things along the way, depending upon local availability of ingredients, so I can come to my own conclusions about various effects. In some of my searches, Google’s been resulting in a number of high-priced books under the Food and Technology classification, that appear to have bits and pieces of the puzzle, but it’s hard to justify spending $250-$1000 each on any *single* books. Curiously, even some of the within-a-reasonable-driving-distance university libraries don’t seem to have copies of some of them, and the under-funded public library(?), not a chance.
The straight dough process I’ve been using lacks a strictly-defined autolyse period, so there’s another possible mixing method investigation, one that would appear to be a simplistic addition versus some of the more complex steps required of some of the fancier-named preferments.
In looking very closely at the photographs, zoomed in, it appears that the 55% water-level batch has the most translucent cell walls, perhaps indicating that they’re very thin and ready to start popping, or tunneling. The 50% water blend seems to have thicker walls, more opaque, even though there are a few large holes. However, it appears to me that the holes in the 60% water batch have popped and a larger number or percentage of them (subjective observation) seem to be in the beginning process of making tunnels from hole to hole. So, what does this mean?
Could it be a bread making axiom that higher water percentage yeast doughs require shorter proofing times, all other factors equal?
I guess I have my next test. Try a repeat of the 60% dough with a shorter proof period for confirmation.
As an aside, If you ever decide to buy an e-scale for cooking, my observation is that an auto-off time of 30 seconds is far too fast to be practically useful for cooking purposes (don’t ask me how I know this). Currently, my 1/10g accuracy scale (the one that I actually use) with 500g total capacity has an auto-off time of 3 minutes, and that is certainly enough time to weigh ingredients, but it also raises the scale’s non-lithium battery consumption.
2009.07.23
I tried another 60% batch, doubling the totals given above to make two loaves of equal weight. The only intentional change of process was a shortening of the proof period to 1:20 (hr:min). Results were mixed.
Looking closely at the photos seems to show small holes that have some minor tunneling, and larger holes that don’t. My feelings about this result are that shorter proof times are probably part of the answer, but not the entire answer. This batch had a poor mouth-feel to it, it was noticeably tougher, particularly when toasted, and you can see the volume is greatly reduced (the bread was denser). One thing that is intriguing is the shape of the holes, they seem to be more uniformly spherical.
So far the best results using this particular mixing process seem to have occurred with 53-55% water + 2.35% vinegar. For now I’m abandoning further experimentation with this formula at 60% hydration, as I’m desiring to experiment with mixing process and incorporating a poolish. On both occasions I’ve made ciabatta, a poolish (100% water) was used, and in my notes I wrote, “Every time I make a bread with poolish, I’m pleased with the result.”
[Snip. The text that previously was located below this point has been moved into a new post that is titled Experimenting With Bread Dough Process. The snip became necessary due to some kind of Edit and Save problem that started occurring at some point early in August 2009, and shortening the post length seemed to solve the problem, at least for now. Hopefully in the future post length won’t be required to be less than 180 characters. :-) ]
One thought on “Experimenting with bread dough moisture, sandwich slices, and oven spring”
Comments are closed.