Playing music on your own instrument is a transitory experience, one in which higher levels of the heart and mind are accessed. While this higher-level experience may be so subtle as to be missed by many beginning musicians, struggling as they are with their chosen instruments, struggling with rules and limitations, struggling to understand the notes or sounds and training the fingers and breath to respond accurately, trust those of us that have been there when we tell you that if you keep at it for long enough and desire it, you too shall hear the subtle music within the sounds your instrument makes.
In the case of the notation system described below, the subtle music I heard was an issue regarding how my brain and body’s nervous system worked, with respect to the dynamic process of reading the notes then pressing the keys, that showed me an inefficiency in the mass-disseminated, and or common, fingering notation used in musical score.
A couple of years ago I purchased one of the least expensive electronic pianos a major music company manufactured, a Yamaha CLP-115. This wasn’t my first piano, but that’s another story. The CLP-115 has weighted keys that feel much like an acoustic piano, they are the same standardized size and shape as those of the great piano builders’ artistic era of the early 20th century, with the same number of keys, 88 I believe. At some point, this new electronic instrument fostered an interest in Johann Sebastian Bach’s music, and the lessons he left for so many of the past and present keyboard greats among us.
While learning to play Invention 1, there was Bach, either in all his full glory or at least some of it, teaching me as I learned. Expressing gratitude outwardly has always been a difficult thing for me, everyday we are given many great gifts of love from others and forget to give them our thanks, taking those gifts for granted, but any day is a good day to begin. Therefore, I’ve named this fingering notation after J.S.Bach. Perhaps others will find it as useful as I do.
Also while learning Invention 1, a problem that both irritated and intrigued me when I was a young piano post-student reappeared. One of the difficulties of playing any given piece is how best to finger the keyboard, or which finger to use on each note, so that all the notes can be strung together in a coherent and intended way when played at increased speeds. Everyone’s hand is a slightly different shape, some with thick fingers, others with thin, some long, some short, to say nothing of other biometric differences, etc., so piano fingering is ultimately the pianist’s individual responsibility to assign.
This is not an easy task, and every Bach admirer has their own thoughts on the subject, and all those thoughts are also Bach inspired, for this form of inspiration is something that we invoke when playing another’s song, even though we might not notice it when first starting out.
In what follows I’ll make use of some graphics to show you how I came to devise the Bach-inspired Graphical Fingering Notation System, and additionally I will present you with the notation as I have used it on the complete score of Invention 2. I have attempted a simple Internet search for any similar music-notation system: if such a system exists anywhere, I haven’t previously seen it.
Please note that what follows has a few very large images, so if you’re on dial-up instead of broadband, be forewarned!
Vector-based Graphical Piano Fingering Notation
In piano sheet music, piano fingering is typically noted by using numbers above the notes on the upper staff typically played with the right hand, and below the notes on the lower staff typically played with the left.
One problem is that the reader of sheet music must train his or her mind to jump from the graphical or visual representation of notes on a staff, to abstract numbers some distance away from the note. There are other ways of approaching keyboard fingering or possible fingerings, however they don’t detract from this graphic or visual versus abstract notation dichotomy.
This mental task of switching from graphical to abstract thoughts presents speed and hesitation difficulties for some of us, requiring many more years of practice reading and studying music than is truly required to experience the joy of the keyboard, and often leads to the conclusion that strict memorization of all the notes is the best way to meditate whilst playing, or simply to play only by ear and forget that reading music stuff! While any of this works to a greater or lesser individual extent for those young ones with well-nourished brains among us, as we age, the brain’s ability to memorize and control the body also decreases to a greater or lesser extent. Therefore, some of us older ones are working on learning better notation techniques, so we may play songs we used to know, but no longer remember.
While learning Bach’s Invention 1, I started wondering how I could mark particular notes that gave me fingering difficulties, critical notes that for some reason my brain and or hand assigned to the wrong finger.
One attempt at this notation was certainly graphical or visual, but it had some problems of its own. It worked well enough as a single-problem location-marker, a place in the music score where there was a tendency to mis-finger a single note among many others correctly fingered when played at increased speeds.
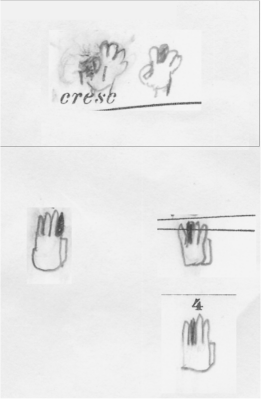
One problem was that it took up too much horizontal space above and below the notes. In the next image, you can see that there simply isn’t enough room to place similar ones above or below all the faster notes, such as above the sixteenths in the upper G-clef. The following image is penciled in on a photocopy of my e-piano manufacturer’s included-with-purchase-of-piano sheet music booklet, 50 Greats for the Piano, the song is a snippet of Bach’s Invention 1 (possibly a slight variation of Busoni’s version).
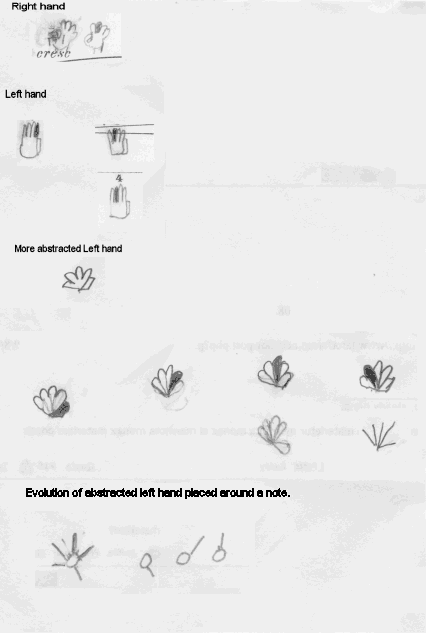
So, back to the drawing board, and please grant me a little image redundancy! I next worked on artistic, if crudely drawn, variations of the above, but all of them have the same problem, they would take up too much horizontal space were they to be placed in the same location as all the numbered fingerings, above and below the notes. Even the location of the number above or below the note is not necessarily the best location for minimizing eye movement as one reads.
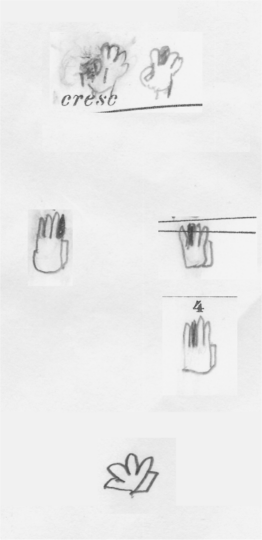
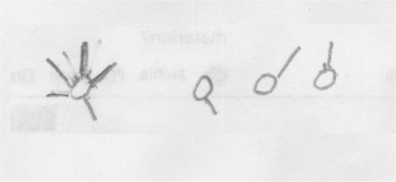
The above progression sparked the ideas for the following progression of graphics:

Ah hah! Now we’re getting somewhere, particularly with the last one above, the stick figure or vector graphic, although the one to the left with it’s graphically-separated opposable-thumb is also an intuitively important leap. This was my “light bulb” moment that led to the following, if not final, solution. We can now see a single mark, a line or directional vector, placed around the note so the eye no longer needs to focus above or below the note to see it, and it can mark a single finger associated with that note by the line’s directional vector (and length, as it so happens)!
A quick recap graphic with additional information.
There was a problem with the vector fingering system when actually using it on sheet music, it was not possible to use either horizontal or vertical lines as directional vectors for any of the notes. It was my intent to create one more graphic that would act as a legend to the sheet music which follows.
Version 1
For the time being it is sufficient to think of the two-dimensional Cartesian coordinate system. For the left hand: the thumb is indicated by a mark or vector in quadrant 4; quadrant 3 is unused; quadrant 2 has fingers 5, 4, and 3; and quadrant 1 indicates finger 2 or the index finger. In quadrant 2, length hints are also used, finger 5 is generally the shortest, and finger 3 the longest.
It’s important to remember that because we humans are bi-symmetrical, the left and right hand being roughly mirror images of each other, so too the graphical-fingering vectors of each respective hand are mirror images of the other.
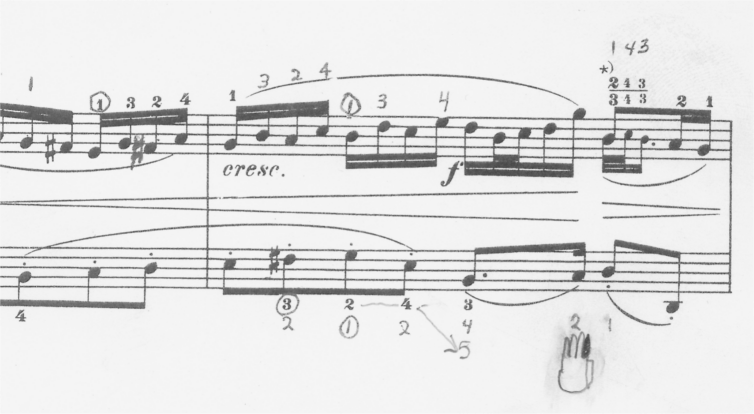
The following is how I use the Bach-inspired Vector-based Graphical Fingering Notation System. It’s penciled in on Invention 2 which follows. Please note 1) I’m not saying these are good fingerings for anyone else besides me to use, though you’re welcome to try them on for size and fingering ideas, 2) there are notes that haven’t been fingered, 3) there are other notes where I’ve erased prior fingerings, 4) this is a work in progress, I don’t claim it’s finished, and 5) as with all things human, there are mistakes.
The images which appeared here have been obsoleted by Version 2 which is below. Consequently, I have changed how these images from Version 1 are linked in this article.
Bach’s Invention 2, page 1, V.1.
Bach’s Invention 2, page 2, V.1.
Bach’s Invention 2, page 3, V.1.
It’s entirely possible to note multiple possible-fingering sequences using different colors on the same notes they appear upon, but I only have an erasable, black 0.7mm, mechanical pencil for the purpose.
Some scores utilize a crossover of the left hand over the right hand (or vice versa), and when they do, it may be necessary to index the right and left hand graphical-fingering notation by assigning each a different color or some other scheme.
Additions of January 29, 2009 follow!
Version 2
In using V.1, I noted my mind was overly concerned with length hints to distinguish fingers 5 from 4 and 4 from 3. Consequently, I decided that having three fingers of the left hand in quadrant 2 was too many and only the index finger in quadrant 1 was too few, so I changed the notation system I’m using a little. Basically, for the left hand I moved finger 3 from quadrant 2 to quadrant 1, and for the right hand I moved finger 3 from quadrant 1 to quadrant 2.
Legend for Version 2.

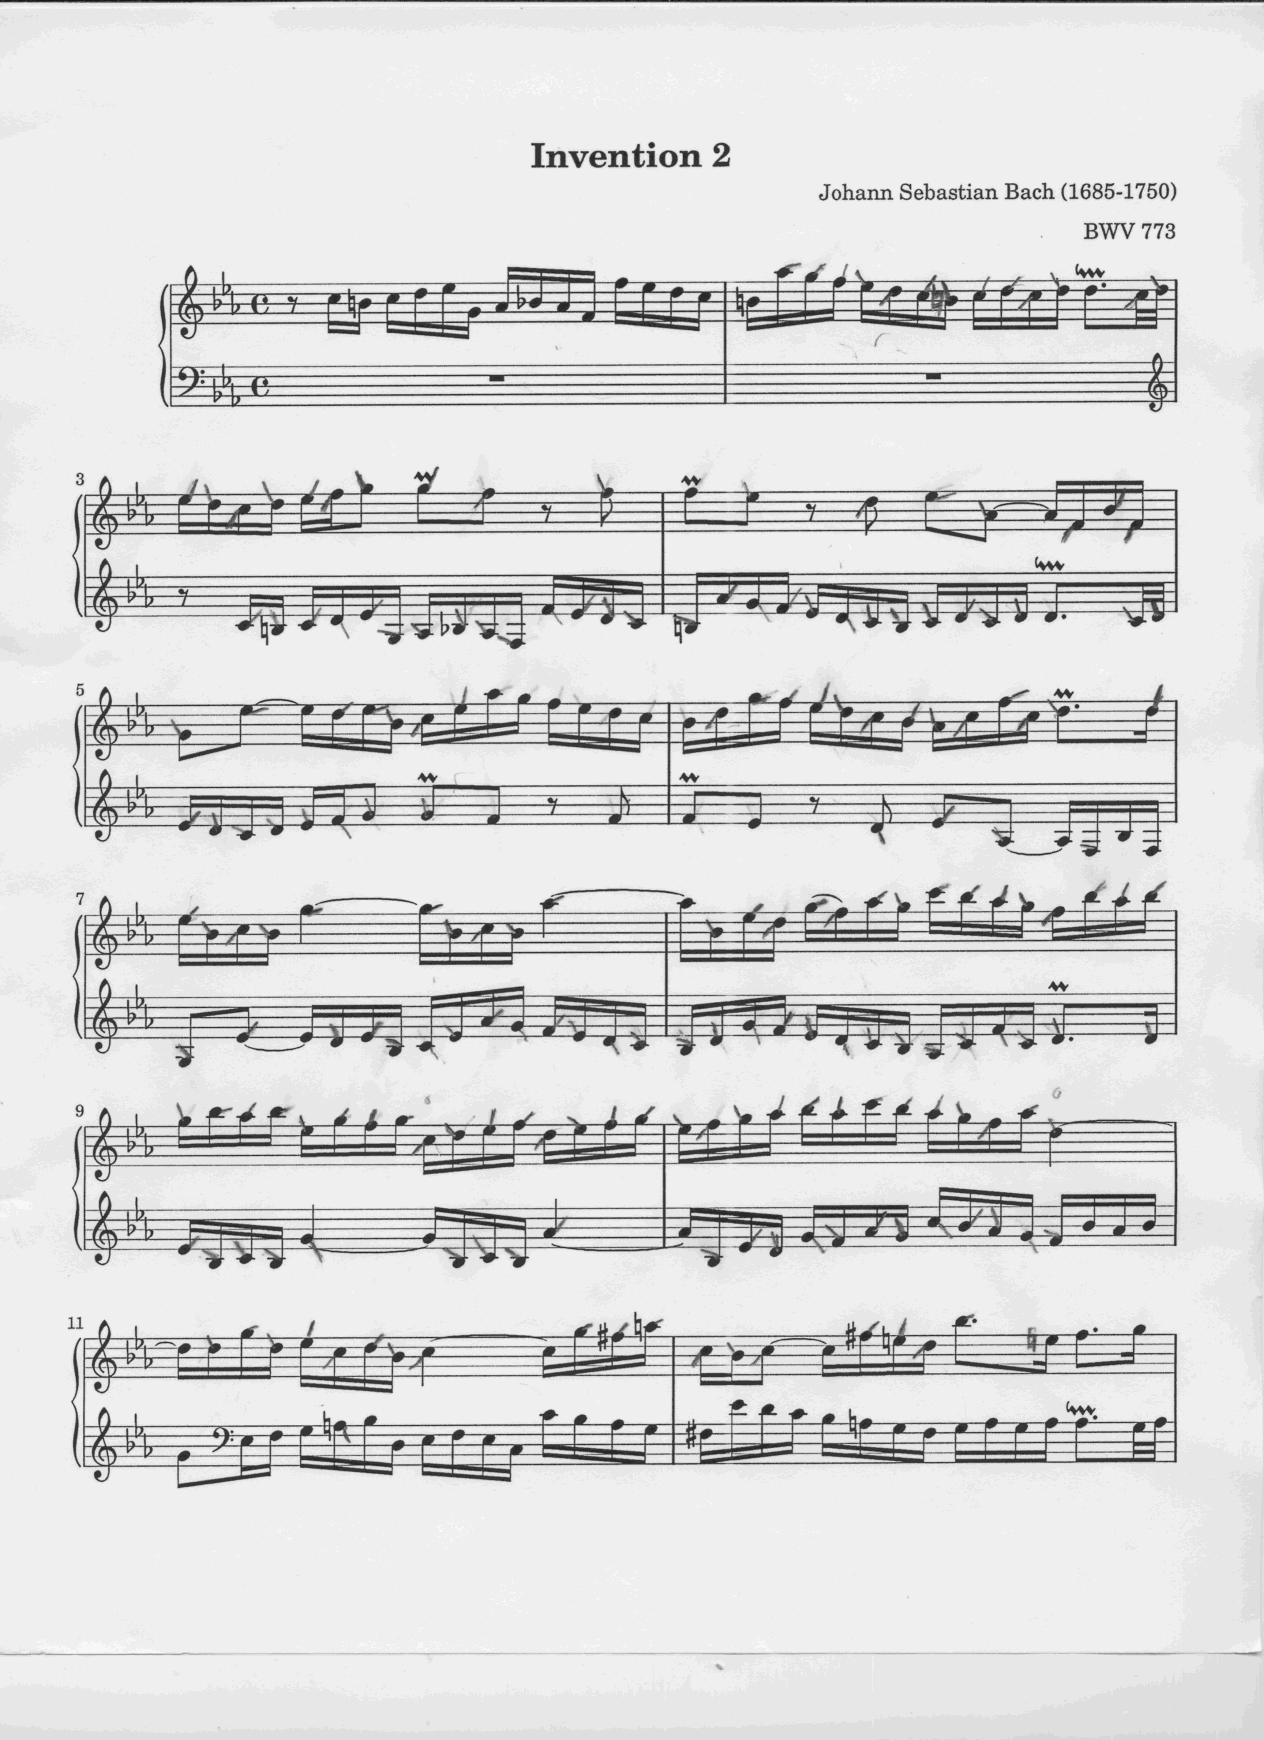
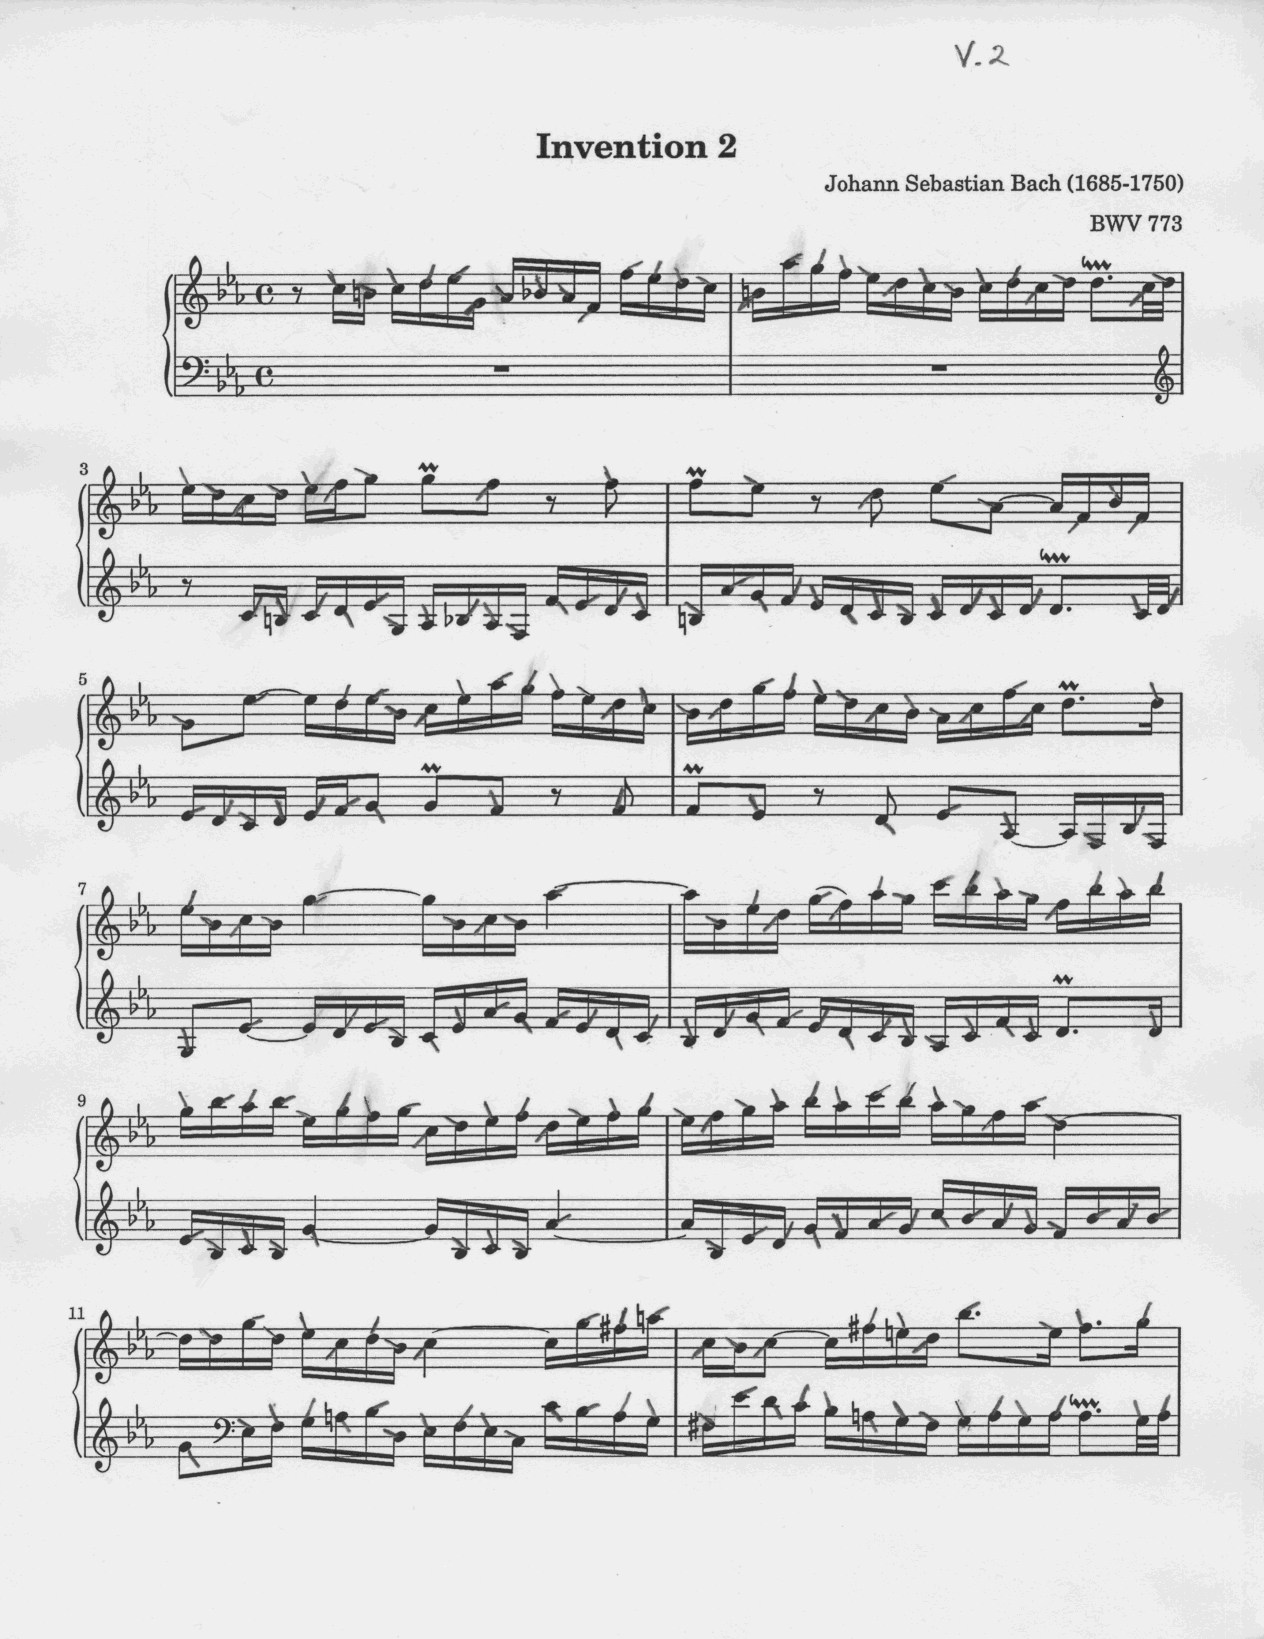
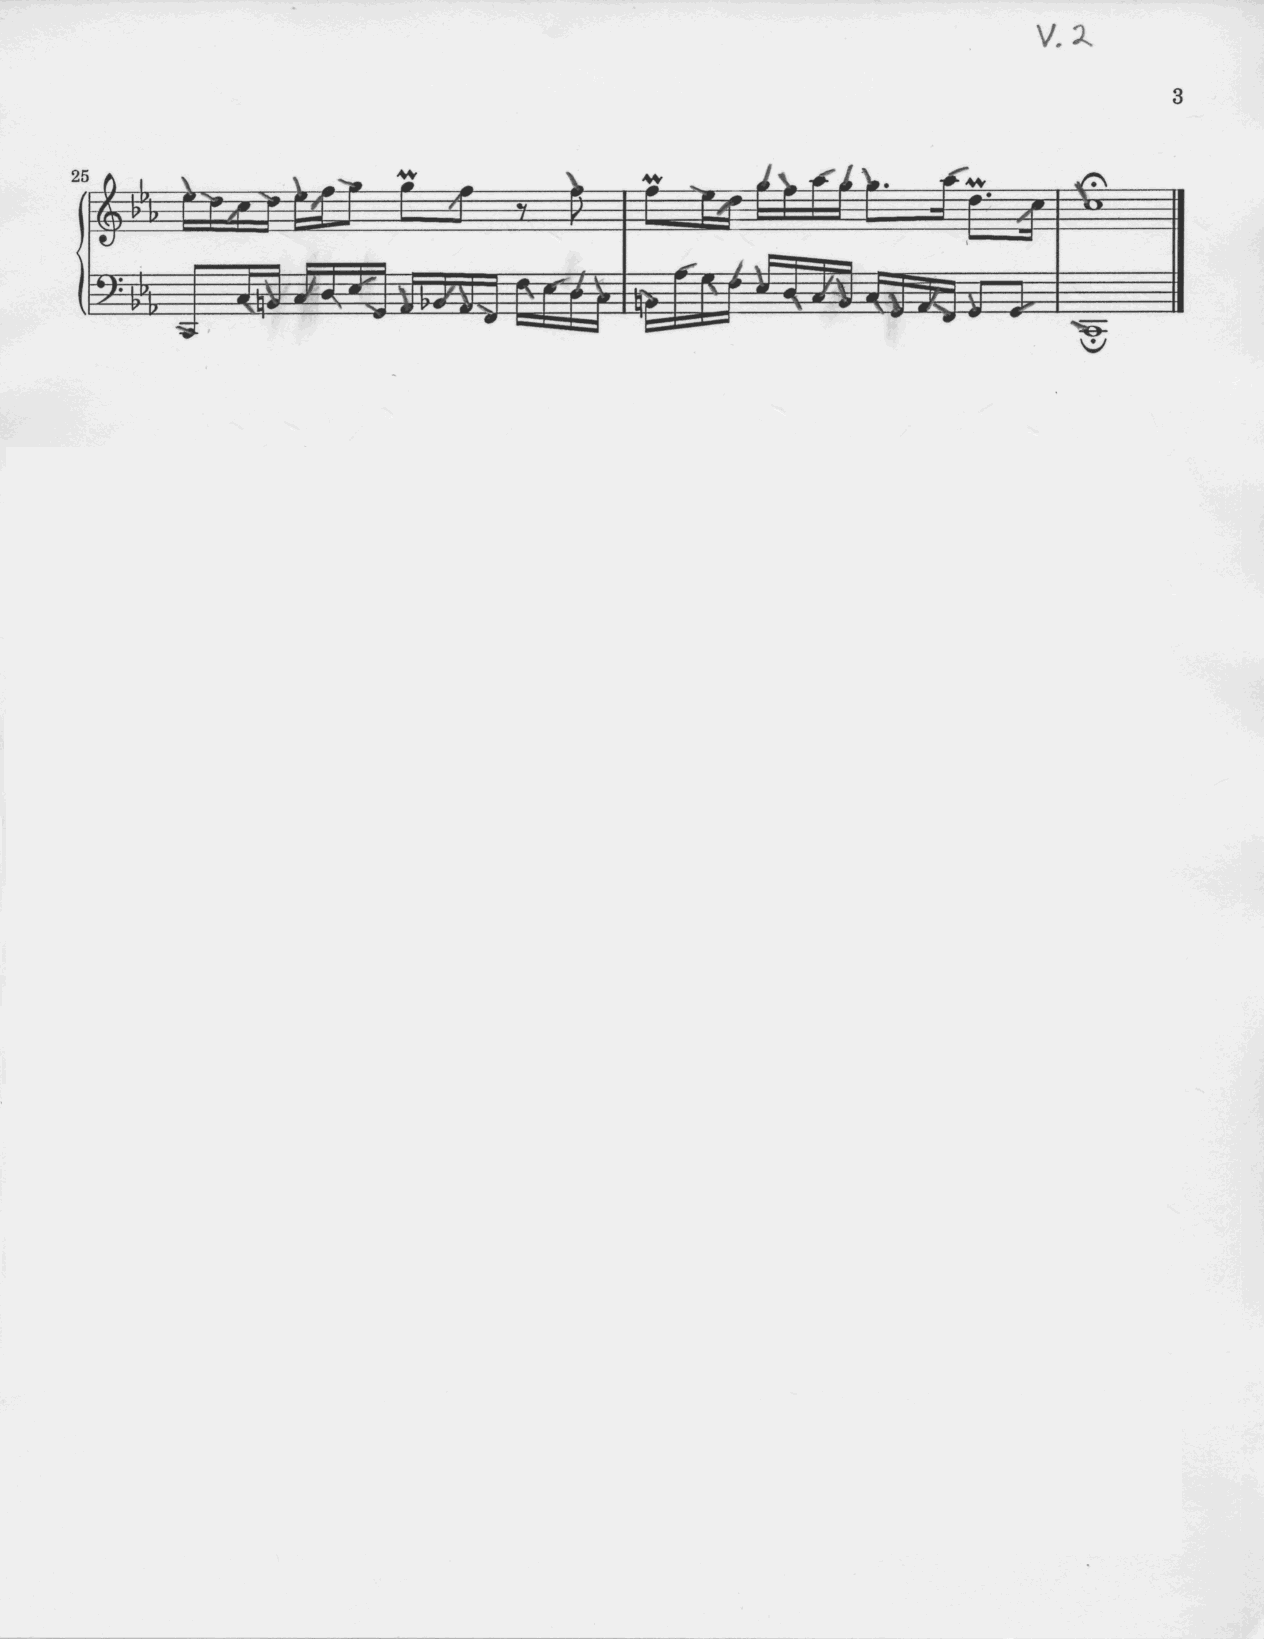
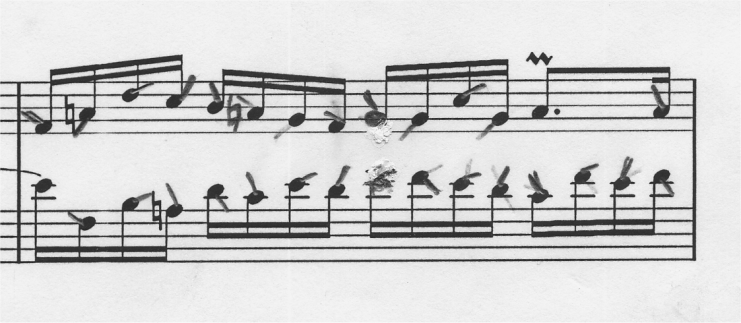
The complete score of Bach’s Invention 2 using V.2 graphical fingering follows, and this time I have most of the notes marked, though there aren’t nearly as many alternate fingerings that have been erased and re-marked. The same disclaimers apply, particularly the fact that I’m human and make mistakes, and that I do not recommend that you use these fingerings unless you’re absolutely sure they’re also good for you (they probably won’t be, though if you’re new to the piano and don’t yet have your own fingering ideas, having existing fingerings to draw from is quite useful).
There’s also a matter around accidentals. In the following score, I’ve presumed accidentals are maintained for the rest of the measure unless indicated otherwise. I’ve glanced superficially at poor-resolution copies of J.S.Bach’s original manuscripts, and believe it’s likely mutopiaproject.org’s score has been interpreted to modern accidental rules. Since the images reproduced here are of my practice score, and since I’ve had a lifelong tendency to forget accidentals for the remaining portions of the measure when playing, where that repeatedly happens I simply re-mark the accidental, even though it’s not required.
You’ll note the fingering marks are sometimes moved slightly from where the legend says they should be located. The reason is that the vectors need to be visible around other marks which appear in the score. The main thing to note is each mark’s angle. Generally, the marks for fingers 4 and 3 are somewhat longer than 5 and 2, though my hand-written marks are far less than perfect! This simplifies and symmetrizes the length hints over version 1.
These are low-resolution images. Clicking on them takes you to higher resolution images.
You’ll note I haven’t fingered the ornaments, wikipedia has some information on them.
When learning this song I realized that when putting both hands together it was advantageous, when playing very slow, to have every note fingered. Practicing each hand separately, until each is so well known it’s either almost or is memorized, and can be played at high speeds *before* putting hands together, seems an excellent piano learning technique.
When I was a child, probably of less than 10 years of age, my first piano teacher, Jerry Ray Witt, taught hands separate practice before putting both hands together. Thanks for your help, Jerry! Rest in peace old friend (he was also a harpsichordist, having built his own from a kit some decades ago) .
Addition of 02.13.2009
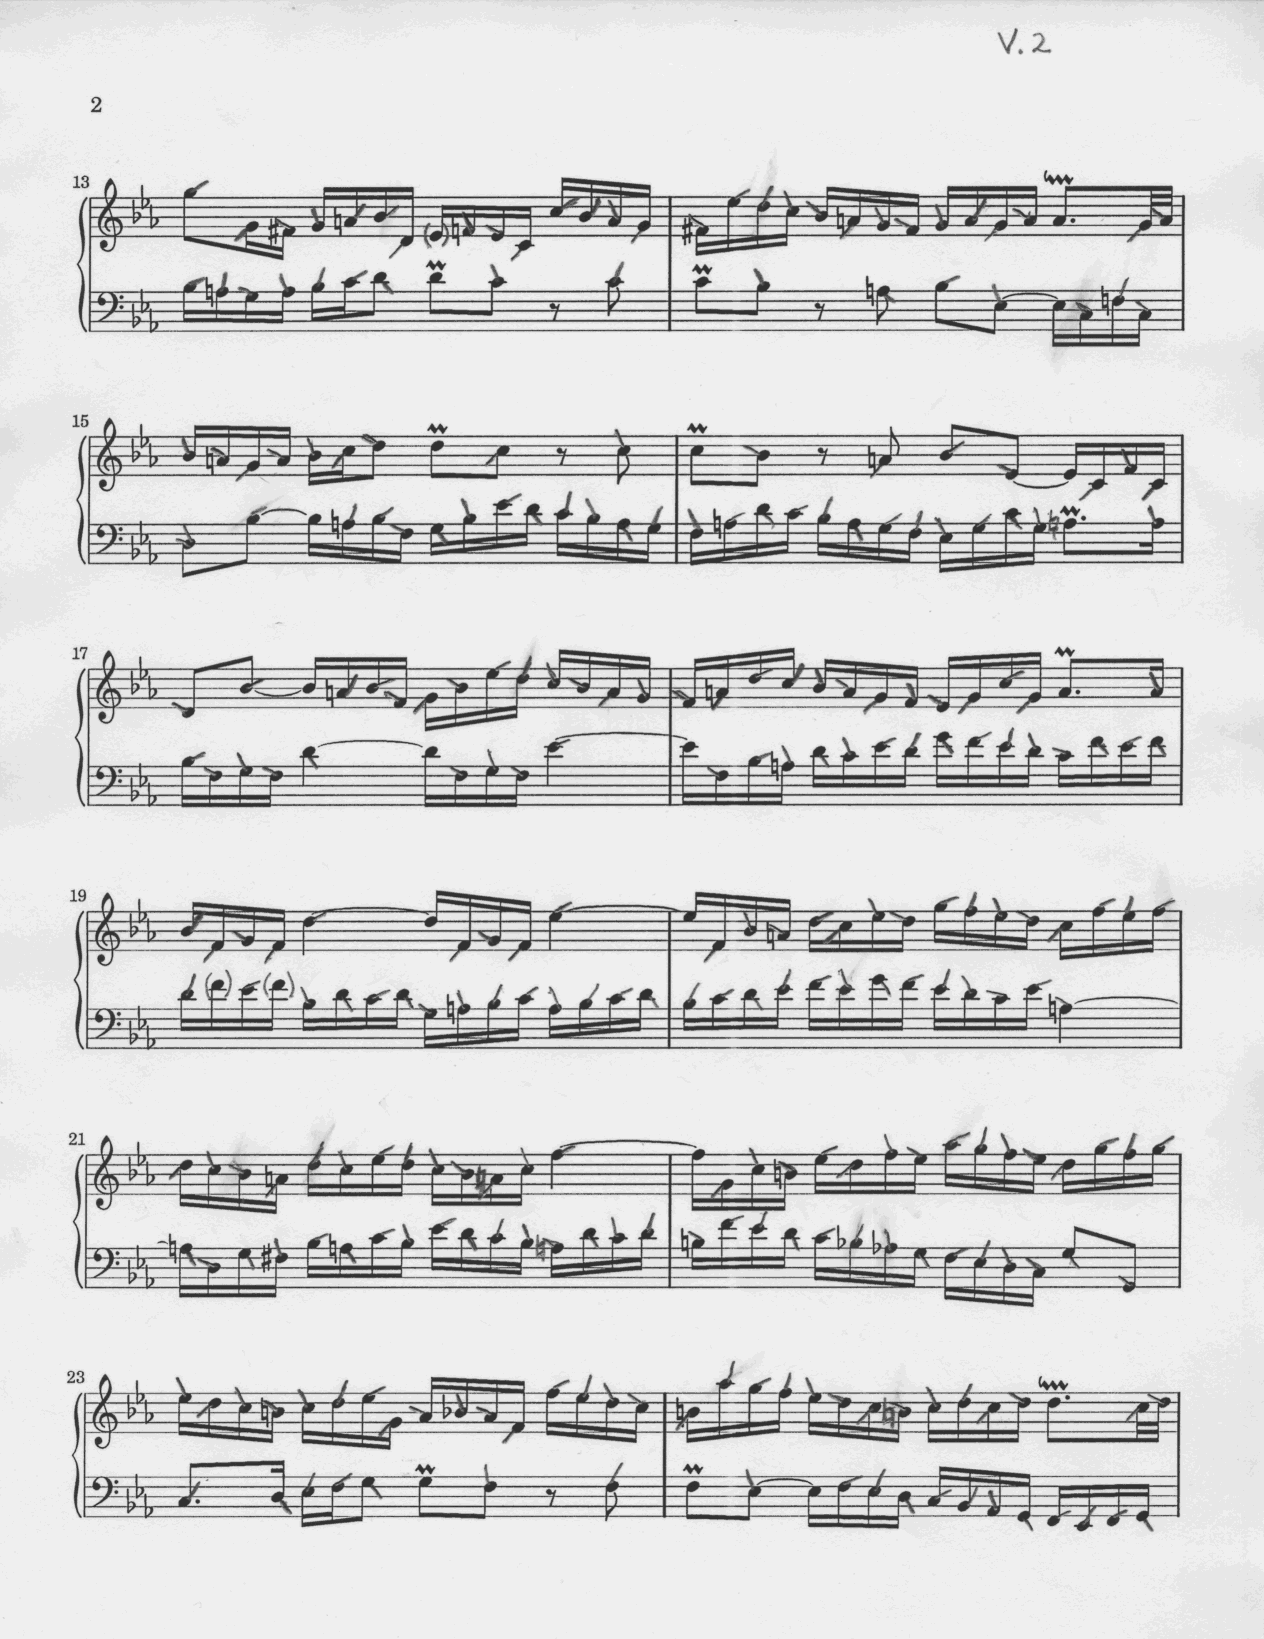
While learning Bach’s Invention 2 (that’s right now!), I initially thought I could play the crossovers in measures 13 and 18 without issues. However, what I found was that they either were or seemed impossible to play smoothly at faster speeds as each required a partial lifting of a hand and finger over the other and it was not possible for me to maintain each note’s sustain fully (for the indicated time) at those locations, so the lifting of the hand was essentially audible by a note’s momentary absence of sound, which I didn’t think was my best audible interpretation given the version I was playing. So, I made changes to measures 13 and 18 to eliminate the hand or finger crossovers.
These changes should sound pretty much the same, if not exactly the same, when played with both hands on a single keyboard (such as a typical 20th-century piano) and, in measure 13, with the ornament; but when played hands separate, each respective hand will sound different versus the score above. These edits exchange some of the counter-points of the left and right hands, so be forewarned.
In measure 13, besides the hand/finger crossover, I perceived an issue with the second left-hand C written as an eighth, after which the right hand hits the same note halfway through the left-hand’s sustain, therefore I’ve also changed that a bit.

Measure 18 changes:
3.19.2009: Invention 2 by J.S.Bach, played by me. I still need to work on the idems!
The MIDI recording was made with Rosegarden, using a UX16 MIDI-to-USB hardware interface between the digital piano mentioned above and a 10-year old laptop with a single USB1.1 port. The file has been minimally processed, i.e., no quantizing or editing of other kinds (I’d have to learn more about those functions anyway if I wanted to use them), so it’s as close to a live “recording” as I know how to make it. A MIDI file is *vastly smaller* size-wise than sound-wave based file types presuming the same set of notes are represented in each. MIDI files do require the player to have a synthesizer, and all synthesizers are apparently not created equally! This means the sound’s quality will vary depending upon your machine’s, and particularly your synthesizer’s, setup.
I find struggling with the piano-to-computer interface, and music software, which I’m almost completely *ignorant* about, to be distracting. When I was a child first learning to play the piano, the home-computer revolution hadn’t yet arrived. I guess this means I’m simply too old.

J.S. Bach-inspired Vector-based Graphical Piano Fingering Notation by Ken L. Klaser is licensed under a Creative Commons Attribution 3.0 United States License.
Please note that the underlying music score itself is in the public domain, and I’m not asserting any rights whatsoever thereto. If you want that, keep reading.
Sheet Music Source:
The original sheet music, before my additions and edits, was from www.MutopiaProject.org. Their score was typeset with LilyPond, and it was placed in the public domain by their typesetter, Allen Garvin. Reference: Mutopia-2008/06/15-58.
Addendum 2009.Jul.25.
I’ve decided to close comments and pingbacks and trackbacks on this post. If you have something you really must say about the topic, feel free to use the contact form (right column, near the top under “Navigation”) to email me directly.